
Within this post its my intention to cover the growing trend of ‘Waterless Washing’ processes and products. I think the term ‘Waterless Washing’, should actually be replaced with ‘Waterless Cleaning’ which I believe is a more of a technically correct term. The basic cleaning of the paint, will be supplemented with a raft of optional steps top create a show room quality clean vehicle; all without water. Some of the optional steps are dependant on the quality of your paint and the levels you want to go to in order to get that showroom finish. If you just want to clean the car and not worry about the best possible shine or protection you can jump straight to the ‘Body Work’ first step, ‘Wheels’ for the second step and ‘Glass’ the third step then you’re done. If you want more shine, or a more thorough clean, then the optional steps will help you get to that showroom finish!
Where water is scarce, such as a hosepipe ban, or difficult to obtain due to the water’s supplies location (like living in flats or apartments), then ‘Waterless Washing’ is a process that can be your work around. Waterless wash still needs to be used with care as the waterless process is not intended to clean a car if you have just driven through a swamp or go off roading!
The whole car can be washed with specialised products including the wheels which are probably the most stubborn to clean even with water. Typically the brake dust, heat and road film will embed onto the wheels and the tyres in such a short space of time. But it can be done without to much hassle.
Glass cleaners are by nature a waterless product, ironically the majority of them may be diluted, but they don’t generally require you to wash the glass first.
Plastic Trims & Rubber, most of the time these are a liquid form application to rejuvenate the plastic back to black. The plastic should be clean and a waterless wash should be fine for the cleaning. Seals around the doors and frame of your car for wind noise or water ingress could also be waterless cleaned. If you have chrome of polished metal parts, like windscreen wiper arms, we will touch on that too. Rubber on the tyres ideally need to be cleaned first for a good shine.
Materials
Cloths
The type of cloth will make or break your experience cleaning a car. With waterless washing always use a good quality cloth to clean and lift the dirt away. For buffing or final cleaning use a top quality cloth. Cheap and cheerful will often fail to do the job well and may introduce marring or light swirls. The better the cloth the longer it will last, better results will be to achieve and easier the process. Due to the nature of this cleaning method, the dirt is not washed of the car first. The cloth will be holding the dirt and obviously get dirty depending on the levels of dirt on the car in the first place.
- Make sure the cloths you are using have any sown in labels removed to avoid scratches, most of the time they will easily tear off by design.
- Where possible use edgeless clothes (grey cloth), if an edge is on the cloth make sure it has a soft silk binding (blue cloth), or at least soft cotton stitching (pink cloth).
- Use a high quality plush cloth for the final stages. Plushness doesn’t always make for a better cloth for application. A buffing cloth will tend to have a thicker nap around the 600 to 1000gsm range, enough to leave a hand print (grey cloth). Trying to buff with a very short nap or light weight doesn’t offer enough barrier and will clog easily and ‘drag’ on the surface.
- Once the cloth(s) has been used it’s essential to wash the cloths thoroughly. Check the cloth for embedded stubborn dirt, if the cloth is badly soiled with visible debris; bin it or relegate it to the real dirty clearing up tasks rather than premium car paint cleaning jobs.
TIP: Don’t use fabric conditioner on the cloths as it will effect the absorbency of the cloth. That’s because the conditioner coats the fibres with an hydrophobic film, lubricants and fragrances preventing absorbency, which is the exact opposite of what you want. If the cloth feels waxy to the touch it won’t be much use until the conditioners are removed. There are specific products on the market that are designed to wash microfibre cloths.


Sometimes a shorter nap will work better for cleaning and product application tasks, rather than a heavier weighted cloth in tighter spaces.
Glass cloths: these are a specific design usually a waffle weaved and tend not to have a nap, but some may have a tight weave nap design, but are different from the normal micro fibre cloths. Using a standard microfibre would work, but more often than not it would leave streaks and smears, or if using cheap cloths it could shed fibres.


Application Pads
Depending on the application task they can vary greatly, they tend to be very short nap or foam based for the everyday user.
Hand Microfibre Pads: these are usually foam filled and padded styles which are ideal for the more delicate, thin or older paint. These microfibre pads are ideal for the application of glaze, sealant or wax. Some of the round pads have a flap to hold the pad onto the fingers without having to hold the pad itself which enables a flatter application of the pad and avoid hand fatigue.
Some microfibre pads depending on the inner construction or density of the foam are ideal for localised polish or paint correction tasks.


Ergonomic Applicators: the pads are attached to a ergonomic carrier where more control is required or more pressure required, but not correction needed with a machine. Often used by weekend wash warriors to save on hand fatigue. The ‘Puck’ style has a Velcro fitting for varying types of pad. These pucks make control much easier of the application of a polishing product in very localised areas. They are excellent for covering large areas quickly for the post cleaning products. The puck will last a long time, you just need to replace the pads depending on usage or application type. Considerably more expensive than normal foam pads. The downside is they don’t give you a feel for the application of the products, especially when applying a premium quality wax.


Custom Ergonomic Pads: These tend to be bespoke to the brand and their product. Usually for application of higher quality waxes as the pads are very soft. They are designed to fit exactly into the wax tin and apply a consistent and even amount of wax across the face of the pad when given a slight twist in the tin. These are great for giving you good control and even application of wax onto the paint. Due to the very soft nature of the pad they can loose their shape after a few uses. Considerably more expensive than standard foam pads. Not that common and can often be seen as gimmick.


Hand Foam Pads: most commonly used applicators, these tend to be thin pads which makes them easier to spread or swipe into a container of wax, apply a cream onto for application. These flat foam pads tend to make it much easier to feel the pressure applied to the surface of the paint when applying glaze, sealant or especially a wax. Often used where hard wax paste is to be transferred from the container to the paint surface. Best used for application of light products such as glaze, sealant and wax. Quality wax pads can be washed a few times before they breakdown. The cheaper ones tend to have a rougher feel to the surface of the foam.
TIP: Cheaper foam pads can have a stiff moulded outer edge (below left), care should be used when using these pads, as dragging that edge on the paint surface could cause marring. The better quality foam pads (below right) have no seam or at least not exposed and trend to be slightly thicker and a smoother surface.


Machine Pads
Dual Action Pads: The sizes of the pads tend to be either 5″ or 6″ sized pads, smaller sizes down to 1″ are available depending on the size of the machine. These pads tend to be foam based, held in place with a Velcro fastening to a backing pad. The pad use and combination of product depending on manufacturers is a real mine field. I have made a comparison chart here, or copy and paste the link: Difference Between Waxing, Polishing And Your Paint Job – One Man And His Mustang. Dual Action pads can be used for applying wax with a soft finishing or ‘jewel’ ultra soft finishing pad.
The contours and design are of the pad contact surface can help with the product application and will shape to the panel being corrected, (below top right) which will avoid hot spots. The compound structure of the foam could be hard or soft, open or closed pores, ridged or smooth, there is a huge range to choose from. Depending on the paint type, condition of paint or the task in hand, pick your pads carefully for the right task.
TIP: Using a machine may well require starting with a cut, then polish and working to finish. Paint correction is not usually a single pass, unless it’s just for a light polish before finishing. Applying a paste wax with DA is possible but more suited to cream style waxes requiring on the softest of finishing or jewel pads for application.


There are some very aggressive pads which are made of wool (above lower left). This style of pad is designed for a heavy cut or to remove oxidisation, marring, swirls or some deeper scratches. These pads can even remove 1000grit sanding marks. If used incorrectly it can quickly overheat the paint and cause damage. After using a wool pad progressively softer and finishing pads would be required.
Rotary Pads: similar attachments of pads to the backing plates via a Velcro. Some backing plates can have the pad face already attached. The sizes are commonly 6″, 7″ or 8″. Where smaller pads are used these can concentrate a lot of torque and heat in a very small space, be careful not to burn the paint. The backing pads on these rotary machines has a significant effect of the application. Where the backing plate is stiff this can concentrate pressure in one spot, ideal for concentrated correction. Where as a softer backing plate will disperse the pressure more evenly better for smoothing larger areas.
I won’t be going over the exact steps of Polishing here, as the assumption is you are competent with the process.
Paint Thickness Gauge
Advisable: Before you attempt any paint correction it’s ideal to know what you are working with for tolerances. There are a multitude of tools on the market that will measure the thickness of the paint on the vehicle. The gauge will tell you where the paint is thin and care should be taken in those areas. This is not an essential tool, but I recommend one when you are correcting any sort of paint. These aren’t that expensive and for the sake of a few pounds or dollars it can save you a respray!


Body Work
Must Step: Each manufacturer’s products can have slightly different application methods and are not the same process for each of them. The majority of these products should be used in the shade and the panels ideally be cool to the touch, but there are always exceptions to the rules.
Before you start the Waterless Process
Evaluate the car if a waterless clean is even possible. These waterless products are not designed to remove clumps of mud on the wheel arches behind the wheels. Common sense should and must always be used as with all products. Before cleaning the car you should check for any specific cleaning tasks first.
Road Tar, Tree Sap, Bugs & Birds
Where road tar, tree sap, splattered bugs or bird stuff and such like are on the car, remove them first. Some waterless washes are much better than others at handling these more stubborn and often baked on contaminates. Use a dedicated cleaner depending for your specific wash task. IF, water is being used some products can be added to the bucket for the shampoo stage like the Chemical Guys (below left). As we are waterless that isn’t an option.
Other products tend to be spray on or cream based, leave and wipe off. Choose your product wisely to tackle the task in hand. If a good protective layer is already on the car then removing such problem areas will be a lot easier to remove with minimal effort.
Applications:


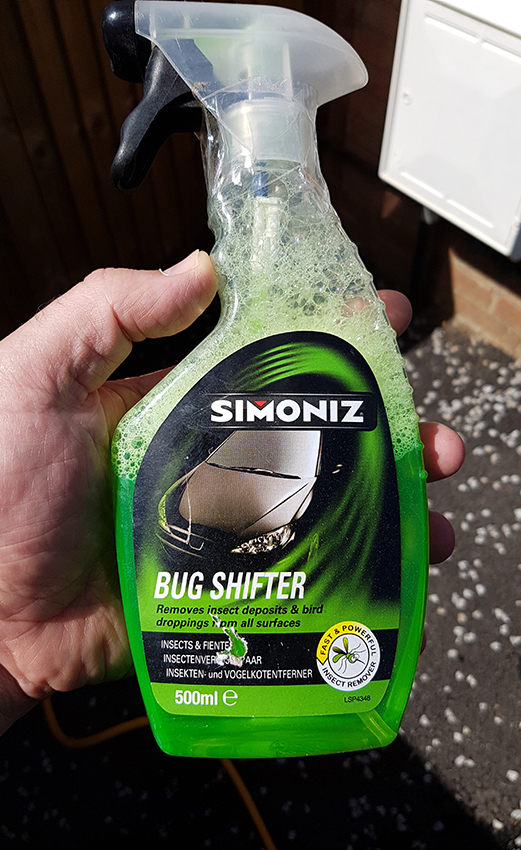
Bug cleaning products work on the principle that they hydrate the bug carcass or what is left of it, allowing it to be removed. Spray onto the bugs and allow it to dwell to soften the bug. With a clean cloth wipe away the bugs and product. Some bug cleaners are absolutely useless, like this Simoniz effort (reviewed on here), which was like water and ran straight off the paint before it even started on the bugs, even when it was on the bugs it didn’t work after using half a bottle. The cream is the better option as it tends to stay in place and not run off or dry out as quick. But some sprays will do the job just fine.
Tar removers work by using solvents to soak into the tar and break it down into a softer state so that it can be removed. Many Waterless wash products won’t remove that type of contaminate alone. Leave to dwell for a while and then wipe away with a clean cloth. The cloth will be pretty much useless for cleaning a car after tar is stuck to it, so use a cheaper cloth to remove this type of debris. Due to the nature of this type of product it will remove existing wax and or sealants on the paint. After cleaning the area, you will need to replenish the wax and build it back up again.
Sap is made from resins sugars and organic polymers, like tar the waterless wash or even a wet wash won’t really help with this type of contaminate. A dedicated sap remover is recommended. Due to the nature of this type of product it’s similar to the tar remover and will also remove existing wax and or sealants on the paint. After cleaning the car you will need to replenish the wax and build it back up again.
Birds can make a huge mess and if it has baked onto the surface of the paint it’s difficult to remove and should be removed as soon as possible before it etches into the paint as the contents are acidic. If the birds have been eating berries the colour of the deposit can cause stains on paint if its left for too long. Where the deposit is dried on, don’t try and scrape it off, even with this type of product. These are designed for removal of the fresher deposits. I always carry these AutoGlym sachets around with me in my cars (reviewed here) as they work very well.


TIP: Where the bird deposit is caked on dry, get a wet cloth or the circular make up removing pads (I keep a supply in my detailing bag), and soak them with water or the waterless wash product. Leave it on the bird mess for a while until it softens up again. Once softened up it will wipe away with water or waterless.
Cleaning the Car
Before tackling a dirty car for a waterless wash, practice on a fairly clean car so you can get the technique right. Never clean in a circular motion for waterless washing, that will introduce swirls. Cleaning in bright sun or hot to the touch panels can evaporate the product quickly which can remove the protective qualities. That will result in the product not being able to trap the dirt correctly and introduce swirls or light scratches. Over application will soak the cloth and not make the cleaning any easier as the product will then also need to be removed. The happy medium depends on the product, where ‘liberal’ application is required then more clean dry cloths are required.
The couple of pics below are getting near to the limits for a waterless wash.


Applying the product:
Most of the products can be sprayed onto the panel with a good even coverage and allowed to dwell for a second or two, wipe off before the product flashes away and dries. Leaving the products to dry on the panel can cause more issues that needs to be cleaned sometimes leaving a residue. Repeat the step to reapply the product and remove the dried product residue as well as the dirt.
The amount of application varies, some products require liberal application, some require a spritz on the surface, some require a spray onto the cloth and not the panel. Rule of thumb, you should be wiping the panel with some product on and under the cloth. Never wipe a dirty surface with a dry cloth.
TIP: lightly spritz the microfibre towel with a quick detailer just to moisten and soften the fibres of the cloth.
Always follow the manufacturer’s guidelines carefully for correct application of their product.
How to use a quality microfibre cloth with any waterless wash product.
Start at the top and work down, in theory that should be the cleanest parts of the car. If you have lots of flat surfaces, start with the cleanest of the panels first. Road film and dirt tends to build up lower down the car, especially around wheel arches, front of the car and sills. Work on one panel at a time.
These products are supposed to ‘suspend’ dirt in the fibres of the cloth. The suspension of the particles within the product needs to then be lifted away from the paint. A correct process for cleaning and wiping is a technique that requires a little skill to master. Learning how to use the cloth or ‘roll’ the cloth is the secret to cleaning and protecting your paint at the same time. You don’t want to push the cloth along the panel and create a wedge of dirt in front of the cloth, think of a tyre locked up while braking in the snow, it will form a wedge in front of the tyre. That potential wedge of dirt build up could probably and will cause problems for your paint.
Some of the products are infused with some additives to help protect the car. The choice of product is yours depending on what you want to do, wash and then wax, or wash and wax all at the same time.


Many products are enhanced with such niceties like carnauba, ceramic, graphene, or some with none at all. Select your product carefully with what you want to achieve and what the end result will look like. Some products are better than others, trust me. Sticking with the main brands or the big players is not always a safe bet. The Chemical Guys Swift Wipe I wouldn’t want to clean a wheel barrow with! The others perform well and I have reviewed all of them here on this website. Some offer longer durability, some offer more gloss or shine. Some are ready mixed like the Meguiar’s, where as Chemical Guys offer a concentrate which is cost effective, but needs to be diluted.
TIP: Where using products that need dilution or you have hard water, I strongly recommend using de-ionised water. Costs can be a consideration for waterless washing as you will go through more product.
The thing to remember is that the longer you leave the dirt to build up the longer the process will be to clean. Keep on top of the cleaning regime and the waterless cleaning won’t take long at all.
The secret is that ‘rolling’ motion (full technique explained below), as you move across the panel you should expose more of the clean cloth in contact with the panel to lift the dirt away from the paint. Pressure should be minimal, but enough to lift the dirt. You’re not trying to press the product into your paint, the product should be doing the work for you acting as a barrier between dirt and paint. Too much pressure will push the dirt into the paint which is the exact opposite of what you want. The panel should be wet enough for the product to do its job by loosening and encapsulating the dirt particles, allowing them to be lifted away as you pass the cloth over the panel. If the panel is seriously dirty and thick with road grime, then a waterless wash may not be the answer.
The ‘Rolling’ Technique Explained
Typically the cloth would be folded in half, then half again. The nap of the cloth should be long enough to lift dirt away and keep those dirt and dust particles within the nap, around 250 to 400gsm weight of cloth is a sweet spot for me. A very short nap will not lift the dirt away enough and you end up pushing the dirt around, to long a nap the fibres will move over the dirt not lifting it, more of a buffing pass than actually cleaning.
Step 1: Lightly mist the surface of a dry cloth with a quick detailer or the product itself, just to moisten the fibres.
Step 2: The cloth should start flat to the paint, wipe in straight lines – in one direction.
Step 3: In the direction of travel for the cloth, roll the leading edge progressively upwards as you go along to expose a clean cloth on the underside as you move along the panel.
Step 4: At the end of the pass the cloth should still be using a clean part of cloth. Ideally you should be out of clean cloth at the end of the wipe. Where the panel is not to dirty you may be able to get a couple of passes from the same section of cloth. If in doubt, Fold & Flip.
Step 5: Work on one panel at a time before moving on to the next.

TIP: While cleaning your car if the cloth looks dirty, don’t be tempted to re-use a less dirty part of the the cloth again. Get another clean cloth and continue the clean. I typically use two large microfibre cloths for a single car for waterless washing.
TIP: If you drop a cloth or any applicator pad on the floor, NEVER use it again, if I drop them I bin them, or relegate the cloth to cleaning up oil or so on. Dirt and gravel can get caught in the fibres and can be dragged over your paint. The cloths are cheap enough to replace, even the top quality ones. Don’t shake the cloth thinking it’s clean and re-use it. Even after putting a dropped cloth through a washing machine, I wouldn’t trust that cloth for a paint cleaning duties.
Note: Some waterless products require an additional final step of ‘buff to a shine’. This buffing step should only be done when the panel is fully clean. Buffing an ‘almost’ clean panel will introduce scratches, swirls, holograms or spider web effects. Remove the dirt from the panel in layers, don’t try and do it all in one go. Some products are better than others at removing the dirt more efficiently than others.
If the panel is pretty dirty, but a waterless wash is still possible, wipe over the entire panel with clean parts of the cloth to remove the worst of it. Where a dirty panel is partially cleaned it may leave a streaks like below. Then start again with more clean cloths and more product to get that panel clean and free of debris. This is where the particles have dried within the waterless product and left on the paint leaving a film.

Be particularly careful around wheel arches, leading edges of the car or lower parts of doors where grit and larger parts of debris can collect. Using one cloth per wheel arch is not unreasonable if particularly dirty.
Cleaning inside door jams and and pillars would be required as they are nearly always be dirty as well. Clean these after the main panels, but before any final paint enhancement optional steps like clay bar, polish, glaze, sealer, pre wax, wax or quick detailer.
Clay Bar
Optional Step: Once the panels of the car are clean, if the paint feel rough to the touch, then you can go for a clay bar decontamination to decontaminate and deep clean the paint. Always use a clay bar with lubrication. Quick detailers are ideal for clay bar lube, or some quality makes will work with water. There are different grades of clay bar.
- Fine Clay Bars: Soft and easy to use, ideal for lightly contaminated surfaces. They are gentle on paint and can be used frequently without causing damage, but may struggle with stubborn contaminants like sap or overspray.
- Medium Clay Bars: More aggressive than fine clay, capable of removing tougher debris. They may leave minor micro-marring, so a follow-up polish is often recommended.
- Heavy or Aggressive Clay Bars: Designed for deeply embedded contaminants such as overspray or industrial fallout. These are best used sparingly on paint, but are safe for harder surfaces like metal wheels and glass.


Some brands are better than others. I have reviewed these above on this Website.
Clay Bar Materials
- Natural Clay: Traditional clay bars are made from natural clay compounds. They are malleable and effective but require careful handling to avoid contamination and breakage.
- Synthetic or Rubber-Based Clay: Modern alternatives, combine a rubber-like layer with a handle-friendly surface. These are easier to use, less likely to crumble, and often reusable.
- Some applications types come in a towel/cloth format or even a glove
After a clay bar decontamination, paint correction or the paint is in good condition you can go straight to the personal preference of a spray, liquid or old school wax paste to be applied on the car. Always use the manufacturers guidelines. Where the paint needs a little work, polishing and or a glaze may be the next step.
Polishing
If you have a Paint Thickness Gauge take readings across the car especially around edges or body lines where the apint application can be thinner.
Optional Step: Typically after a decontamination, the polish step may be required depending on the paint if a correction is required. I have written a guide on machine waxing and machine polishing differences here, or copy and paste the link: Difference Between Waxing, Polishing And Your Paint Job – One Man And His Mustang polishing and waxing is not the same!
The polishing will or should remove paint imperfections and prepare for the final stages of the paint finishing. The vast majority of paint correction is done by a machine.
Trying to polish a dirty car may well destroy the paint and finish.
Rotary Polisher
Rotary machines operate using a direct-drive, single‑axis rotation and tend to be professional tools. The pad spins in a constant circular motion, which means every part of the pad follows the same path across the paint. This makes a rotary extremely effective at cutting through defects such as heavy swirls, scratches, oxidation, and sanding marks. Because the motion is uniform and aggressive, a skilled operator can correct paint quickly and achieve a high level of refinement. However, that same strength is also its drawback: a rotary generates more heat, can burn through paint if misused and can create holograms if the technique isn’t controlled. It’s a precision tool that rewards experience, steady movement, and careful pressure.

Dual Action
A dual‑action (DA) polisher, by contrast, is designed to be far more forgiving. Instead of spinning in a single circle, the pad oscillates and rotates at the same time, creating a random orbital pattern. This motion dramatically reduces heat build up and makes it much harder to damage paint, which is why DA machines are the go‑to choice for enthusiasts and professionals working on modern clear coats. While a DA may correct defects more slowly than a rotary, modern long‑throw machines have closed the gap significantly, offering strong cutting ability with minimal risk. The DA’s balanced movement also makes it ideal for refining, applying glaze or waxes, or performing maintenance buffing.
I’ve reviewed the Meguiar’s MT320 Dual Action here or copy the link to your browser Meguiar’s MT320 Dual Action Polisher – One Man And His Mustang

By Hand
Hand polishing is the most gentle and controlled way to improve paintwork, relying entirely on your pressure, pace, and technique rather than machine power. Often recommended for old, thin or delicate original paint work. Using a quality applicator pad and a light abrasive polish, you can remove minor swirls, freshen tired paint, and boost gloss without the risk of heat building up or over‑correction. Its slower than machine polishing and won’t tackle the deeper defects, but it’s ideal for spot work, delicate areas, or those who prefer a more careful, tactile approach. Hand polishing is all about patience and consistency, and when done well, it can noticeably brighten and refine a panel or car with minimal effort.

Polishing Pads
Polishing pads are the crucial link between your machine and the paint, controlling how much it will cut, correction, or refinement you deliver. They come in different materials, designs and densities, typically foam, microfibre, or wool. Each combination of style and construction is designed for a specific level of aggressiveness. Heavy‑cut pads are firmer and more textured to remove deeper defects, while softer finishing pads gently refine the surface and boost gloss. The pad’s structure, heat management and ability to stay clean all influence how consistently it performs. Choosing the right pad for the job ensures your polish works efficiently, your machine stays stable, and your paintwork ends up with a smooth, even finish. Starting with an aggressive pad will need to polished with progressively finer pads.
I have created an extensive guide to paint correction here with a downloadable pad comparison guide, or copy this link to your browser: Popular Manufacturer DA Pad Comparison Chart – One Man And His Mustang

Paint Correction
Optional Step: This isn’t a regular step, it’s a little used step where the paint is looking tired or damaged with a minor scratch or swirls from poor contact washing and needs to be refreshed or rectified.
NOTE: When I refer to ‘paint‘, this will include the clear coat top layer as well.
Warning: This step is exactly what it says, you’re not cleaning, you are altering the paint’s surface, typically done with a machine. A heavy cut with a wool pad on a rotary machine held in one place will heat up the paint and burn through it that’s a respray! This paint correction process will give amazing results for the look of your paint. If in doubt: get a professional or somebody who knows what they are doing to do it for you. It’s usually the clear coat that has the minor imperfections. But, some swirls or scratches can go through the clear coat to expose the paint itself underneath.
Always start with the least aggressive approach to paint correction, if that application didn’t work you can move to a more aggressive and then work back again to fine finishing. Experience will tell you what you can start with for the job or task in hand. You don’t want to use a hammer to crack an egg.
To polish your car you need the right product and that various considerably. Even different manufacturers need different products. Some paints are ‘soft’ and need a more gentle approach, some are ‘hard’ and can more aggressive correction. There are professional grade products like the 3M which are great products, but if abused can make things worse. Then there are the more mainstream like AutoGlym, Meguiar’s or Mitchell & King. Most of the time these products are cream based and more forgiving. Depending on the aggressiveness or the ‘cut’ you want, the choice of product is critical. These products also need to be used on the correct pads, a gentle finishing compound on a harsh cutting pad wont do a lot, maybe burn the paint. Same as aggressive cut on a finishing pad won’t do a lot, apart from break up the pad.
Some polishes require multi steps to progressively apply finer applications, starting heavy, then medium then light to get get that gloss and smooth finish.
Most of the time the mainstream suppliers, like Meguiar’s, Chemical Guys, AutoGlym or Mitchell & King state that they are ‘Clear Coat Safe’ and you should be OK, if you follow instructions. Don’t rush this step.


Old school scratch removers like T-Cut are extremely aggressive even by hand as they contain some aggressive micro abrasives, to remove the damage quickly, hence references to fast, quick or rapid. These products remove fine layers of dull paint (or the clear coat) to expose a more original colour underneath that hasn’t been exposed to the elements, a bit like peeling an onion or sanding old varnish off wood. The products will level out the imperfections if used correctly. More main stream scratch removers aren’t so aggressive. Pair these with a DA or Rotary machine you have a formidable combination which should be used with care.
By definition to remove a scratch you’re not filling in the scratch like a Glaze, you’re rubbing it out or reducing the coats around it, the same as all polishes to varying degrees.
Tip: If you can feel the scratch with your nail, the polishing or cutting won’t remove it fully. The scratch has gone through the base coat into the undercoat or possibly down to the metal. Only fix here is to use a touch-up paint and then polish to a gloss.


Pre Wax Cleaners
Optional Step: This step is not often performed by the weekend warrior. However, where a top quality finish is required such as a concours event, or a show & shine event, then this step is a must. A pre wax cleaner will remove any traces of polish, residue or old wax from the paint, allowing a start with a clean slate. If the paint is in good condition and a Glaze is not required then this pre wax process will give good results and help prolong the final wax durability. These pre wax cleaner products can be in spray, liquid even a paste. Some manufacturers have introduced a ‘Cleaner wax’ which provides an integrated cleaning for a solid base application at the same time as the wax application.
The all-in-one products may be fine (I don’t use them), but you are restricted to the type of wax you apply on the paint by the manufacturer’s ingredients. For a properly clean and prepared base ready for some proper wax, I suggest a dedicated pre wax cleanser product.


Glaze
Optional Step: Car glaze is a gloss‑enhancing product designed to visually improve paintwork by adding richness, depth and a “wet look” shine. Unlike polishes, which remove defects or waxes and sealants which protect, a glaze works by filling in fine swirls, hazing, and micro‑scratches with oils and resins. These fillers level out the surface optically, allowing light to reflect more smoothly and making the paint appear darker, clearer, and more vibrant and glossy.
Glazes are especially popular on darker colours and older paint where you want maximum visual impact without any paint correction. They’re often used before waxing: the glaze boosts the gloss by creating a uniform reflective surface. The wax application will protect the glaze from the elements for a freshly enhanced paint finish.
Typically Glaze is in the form of a cream that is allowed to cure and buffed to a shine. More modern variants like the AutoGlym is called ‘Paint Reviver’ which requires a particular style of application and is a clear liquid but is the same principle.


Note: Glaze products are a temporary fix, they are fillers. The glaze products will hide some imperfections not all of them, it certainly won’t fix them. How long it disguises the problem depends on the damage to the paint, quality of product and application processes. Where paint correction is not an option, such as old original paint, worn, thin or delicate paint finishes, then glaze could be the ideal non destructive solution. A Glaze longevity will depend on the application, quality of product and the protection on top of it, either a sealant or a wax layer(s).
Sealants
Often asked questions are, ‘should sealant be before or after the wax’? The simple answer is; Before. Second question is; why? Well the sealant is designed to bond to paintwork for the protection. Where wax has already been applied sealant may not bond as well and not provide much protection. Professional detailers would apply a sealant first before a wax layer.
A sealant is designed for longevity regardless of the elements. The downside is although sealant will add a gloss or shine, the wax layer provides the depth and gloss to the car’s paint. The wax layer on top of the sealant is a sacrificial layer by design. If you apply the sealant to the wax layer yes it will apply, but the gloss or depth provided by the wax application can be dulled a little due to the sealant, although it will in theory last longer than the wax layer, providing it bonds in the first place.
Optional Step: After the paint has been cleaned, corrected and or a glaze has been applied, to prolong those corrective layers you can use a sealant. Sealants can be in spray or a thicker liquid forms, depending on your preference. The ‘Sealant’ is designed to lock in the previously applied layers underneath providing an additional barrier for the corrected paint finish to make those layers last longer. Some sealants are two part application and can take longer apply. These products often require a cure time and then buffing off to a shine process before the wax can be applied.


Application is very similar to a glaze or a wax process. There are ceramic versions now that can be applied at the rinse stage of the wet car wash. Just spray over the wet car, rinse with water and the ceramic is applied, such a simple process. But, as we are talking waterless the process will need to be a manual application. Depending on the quality of the sealant it can still give you a beautiful gloss even before a wax layer.


Waxing
Preparation
The better the preparation of the paint surface the better this step will look. If you used a clay bar, glaze or even gone down the route of some sort of paint correction the better, but it’s not essential. Just a clean car with good paint will benefit from a wax layer or two.
Recommended Step: The better the surface of paint, the better the results. Think painting a wall in your house, smooth plaster with no cracks and level surface gives a painted wall a smooth even finish.
Wax is the same principle, but in much finer layers. Wax is designed to give a smooth, uniform, light‑reflective surface on the paint. Wax is the sacrificial layer to the elements protecting the actual surface of your paint. This is why it needs to be reapplied regularly to keep that barrier up. Some waxes require more than one layer to achieve the best results for reflection, gloss and depth of paint.
Some waxes offer better longevity than others, protecting your car from the elements. Other waxes are designated ‘Show Wax’, these waxes offer little protection, but offers the maximum gloss or wet look for your paint, often costing big money. There are of course waxes that offer both options with varying degrees of success.
When a wax has been applied, the wax fills microscopic pores and imperfections in the clear coat, leaving the surface flatter and more consistent. The corrected and well prepared surface texture allows light to bounce off the paint evenly, which is what gives that deep, wet‑look shine you want.
Types of Car Wax
Liquid Wax: Liquid wax is the probably the most popular type due to its ease of application and easy buffing. It can be applied with microfiber cloths, applicator pads, or dual-action polishers, making it convenient for regular use while providing a glossy finish and moderate protection. Some liquid waxes offer an all in one solution, a cleaner, polish and wax. This type of product can give good results, but those individual steps are always better.


Spray Wax: Spray wax is less concentrated and sit in a fluid carrier in order to be sprayed. Most of the time they are designed for quick top-ups between full waxes or for detailing. It’s ideal for fast application and is often used at hand car washes (if you’re lucky), if not hand washers may have the ‘Wash & Wax’ shampoo product in the bucket, to cut time and save on effort. While spray wax will provide a shiny, glossy finish, its protective properties are generally less durable than liquid or paste wax. Some brands will make claims on longevity, what works on one make of paint may not work on another. Trial and error may be required for what works best for you. Some spray waxes with with ceramic or graphene will last longer that standard carnauba products.


Paste Wax: Paste wax is a thick or firm traditional wax that usually comes in jars or tins. It offers the longest-lasting protection and a deep, rich shine, but requires a technique, more effort to apply and buff. Paste waxes are preferred by enthusiasts and professionals seeking maximum durability, paint protection and that desirable wet gloss look. Some extremely expensive waxes are applied by professional detailers by hand without any applicators.


Wax Composition Types
Natural Wax:
Typically made from carnauba, natural waxes, oils and specialised extracts to provide a high-gloss finish and long shelf life. These high end waxes are prized for their deep shine, but may require more frequent reapplication compared to synthetic options. Cost of these high end waxes can cost many hundreds of Pounds or Dollars for just a few ounces. These waxes are best left to cure to allow a bond with the paint, sometimes overnight. These waxes don’t usually need the ‘haze phase’ and can be buffed to a shine pretty much straight away. Often applied in very thin layers and built up to achieve top quality results. The rule of thumb is the better quality of wax the easier it is to apply and buff to a shine.


The natural high end waxes are a luxury, some people won’t be able to tell the difference. But, the user experience of application, ease of use and the quality finish of the product is noticeable. For somebody who only waxes once or twice a year then synthetic or hybrid waxes are the way to go. For a classic car or a show car, you can pretty much guarantee they are using a top quality natural wax product as they don’t tend to go out poor weather.
Synthetic Wax:
Made from various polymers suspended in a base carrier often paraffin based with additives like ceramics, graphene, Teflon or similar added. These waxes need a cure time for the waxes to ‘haze’ which is where the carrier base has evaporates enough and leaves the coating elements behind. If you can swipe a finger on the hazed remains to leave a clean mark behind, then it’s ready for buffing. Synthetic waxes are more resistant to UV rays, acid rain, and environmental pollutants. They often last longer than natural waxes as they are designed to bond with the surface of the paint and provide strong protection against the elements. Some of these cheaper products can leave a dusty powder residue behind once the haze has been buffed away. This type of residue may need additional buffing to remove the powder, or a quick detailer spritz to remove stubborn powders.


Hybrid Wax:
Combines natural and synthetic ingredients to offer both the deep shine of carnauba and the durability of synthetic polymers. Hybrid waxes are versatile and suitable for a wide range of vehicles. These are aimed at longevity, ease of application and excellent all round results. These don’t tend to powder, but often need a little work for buffing to a gloss. It’s said that they don’t offer the warmth of carnauba waxes, but the average detailer wouldn’t be able to tell the difference. Often the best all round choice for shine and protection, ease of use and cost effective.


Application Methods
Wax Strips:
Convenient, but generally provide less protection than other forms, not very common. Requires cure time and not that common. rub the stick onto an applicator and work onto the panel. After a cure if required buff to a shine with a plush cloth, turning frequently.
Spray or Liquid:
Easy to apply and buff, suitable for regular maintenance. Quick application by spraying onto the panel or squeeze onto the applicator and work into the panel. Apply in gentle circular motions with over lapping passes. These products don’t usually need a cure time and can be buffed quickly after application. If this product is a hybrid then a small cure time is advisable.
To buff lightly spritz the buffing cloth with a quick detailer. Fold the pad into a pad on the hand lightly apply pressure to remove excess and buff the product. Turn the cloth frequently to avoid the cloth clogging up with product depending how much was applied in the application stage. More product doesn’t mean a better shine.
Often these products provide some good lasting results especially the hybrid products. These products are tolerant of over application and easier to buff to shine.
Natural & Hybrid Paste:
Requires more effort, but can deliver maximum protection and longevity, or extreme shine. The best results for your car if you put the time and effort into their application. Patience and layering can give outstanding and lasting results. Depending on the natural or synthetic composition cure time can vary. I would recommend a couple of layers for a natural wax product.
Lightly spritz the applicator with a quick detailer to soften the pad. Swipe the applicator lightly over the surface of the paste to load the paste onto the applicator pad, around a third of the pad used at a time. When the pad is clogged or difficult to apply, use another part of the applicator to avoid over application. Always apply paste waxes a thin layers. Work on one panel at a time using over lapping circular motions. Keep the hand flat if possible to allow an light even application of wax. Less is often more with these products. You are not grinding the paste into the paint, you are applying it to the surface.
Lightly sprits a good quality plush microfibre and fold into a pad on the hand. lightly buff to shine. Where the cloth becomes grabby or not moving freely, flip and fold for a fresh part of the cloth. Having a nice folded pad in the hand can held with an even buffing application.
TIP: The quality of the wax is critical. A cheap wax will make a panel look OK. But if you want exceptional gloss, wetness or good element protection then it can come at a price. By the same point, a rubbish paint prep won’t look amazing even after a £600 pot of wax has been applied. This loops back round to the preparation, if you just want protection with a nice bead then you won’t need to spend hours applying a glaze or sealant. For a weekend washing warrior, a good hybrid wax like Meguiar’s Ultimate will do you well for protection and give a great gloss. For a warmer classic show room shine waxed look, Meguiar’s Gold Class would be a good start. Or go upmarket for a Mitchell & King hand blended waxes.
TIP: Applying the wax in thick layers will not give you a better shine. All it will do is cause a lot of trouble short term trying to remove it. With waxing, the rule of thumb is less is more. A thin applied layer then buff to a shine, then repeat.
Different waxes on the same paint can give different results to the gloss, wetness, slickness or reflection. What looks great on one car may not look great on another. Colour of the vehicle may have an effect on wax choice, with some waxes can make the paint appear warmer.
TIP: If you have over applied the wax and find yourself just pushing the wax around, get a clean cloth and spritz a little quick detailer on the cloth, this will help the cloth glide and get you going again. Try and less plush cloth to try and absorb the wax product.
Wheels & Tyres
There’s no point in having a clean car if the wheels look dirty, it can make such a difference. Probably the dirtiest job to clean on a car due to the brake dust and road film. To waterless wash a wheel still isn’t that common as there are only a few makers of waterless wheel cleaners. Meguiar’s does make a good product, but it can be messy scrubbing the tyres. The secret here is to clean the tyre first as the tyre dirt and grime tends to get flicked around. Then clean the inside or face of the wheel.


Tyre
Application
A hard wheel brush is best for the tyre. Spray the product onto the tyre and work into the tyre to loosen the dirt and road film. With the tyre scrubbed wipe of the dirt and grime with a microfibre cloth. Depending on how the tyre looks after the first clean, you may want to repeat the process.
Rims
For the rims there are a lot of options, mostly aimed at water washing with different types of long brushes that reach through the front of the rim to scrub the barrel. Some brushes are thick nylon brushes, some are wool and some are a bit of both. The brushes are designed to collapse into small areas like the gap between the wheel and the brake calliper. With ordinary ‘water’ wheel cleaners you spray through the front of the wheel into the back (barrel), then scrub back and forth to remove the debris and then rinse. If you are water washing then it doesn’t matter if you clean the tyre or rim first as they will both be rinsed anyway.
Application:
Spray the product overt the complete surface and allow to dwell depending on brand. Some products are colour changing to help with the cleaning, when the product goes purple it working. To save product you either clean the face and hope nobody notices the barrel, or get under the car to clean the wheel’s barrel while still attached to the car, which is quite impractical and will be extremely messy for you and the surface you are cleaning the car on. Your only real option to clean the inside of the wheels properly is for the wheels to come off which isn’t always practical.
For waterless cleaning you sometimes have to agitate the product to get into the corners. For me the oversized ‘paint brush’ idea can get into the tight spaces to remove the brake dust, my personal favourite is the AutoGlym brush which has a dome shaped, fairly stiff bristles and works well. Depending on the finish of the wheels, like chrome I would seriously only recommend a cloth or soft applicator pad. For other painted finishes at least very soft bristles, applicator pad foam or cloth. A microfibre draped over the end of the AutoGlym brush works well for delicate finishes. Depending on how dirty the wheels were, you may need a second go to get them clean.
To clean up the wheel, wipe the product off thoroughly with a clean cloth. I like to use a quick detailer to make sure all the product is removed and also add nice protective gloss.


Wheel Nuts
These are usually cleaned at the same time as the face of the rim with the same application. To get into the wheel recesses a cloth or a brush may not reach into the cavity. With water you can jet wash into it the gaps. The alternative is these lug nut cleaners, which are handles with a foam end that slips over the nut cleans the outside of the nut, and also the inside of the cavity. Spray onto the lug nut cleaner as you don’t want to soak the cavity. Then use a microfibre to clean and polish the residue off.


Wheel Seal
Recommended Step: Clean wheels are often given a sealant coating. These products tend to be refined for wheels as they are next to hot brake discs and take a lot of punishment from iron fallout (from the brake pads) and the road film. These products and applications are definitely recommended to provide the protective barrier which will prevent brake dust and road film sticking to the rims and allowing a much easier washing.


Application
The majority of the time these products are sprayed (not recommended on brake rotors, or cream formula applied onto an applicator pad and wiped directly onto the wheel. Usually the products are allowed to cure, then buffed to a shine.


Wheel sealants are a worth while extra step, it will save you a lot of hassle in the long run trying to clean of brake dust. The dust won’t stick to the wheel rims and can easily be cleaned with a quick detailer instead of a dedicated waterless wheel wash. Keeping on top of the wheels once the sealant applied, using a quick detailer or even a wheel wax, will significantly speed up the wheel cleaning on the dirtiest job of the car wash. A quick detailer with a silicon, ceramic or even graphene additive will help build up that barrier between wheel and brake dust.
Tyre Dressings
Recommended Step: Once the tyre has been cleaned and dry, they often look dull or brown, unless the wheel is new then black tyres don’t really last that long, after a winter the black new look has all but gone. But, you can prolong the look or even try to revive it, with varying finishes depending on preference. Each of my cars has a different finish to suit the cars.
Not only do these products make the tyres look better they actually serve a function. They can nourish the tyres and help protect the rubber from harmful UV rays, protection from the elements (salt in the winter) which can cause degradation of the tyre or even cracking.
TIP: Don’t get these products onto the tyre tread, as they can lose traction with the road. However, at a prestige shows I have coated the tread of the tyre as it looks better for the photos. But, I’m extremely careful when driving for the first mile or so untill the coating has worn off. It’s really not recommended on the treads.


There are multiple options of application with various finishes. Depending on the type of application there is some thing called ‘Sling’. This is where the product runs of the tyre at speed due to centrifugal forces. The product is then flicked into the wheel arches, or worse down the side of the car depending on the wheel offset which requires cleaning. The sling can then attract the dirt and dust onto the paintwork. A Tyre dressing can also keep the tyres cleaner for longer making them easier to clean.
Application
Spray Can: by far the easiest way to apply the product. On a clean tyre hold a few inches away and spray around evenly onto the tyre. Where there is any over spray wipe away from the rim finish. This product can produce high gloss finishes. To reduce the gloss you can dab away the excess. Additional applications may make a bit of a difference but not a lot. Can be prone to runs on the tyre when over applied.
Not everybody like the super gloss look as it can look artificial. The product can be prone to sling depending on number of applications.
Spray Trigger: A variation where these can products are hand sprayed onto the tyre. Depending on the finish required usually a sheen or satin finish, they can be layered can improve the gloss. Application can be a full mist or a jet during application and can be a little more messy to clean up. Where the application is a little to shiny they product can be dapped down or wiped away to leave a more matt natural look. Less prone to runs on the tyre.
More common for classic or show cars looking for the OEM or new black looking tyre. Little to no product sling.
Gel: This is the more controllable application as it’s applied to the pad or cloth and wiped onto the tyre. The products vary widely based on the finish required. The gels tend to get messy as the foam applicator pads or various brushes. Some application pads can be shaped to the tyre wall, plain foam or microfibre or a dedicated brush like the excellent CarPro round brush with carbon bristles.
Gloss or matt finish is controlled by layers of application and the claims of the product. Heavy applications or the cheaper products on the market will suffer from sling. The better quality products don’t tend to sling and stay their intended finish for longer.
Manufactures can make some exaggerated claims for longevity and looks of the products. In my opinion for a daily driver they rarely last more than a few weeks. Some Gels can remain tacky to the touch, which is fine for a static vehicle, but driving with road dust and debris can stick to the walls of the tyres again soon making them dirty again.
Do the homework for the finish and longevity of the product. I have reviewed many tyre dressings on this website. They do vary significantly from look and longevity.
Wheel Wax
Optional Step: Depending on your wheels you may want to add some extra protection. For my chrome wheels this is a must. My go to product is the Angel Wax Bilberry, which is amazing and so easy to apply. There are other which are pretty good but require a little more effort. With a sealant and a coating of wax your wheels will be so much easier to almost wipe clean without washing.
Application:
This is the same principle just like the paint, apply a thin layer and allow to cure. When the wax has hazed or been left for the directed time, just buff to a shine. Where there are deep grooves where an applicator pad won’t reach, I find the soft foam brush makes it so much easier to apply into the tight areas.


Wheel wax is not just for chrome, any type of metal finish should be fine, at the end of the day, it’s just another sacrificial layer. Powder coated wheels will clean up nicely for a deep gloss wit ha wheel wax.
Trim
Depending on age of vehicle the type of trim changed. Classic cars tend be metal based, painted or a little more upmarket was chrome. More modern day cars are now pretty much plastic.
Exterior Bright Work
Cleaning Chrome or metal tends to be easier than plastic. Where metal has tarnished a good quality metal polish will remove the grime and clean the surface to a shine. Once chrome has been cleaned it’s recommended to add a layer of wax, to protect from the elements. Depending on the metal to be cleaned, not everything will look like a mirror finish, things like an stainless steel exhaust, exhaust tip, door handles, glass trim or metal fuel tank may not shine like a mirror but will be clean with a nice finish.
Essential Step : Some metal polishes will add a level of protection at the time of cleaning like the Meguiar’s Metal Polysh. Others like the Mitchel & King Metal are straight forward cleaners. A layer of protection for metal work, bright work as it’s often called or Chrome would be a wheel wax or any type of wax. If there is light scratches, maybe a glaze first. It all adds a layer of protection and makes the metal shine. Any form of protection from a spray on wax to a dedicated wheel wax will beneficial rather than an exposed surface.


Where metal has been painted, such as door glass trims this can be treated like body work paint. The levels of paint on the trims can be less than the car’s actual bodywork.
Plastic Trim
Over time the plastic trim on cars can fade usually down to the Sun’s UV rays bleaching, there not a lot you can do about that. What once was black now looks like a lighter shade of grey. There are plenty of products on the market some much better than others, while some disguise the fading, some actual apply a stain of sorts to the plastic to take it back to black.
Recommended Step: applying a ‘back to black’ treatment to faded plastic can make big difference to a car with a lot of black trim. These treatments often claim to have a degree of UV protection within the product preventing further damage. Some products also offer protection to the elements. I have tried a number of these products, some only last a couple of weeks and soon fade, or after a couple of car washes they disappear. The best I have used to date is the ‘Solution Finish’, a small bottle that is black on application and lasts a good while. It can get messy and gloves are recommended as it stains. Tire and Trim gels vary greatly, some will just add that layer that disguises the faded trim and looks good for two or three days, some will even leave a tacky film on the plastic. Always go for a ‘dry to touch’ formula.


Application:
Apply the product to the applicator, and work onto the trim. Some products will advise to wipe away the excess. Allow the product to dry. A good trim application will show some water beading properties like the paint.
TIP: The other big culprits for making a mess of plastic trim look unsightly are wax and polishes where they have been over applied. Many wax especially the cream sort will say to keep away from plastic trim for this reason as it makes the trim go white. Hard wax pastes where the carrier is paraffin based, non natural waxes, will leave a stain as their base evaporates.
TIP: If using a polishing machine, mask of the areas up that you don’t want any marks on, a splat being sprayed from the pads on the machines can land all over the trim.
The only way to clean that stained plastic or faded time is plenty of patience and a bespoke cleaning product(s)s depending on the trim type, rubber of plastic. Sometimes the wax or glaze won’t come out and the only option is to blacken the trim again, (below left). Examples of some 50/50 treated and non treated plastics trims.


Rubber Trims
Optional Step: Rubber trim is usually found around the seals of opening panels, around the doors or trunk etc. These trims or seals are so much easier to clean, anything that will clean the tyres will do the job on the rubber trims. Products like the Tire & Trim Gel will nourish the rubber and keep it supple.
TIP: A coating applied to the rubber would also help during the winter to prevent the doors sticking on cold and icy mornings.
Rubber car mats would fall under this section too, although not as common as they used to be. Now days most car mats are fabric with a heal pad for the driver.
Application:
Clean the trim or seal with a quick detailer and allow to dry if the rubber isn’t to bad. More often than not these Trim cleaning products are a simple spray onto the cloth and wipe over the rubber to clean it. If a cream based product, apply to the applicator pad and wipe onto the trim, depending on the product you may need to remove any ‘excess’ product. There is no need to ‘buff to a shine as its not that kind of product.
For heavier ground in dirt like on car mats you may need to spray on and scrub with a all purpose cleaner, or a citrus based ‘pre wash’ cleaner to cut through grime. A good all round cleaner from Chemical Guys ‘Nonsense’ is great at wiping things down for a general clean, and also great for the heavier duty cleaning tasks too. Many cars come with a fitted ‘trunk liner’ often rubber based, or a soft vinyl, these can be cleaned in the same way as driver and passenger rubber mats.
Caution: Where rubber car mats have been cleaned; make sure any coating that you may want to apply will not cause the feet to slip while driving.


Wheel Arches
Optional Step (difficult without water): Without water this will be extremely difficult, as removing the debris can’t really be done with a cloth. A jet wash or at least a bucket with a stiff brush to scrub clean and allow to dry. Some products like Bare Bones will add a showroom OEM finish and works very well. The trouble is as soon as you drive the arches will get dirty pretty quickly once the protection wares off. This is more for a showroom shine and a nice touch, it can make a difference, but not many people would notice.
Application:
Simply spray onto the dry surface to give it an even coat. If over applied you can dab away the excess and allow to dry.
Before application left and after the finished application right.


Interior Hard Trim
Recommended Step: The interior of the car will get grubby hand prints everywhere, especially on touch screens dials and nobs. There are a number of products on the market with many various finish options.
Modern Interiors
The best finishes are the OEM look which is more of an egg shell, or my own preferred look is the satin. These products often have a level of UV protection within the ingredients. These are especially welcome where hot weather can bake old plastics to cause them to crack or discolour. In my own testing, some products work much better than others. Products with additional ingredients like ceramic or even graphene will help prevent finger prints or marking between the next cleaning.


TIP: Some interior detailers will offer a shine finish, be very careful here as a glossy surface will reflect in the windscreen and cause a distraction.
Application:
Due to very nature of electronics in a modern car, where switches are present, I would apply to the cloth and then wipe the surface and then buff. For surfaces like the touch screen you could spritz the surface to clean it then buff to finish. Where clear plastics are to be cleaned, I would recommend a glass cloth. Don’t use cheaper stiff cloths as this may leave a light marring on the plastic surface and shed fibres.
For the larger dash areas, centre consoles or foot kick panels spray you can evenly spritz the product and work into the surface to clean the area and buff away any excess. Some products can be layered, where additional layers are applied this may well make the finish more glossy, that’s a personal preference.


Classic Interiors
Older classic cars tend to be much more robust to cleaning with a lot less electronic gadgetry. A light spritz over most things would do you well. Big vinyl dash boards which are prone to cracking in heat or from being baked in sun, I highly recommended using a product that offers the UV protection on the older cars.
For things like wooden steering wheels would need bee’s wax or similar.


Where metal knobs or switches are on the dash, these may need a light metal polish, or a quick spray wax to keep clean and remove finger marks. Most of the dash areas from classics were metal with a paint of some sort. These can be cleaned with a quick detailer applied on a cloth and wiped over the surface. Or if you feel the urge a light spray on wax for a little extra gloss. Again high gloss could reflect in the windscreen and cause a distraction.
Carpets & Upholstery
Upholstery
There is an abundance of cleaners on the market for cleaning car interiors and household furnishings. Just because it’s a car doesn’t mean you can’t use a household carpet cleaner. However – these may be stronger and cause more foaming or soaking of the area which could be a problem to try and remove after the initial cleaning phase. Auto cleaners tend to be spray on and wipe off style with little to no soaking. Some carpet cleaners are spray on foam type application. There multitude of interior constructions; fabric, vinyl, leather, plastic, wood, metal, nylon etc. Each have their own cleaning processes. I will quickly cover the main ones.
Some household cleaners can be strong enough to remove some dyes in vehicles carpets or upholstery.
Fabric Application:
Spray onto the surface and work in with a brush or a cloth, dry and repeat. Some products require the application to be on the cloth first and worked into the material to be cleaned. Due to the more delicate nature of vehicle cleaners more than one application may be necessary. If the stain or grime is particularly bad you can use a upholstery brush.
For fabric seats I have found the AutoGlym Interior shampoo to be excellent. It sprays on and in a second or two it foams up on the fabric. Rub the foam into the fabric to clean it with a microfibre cloth. Wipe away the excess with another clean cloth. It also leaves a fresh smell to the fabric.
Cloth on the door works particularly well with the foaming shampoo.


Leather Upholstery
Leather can be effected by heat and sun drying out the hide and causing it to crack. If the leather is kept nourished from new, the seats will resist cracking and stay supple for many years to come. This will also work for leather steering wheels, which will take virtually all the oils and grime from your hands. From a hygiene point of view, you should always be wiping over the steering wheel.
Typically leather is cleaned in a two part process and my preferred method. Once the leather has been cleaned it may remove the natural oils. A second stage is applied to the leather to soften and add those natural oils back in called ‘Balm’ or conditioners, they are the same thing. There are newer products on the market which clean and nourish leather all at the same time, which can save a lot of time and effort.
Cleaning Application:
Depending on the product it can be a cream applied to an applicator pad or a short nap microfibre, work into the leather to start the cleaning. Take a clean cloth and wipe over the cleaned area to remove the residue and buff the leather. If the product is a spray on product, usually application is via a spritz onto the leather and worked in to the leather to create the cleaning. Use a clean cloth to remove the cleaner.
Where the leather is in good condition but just a needs quick once over, a leather quick detailer would be ideal. Simply spray onto the surface and wipe clean.
Where Leather may be on door trims or dash pads, these are cleaned the same way as the seats.


Balm or Conditioner Application:
If you have used a dedicated cleaner then you should nourish your leather to keep the natural oils in the leather. These balms or conditioners tend to be a richer thicker formulation in the style of a cream.


Application:
Apply some product onto the pad and work into the leather with circular and over lapping passes on small sections at a time. Allow the ingredients to be absorbed for a few minutes. Wipe or buff to a finish. Additional applications may give a glossier look.


For leather dash and exposed to the sun leather, a balm is highly recommended.
TIP: allow the product to soak into the leather undisturbed for a few hours where possible after the application.
Vinyl Upholstery
Very similar to leather and many products often refer to ‘Leather & Vinyl Cleaner’, can be used on leather and vinyl; like seats especially in older or classic cars. The vinyl can dry out over time and crack just like leather. Once vinyl has cracked, the only real choice is specialist repair or replacement. The main difference between leather and vinyl is that leather will absorb the balm product to nourish the hide. Vinyl seats are essentially plastic, they wont absorb into the material like a natural hide. But, you can keep it supple and avoid any cracking with some UV protection based products.


TIP: Avoid using strong cleaners on vinyl as they may remove the dye in the plastic or cause them to fade. Harsh cleaners may also dry the vinyl and prematurely age the vinyl causing it to crack or discolour.
Carpets
Vacuum
Recommended Step: I don’t need to dwell on this too much. There are many vacuum cleaners out there and a general household vacuum will do the job if they are the cylinder style, or have an attachment for a hose. Many car vacuums can plug into the cigarette lighter or 12v supply, or a rechargeable hand held. More often than not these are under powered. Perhaps the household vacuum won’t be allowed near the car, just use what works best for you like pet hair, hypoallergenic etc.
Move to the seats, seat back pockets, trunk (boot) and carpets. Sometimes a simple vacuum will freshen up the car, especially if it has been damp from getting in and out of the car in the rain for example.
TIP: When vacuuming the car or cleaning the inside, leave the doors open to allow some fresh air in.
Cleaning Carpets
After vacuuming the carpets you will have a better idea of how the carpets are looking. Sometimes the vacuum will remove a lot of the dirt that looks like a stain, but is just a collection of localised dirt or debris. Where carpets a heavily soiled a wet & dry carpet cleaning process will do the job best. But, as we are talking waterless that isn’t an option in this case, so we will just work with what we can.
Optional Step: Carpets are probably the first thing that gets dirty inside the car. Getting in and out with shoes that have just been on a dirty road, grass or simply wet, will add to the odour and dirty any carpets. Like I mentioned before household cleaners could be used, but tend to be harsher cleaners.
The dedicated car upholstery and carpet cleaner products tend to be sprays or foam application types. They require agitation of some sort to remove the dirt.


Application:
The spray on products tend to settle into the carpet quicker as they are more liquid based. Some products require a wipe over with cloth after rubbing the surface or carpet to remove the dirt. This may take a few attempts to get the carpets clean and remove all the debris from the carpet and removing traces of the product.
Some foam applied products come with their own little brush on the end allowing you to get into the folds and tighter places which is quite handy.
For heavy dirt and stain the big guns can be applied, a carpet brush, or in the case of serious stains, a rotary drill bit attachment. Spray the product onto the carpet, and work the product in one direction. Then make another pass perpendicular to where you have just been. There are many types of brush, and personal preference is the choice at the end of the day.
When using the rotary pass up and down in one direction then again perpendicular. Ideally work in all four directions, up and down, left and right. This tends to get the carpet fibres worked in with the product. You will need to use more product with the rotary cleaner on the end of a drill and tends to be more messy.
To clean the product off and dry the areas, use clean cloths to wipe away the dirt.
TIP: Where the vehicle has car mats, remove them to make it easier to clean. If the car mats have done their job, then the carpet itself under the mats should only need a quick clean or vacuum.
TIP: When using a rotary brush on a drill, don’t run the brush over embroidered stitching, where the car brand or model has been stitched into the carpet. The stiff bristles may pluck the stitching and cause the threads to be pulled away.


TIP: Where cleaning the carpets has used a lot of product; where moisture can be left on the mats, carpets or fabric seats etc. may cause the car to get damp inside. Try to get the interior as dry as possible before closing up the car.
Patterns
Optional Step: There are a few little gadgets on the market that can make the interior look quite cool. These carpet brushes will align the carpet tread in different ways. Some of the brushes are nylon, natural bristles or just rubber blocks with mini spikes. They are often relatively cheap.


Not often seen to be honest but it’s quite fun. Some professional detailers may do this finishing step, just because they can. Seeing the trunk all brushed can look quire impressive.


Not to every body’s taste, but your imagination is only limit on this step should you choose to do it.
Air fresheners
After a while a car get a little stuffy. Especially in the winter months when no windows or ventilation is running. Transporting pets, after they have just run around a damp field can make the car smell, damp dog being the expression. Vacuuming the carpets and cleaning them will make a difference. Where you sit on fabric seats can hold bodily odours (I don’t need to spell that out!). Smoking certainly will make the car smell pretty bad. Perhaps a a leaked bottle of juice or something from the shopping can soak into the carpet. more often than not just the moisture can make a car smell.
TIP: Treat the source not try and mask the problem, if the floor is wet, clean and dry it. If something spilled, clean it.
Air conditioning units and cabin filters can be a big culprits too, the filters can get clogged and will just re-circulate the odours. There are products on the market that are like a deodorant bomb that just blitz the inside of the car for some serious overkill.
Process:
Start the car, turn the air conditioning on to recirculate within the car to max. Place the can in the car and press the button and shut the doors, quick. The can will deploy into the car and be recirculated by the air conditioning going through the filters. After 15 minutes you should be all nice and fresh depending on your choice of scent. The scent should stick to the softer furnishing in the vehicle like seats carpets or head liner etc.


TIP: Replace the cabin filters regularly, they aren’t that expensive and can make the interior much nicer.
TIP: Old school trick is to leave a bowl of baking soda in the car overnight, this will absorb most odours. Sprinkle some baking soda into the carpet and work it around the fibres before vacuuming it away.
Cigarette odours and stains are the worst, not to mention the lingering smell. The residue from the smoke and tar will often make surfaces turn into a yellow/brown stain, especially headliners where the smoke rises. To clean this sort of stain is extremely difficult, where cleaning doesn’t work, it’s damaged. Steam cleaners are good at loosening some of the stains, but care should be taken that the area getting the steam clean can handle it. A mixture of chemicals sometimes harsher than the car cleaning products could do the trick. I don’t really want to go down the rabbit hole for this one, you will need to do some serious homework or even get a professional clean.
Fragrances:
A list of some of the more common and popular fragrances: Black Ice, New Car Scent, Vanilla, Apple, Berry, Cherry, Coconut, Beach, Mountain Pine, Fresh Grass, Coconut, Leather, Tutti Frutti, Yankee Candle (various), Gentlemen scent (fresh shave), Barber, Rose, Lavender, Bubblegum, Apple, Citrus, Forest, Peach, Rain Forest, Musk, Summer Linen, Water Melon, Stripper Scent, Chocolate, Rio Carnival, London Flair, Jasmine, Spice or Baccarat Rouge 540 Extract and so on. Personal taste, preference of application and budget is a staggering choice.
TIP: Make your own! There are kits you can buy that have the essential base carrier oils, just add the concentrate, mix and match if you get the artistic flair.
Designs:
This quickest way to make a car smell nice is the good old air freshener. These can be hanging of the mirror, old school dash switches, coat hooks, stuck on glass, even attached under the seats etc. They come in many forms spray, pots, card, wood, leather, plastic, glass, static, vent mounted or even solar power! They come various forms such as use once, refillable or make your own.
Hanging style is the most popular for ease and cost. Little Trees or Jelly Belly, novelty or branded can vary in longevity. Some cheaper ones will only last a week or so, some can last for a few weeks. This type of freshener is typically card and soaked with the scent. The more upmarket you go the construction can get more elaborate. Some hanging items are made of natural products like leather, wood, or a jar with a some sort of wick idea. These tend to last longer, but are a premium and can be a mini status symbol. They can be very cheap like £1 each up to silly money like £100 for the top luxury products that will last quite a while.
Vent mounted are simply slipped onto the vents, so when the air is turned up you get a stream of your selected scent. These can be variable with a some sort of restriction. The vent styles tend to be refillable and can be expensive depending on style and brand.
Static styles are the round pots that can sit in cup holders or dash mounted. The contents are a some sort of waxy material that gives a steady odour, often lasting much longer. A good option is the sort that clips under the seat out sight out of mind, suspended on elastic with little hooks. These tend to provide a little scent when the air is moved like opening a door or closing. I have had good results with this style and can last a decent time. Static styles are often upper end of the scale for prices.
Sprays, not taking into account the air bomb approach, many hand sprays either trigger bottles or little concentrated spritzers offer instant smell, but can disburse quickly.


TIP: If you use the disposable style, once they stop offering their scent, get some concentrate scent or essential oils and drop them onto the old air freshener for a new lease of life. I even use sprays to soak into the hanging car style. This works out much cheaper and can make the sprays last that much longer.
Quick Detailers
In essence these are a spray on waterless cleaning product. They are not a dedicated heavier cleaner as the waterless washes, they are also not a specific spray on wax either. Quick Detailers are the similar in principle, but are an aimed to fit between washing and waxing processes.
These quick detailers come from many manufacturers, some with specific claims and various ingredients added. These products are designed to ‘flash’ quicker or evaporate faster allowing for a quicker clean process. You don’t always want to be applying a wax at a car show and spend time getting the car clean. After driving to a car show I wipe the car over to remove the road dust or film. When I get home I do it all over again before I put the car away and cover it up.
These products are aimed at cleaning lighter dust or finger prints. If the car is kept pretty clean, then a full on Waterless wash isn’t that necessary as this type of product can cope with most light duties. These products are ideal for car shows or cleaning a bit of fresh bird stuff of the car.
The car should be in a fairly clean state as these products are to give a minor clean, enhance shine and keep it looking just washed and waxed. Don’t try and ‘clean’ the car with a quick detailer. I find after cleaning with a waterless wash I like to go back over the paint with a quick detailer to add an barrier.
Forms:
There are many products to choose from, some products work better on some car paints than others. Experimenting will get your preferred product. The ingredient additives will very from a basic no fuss cleaner or infused with Graphene, Ceramic, Carnauba or a hybrid of concoction of chemicals. Perhaps these are my favourite products to use the cars.


Old School, products like the Mitchell & King QD or Mirror Image Car Care Old School Quick Detailer are brilliant at cleaning and getting the job done. Perfect for removing other product residue and require little to no effort leaving an great shine behind.


Carnauba based products like the Chemical Guys P40 offer a great simple clean and provide nice a glossy layer of protection at the same. A recommended product.


DoDo Juice Red Mist and Meguiar’s basic quick detailers offer a general purpose quick detailer, good for a light clean and for a clay bar lubricant or a quick wipe over the wheel face.
Hybrid detailers like Meguiar’s Ultimate Quick Detailer, Chemical Guys Synthetic Quick Detailer are excellent all rounder products that offer the hybrid solution with good water beading and element protection properties.
Other products like Shelby that have Ceramic or Graphene require a little more work to buff to a shine. I found their exotic ingredients can cause some streaking and needed a couple of buff overs to get a clean even shine. But, they do give good results with beading if you can take the time and effort, as they aren’t quite as quick as other products.


Many brands make quick detailers, some are so much better than others. Depending on what you want; just a cleaner, warm depth, clearing up bird mess or an everyday run around quick cleaner the options are there for you.
Recommended: After waterless cleaning this quick detailer is great step to finish the paint and remove any traces of other products. Depending on the product you may be adding even more protection or more gloss.
Application:
The technique is exactly the same as the ‘Waterless’ clean as you should ‘Roll’ the cloth as you wipe the panel in a single direction, see the instructions above for Body Work Waterless above. Some products like to be sprayed on the cloth for application to avoid over application, other want an even spray on the panel. Once applied and worked on the panel to remove the dust or finger prints. Once the dirt, sticky or oily finger marks are lifted away, a quick buff with another clean cloth will give you a great shine again.
Depending on the quality of the product, sometimes a spray on and wipe over the panel won’t even need a buffing.
When in direct sun or the panel is hot, some detailers don’t like that and can flash quickly and leave a product residue behind. Work in small areas if that’s the case, or don’t do it at all depending on the product choice. Some products that have Carnauba are slower to flash away and give a longer working time with the product. Hybrid detailers can work well under a wide range of conditions.
Most detailers can be used on all surfaces, paint, glass, plastic, rubber or even wheels. At a car show to remove any brake dust on my chrome, a quick wipe over with a quick detailer which leaves the wheels sparkling again. This works even better if a wheel sealant has previously been used as the brake dust won’t stick. Using a graphene infused or carnauba detailer will also add an additional layer to the wheels.
Tip: Quick detailers are your secret weapon for cloths. When using a cloth for many reason, such as to buff a wax layer, or a drying towel, lightly spritz the surface of the towel to lubricate the fibres. This will also reduce drag on the cloth when buffing.
Paint Glossers
This is pretty hard core step and not always required. These products are designed to fill in the microscopic imperfections on the paint (clear coat) to leave an even gloss. They are like a glaze but the end step for paint. Some Show & Shine events where gloss is everything. these can make a difference. However, if you have paint that is well prepared and in great condition, topped with a premium wax, these won’t make that much difference. They can have advantages but aren’t quite the same as spray wax.
Optional Step: These are not cleaners, they are a short term layer or coating. The longevity will tend to diminish with a drive home in the rain or after a wet wash. If you understand their short lifespan and willing to pay for another product, another process and put the work in, then these may be worthwhile step for you.


I’ve had varying success with these products. The Meguiar’s actually made the gloss look worse after leaving some smears and I don’t use it at all now. The Mirror Image Car Care is a new product me which was amazing on the paint and also the chrome. I will certainly use this again at some shows for sure.
Application:
The paint must be clean. Each of these products require the product be sprayed onto the microfibre cloth, wipe over the panel in straight lines. Buff immediately with another clean cloth with an enhanced gloss and shine. A few minutes with a product like this could make a difference. Don’t allow to dry on the panel.
Glass
The thing you see most, or shouldn’t be seeing it at all. When driving you look out the glass and dirty glass will restrict that view. Some glass cleaners will offer additional benefits, like a rain protection. When putting your wipers on do the shudder? Perhaps it’s time for a glass clean. If the clean glass doesn’t cure it, then it may be time for new wiper blades.
Like paint, the glass can be pre cleaned with a dedicated glass polish to get the old debris of and road film from the glass. Once polished the simple cleaning for a crystal clear finish.
Glass polish:
Optional Step: A cream based product for a deep clean and ideal surface preparation
Application
Clean the glass first to remove any loose contaminates. Place a small amount of product onto an applicator pad and work onto the glass. No need for a cure time, once the glass is done, just buff to shine with a short nap cloth. I have seen this applied with a DA machine, but I wouldn’t recommend it on glass.


Cleaners
Glass cleaners can be a hot topic, many swear by home made mixes, like white vinegar and news paper which works well. But many are designed to give an instant cut through grime, grease and traffic film. Some of these original products contained ammonia as the cleaning agent and wasn’t a great smell. Now days they smell so much better like menthol and work just as well if not better.
Glass cleaners to have a pretty fast flash or evaporation point, working quickly with the product on the glass tends to avoid streaks.


Probably the most simplest of products to use and apply. Use a good quality glass cleaner with a dedicated glass cleaning cloth with the correct waffle weave and not a plush microfibre cloth. The glass cloths typically have no nap to them so they don’t shed their fibres back onto the glass, and the cloth can have more pressure to lift the dirt. The four brands above are the best I have used to date, with the Mirror Image Spritz being the best performer yet. But there’s not much in it. The type of cloth you use will play a big part of this process. Glass cleaners are the cheaper end of detailing products. Even household glass cleaners would do the job if you run out of your car brand.
Look for the products that have additives in them, like a water proofing agent. When driving these agents that have bonded to the glass tend to make the rain run off the screen without needing to use wipers for light droplets. Also a big bonus where a huge amount of water has been splashed onto the screen form a passing lorry or car. The water will disperse quickly before the wipers get there.
Application
Spray onto the glass and wipe, flipping the cloth regularly. Try not to overspray the glass cleaner onto the paint as some products could break down the layers of wax or protection, especially the more brutal ammonia based cleaners. Some cleaners are much more superior than others. Over application may see the product being spread around not lifting the dirt away and may leave smears. Try another application of product with a clean cloth. If that does work maybe time to try another brand. Cheap and cheerful isn’t so cheerful when having to keep cleaning the glass to remove the smears.
TIP: When cleaning the glass work in a single direction inside and the opposite on the outside. Any smears will be shown in the direction of the clean. For example; clean up and down outside the glass, and side to side for the inside. Which ever way the streaks are will tell you what needs another pass.
Where glass headlights are used these cleaning steps can be used. Where the headlights are plastic lenses, these require a little more care and be careful no to damage them.
Engine Bay
Optional Step: Now we are talking about some serious cleaning that may well be a step to far for many. Under that hood depending on age of vehicle, could be a work of art or just a engine doing it’s job. Modern cars often have huge plastic or carbon fibre covers over the top, all you really see is the manifolds, air intact, filler bottles, radiator and a few bits bolted on. Older cars tended to be more accessible with more things on display, for better or worse depending on you point of view.
Clean out the leaves and other objects that may be caught in grills or vents.
Cleaning the engine on a modern car with the plastic covers is a simple job, but can be messy. With a wet wash you use a cleaning agent and then jet wash it away and dry. As we are waterless cleaning our options can be a bit more limited. Most of the time the products will be degreasers and cleaners. Depending on the level of cleaning you may want to detail under the hood there are products for that too.
Caution: Never spray water or cleaning products directly into electrical equipment fittings. With Modern vehicles they may well be highly charged with electrical control equipment or cables. Refer to manuals what can or can’t be cleaned, what you can or certainly can’t touch.


Modern Cars Cleaning
Where you see orange cables in an EV these are the high voltage power cables, extreme caution is advised around them.
Depending on the type of component. The plastic covers are a good place to start, spray a cleaner or degreaser onto the part and work in with a soft brush or a cloth. The cheaper cloths can be used on these type of tasks when wiping the dirt to dry the part.


Products Like Chemical Guys VRP is great at plastic rejuvenation. can also be used outside. They can even come in handy wipes for the interiors.


If you can get your hands down the sides of the engine to the inner apron then a degreaser could be good choice for a clean. Where car colour paint is seen this can be cleaned and waxed just like the other paint surfaces.
There are also products called Engine Dressings that can add the next level of clean. Some plastic trim treatments can also be used to give a nice sharp black look, if that’s what you are after. To clean rubber parts spray the dressing onto the cloth and wipe over the part. Most rubber under the hood can be cleaned, and the plastic parts too. Don’t apply dressing to any belts as that may cause them to slip.


These engine dressings can also offer a layer of protection from the elements and keep plastics supple with the constant hot cold heat cycles of the engine. Metal parts visible could be given a little spruce with a metal polish and buffed to shine.
Older or Classic Car Cleaning
Many parts are mechanical and no so thing as fly by wire like modern cars. We’re going to go on the assumption that mechanical linkages, grease points, oil ways etc. everything is clean and in working order for those parts, we’re not maintaining a vehicle for this guide. If it’s has grease on it and it should be there, don’t clean it off to look clean.
Where the engine block is visible an engine degreaser can be good start with a small brush to keep those nooks and crevices clean. For rubber hoses, they can be be given a wipe over with an engine dressing to give a nice sheen. Don’t apply dressing to belts as they may slip. Where metal parts are exposed, more often than not a little bit of chrome bling is seen, a metal polish can be used and buffed to a shine. A nice shiny carb can look great with the hood up. Hose clips, rocker covers, brackets or metal linkages can all be cleaned.


Providing there is no grease or oil which has been missed, there is also the good ol’ waterless wash or quick detailers to give a clean. Wiping down the inside of the engine bay with a waterless products can make the car look totally different. Where painted metal is visible, you can apply a wax or sealer to protect the paint. Or if the engine bay is satin and not wanting a waxed look, engine dressing with the sheen look will be the best option.
I hope this guide gives you an idea on how to use the products. Always read the labels and use common sense. Misuse of the products may cause you damage, and I won’t be held liable for that.