
Cost: £32 + Shipping + Import Duty. Total to UK = £50 (slightly rounded cost)
(Purchased with my ow money.)
Date of Review: 27/12/2018
The Sales Pitch from Amazon:
Garage Parking Assistant’s unique design makes it extremely useful for vehicle parking inside the garage. Every time all the times, park your vehicle consistently at the same distance from the front wall. Power saver feature turns off the power when not being used and turns on automatically when it detects movement. The product comes with the double sided adhesive pads for the quick installation. The display unit and two sensors needs to be installed on the wall facing the bumper of the vehicle. Just plug in the ac adapter connector to the display unit and it is ready to go. The display shows the distance (in inches) between the bumper of the car and the sensors. You need to decide at what distance from the front wall you want to park the vehicle. Depending upon the length of the vehicle and length of the garage, the parking number may be different. Once you have the number, you can stop at the same number, every time you drive in the garage. The display shows the distance in inches from the closest sensor to the bumper. Maximum 99 inches distance is supported. The gap between the sensors can be between 4″ to 18″. Watch the video on http://www.garageparkingassistant.com.
Source: https://www.amazon.co.uk/gp/product/B075RWVKD6/ref=oh_aui_detailpage_o00_s00?ie=UTF8&psc=1
What You Get:


Product Description:
A twin sensor that detects motion of the vehicle and will automatically turn on (and off) to give a count down to your desired parking distance.
Instructions:
The only documentation that comes with the unit is this sheet of paper.


Basically you plug the sensors into the display unit, plug in the power supply, mount the sensors and your done.
Installation:
The setup has two sensors to be mounted on a wall which has 3M sticky pads for the purpose. A single dot for the sensors and a strips for the display unit. As I am not entirely convinced that the position I have for the sensors will be the final position I used sticky velcro tabs for the backs and for the wall. Temporary for now, when they prove to me that they work accurately I will then make them more permanent with the correct sticky tabs.


This is where I have a problem; the cables are short, that’s both the power supply being only 36″ long, and the sensor cables shorter by a few inches.
If you have a high hood vehicle then you could have difficulty seeing the display. The second issue is that the power supply is USA two pin plug. However the good news is that the power conversion is rated from 110v – 240v, so you just need a UK power adapter as well.


The sensors will need to be mounted between 4″ to 18″ apart. The measuring distances should be around 12″ away from measuring so the instructions say, but other product descriptions say 6″ minimum away. So the worst case scenario works for me.

The sensors should be looking at the bumper or a flat surface as the ideal points of reference. I mounted them at the only point I could see that would work. The reg plate under the bumper, this also gives the distance clearance required for the operating minimum from the wall. I measured the centre of the reg plate and measured the sensor to correspond at the middle of the reg plate and velcro the sensor in place.

The information says that the two sensors will read from the closest point from the two. To make sure that the sensor reads from the reg plate I moved the other sensor to the side as the front valance curves away to the indicator. Thus ensuring the reg plate is the picked up each time.
The display unit has fittings at the bottom for the two sensors and the power supply. There is also a larger USB ‘B’ type fitting that has no mention as to its use, however I suspect that this is for firmware updates perhaps.
I have emailed the company for an explanation and use.


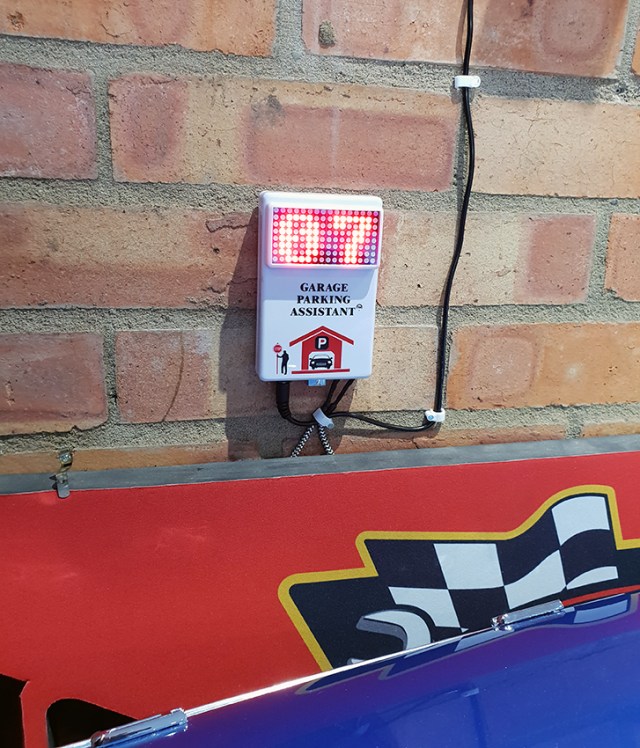
The display unit is a series of some LEDs that show large numbers in red. The camera doesn’t pick the colours up very well, but they are bright, red and clear.


I have lightly cable clipped the wires until I am sure that I wont need to move anything again. Once I am entirely happy then it will be all tidied up with the correct clips.
Operation:
Plugging in the unit and turning on will start ticker tape style display moving left to say ‘GPA 3 v6’ then it will show the measurements all within a few seconds. The display numbers should be still and not changing, if they constantly change then the sensors will need to be rechecked or repositioned. There is a green LED to show that the unit is powered up on the plug. With the adaptor fitted the now sideways mounted transformer sits above another plug so doesn’t take up any room, quite handy really.

The display has an auto shut down facility, if nothing moves for around twenty seconds or so the display flashes and then turns off. Move something in front or walk in front of them and the display springs back into life with the current measurement numbers.
I pushed the car backwards partially out of the garage and the sensors picked the car up at a distance of 40″. The max range of detection is noted as 99″.
Standing behind the car I pushed it back into the garage towards the exact spot where the car should be at its final positioning, while pushing the car back in the numbers did indeed start their count down, quite reassuring in fact.

The static position I needed turned out to be ’07’ on the display. I repeated this process a number of times back and forth until I was happy with the consistent count down. I put the wall protection padding back on the wall. Once again I pushed from the back in again to the distance of ’07’ and checked the car. Perfect.

Results:
So far so good and works consistently and accurately. This is one of the very few non battery operated units which was a big consideration for me. I didn’t want to mess around with batteries that could run out or start to give inconsistent reading considering just how close I have to park to the wall.
The sensors position the car where I need it to be. The car has to be driven in and out straight from the garage as there is no room to turn the wheels, and very little clearance from each side of the garage entrance, so in theory the distance should be the same each time.
The cables could look unsightly on the wall, but if the car is in front of it then you won’t see them. Mine are hidden by a large Snap On floor pad for now.
Rating: 9 out 10
I didn’t give top marks for the rating score because the I believe all the cables should be longer, especially the power lead. Supposing you didn’t have a plug where I have mine?
I will be updating this review in a number of months to let you know how it performs over time and continues to be accurate.
Conclusion:
Mains powered, easy to read, easy to install and works.
I park the car up for days or weeks at a time between car shows and nice days, especially over the winter season. So for me there is no need to have the unit switched on permanently, so for me the unit will be turned on when I take the car out ready for my return. If you are to move a daily driver car then there is no need to touch it once it has been setup. I do think the instructions should have explained the USB ‘B’ port and what it is for. If this is indeed for updates then this could be a considerable bonus over other options on the market for a similar idea.
Of course the way this has been set up means that only the Mustang will work the sensors. If another car is to be used, then a mutual sensor locations for each vehicle would need to be thought about.
Would I recommend it? Yes.
Would I buy it again? Yes. Although the shipping and import charges made it more expensive for the UK.