School Boy Error

As virtually all the car shows have cancelled or postponed this year due to the Covid-19 running riot there is a slight chance that two are still going ahead. Pre-booking has been essential and due to obvious reasons they have been over subscribed with people wanting to show their cars, or just get out for the day to look at cars. With this in mind I decided to give my little lady a check over as I always, tyres, levels, leaks etc. When I opened the hood there was a strange and a rather ‘funky’ smell. After each car show season has finished I take out my water washer bag, or colostomy bag as they are often referred to and empty it out and put it back to stop the water going bad. The reason being this is a breeding ground for bacteria, the engine bay gets hot, then cold, then hot again. The end of last year I forgot to empty it out and clean it. So, when I opened the lid on the bag it wasn’t good news.

I disconnected the bottom pipe from the bag, quickly put my finger over the drain hole and took out the bag to the drain where it was emptied out. There was some black algae in there, which needed lots of rinsing, some citrus cleaner and more rinsing in order to clean it out properly. It took a while, but in the end it ran clean and smelt a whole lot better.

The back of the bag also showed some signs of being dirty. I started to clean it and thought I would share it with you, so this is sort of a third of the way through it. I started then general wipe down with some Meguiar’s multi purpose cleaner. Spray on let it dwell, then with a brush work it into the bag. Rinse and repeat a few times.

After a few applications it came back to white again after being dried out.

The bag is now empty and waiting for a refill before the next show. I do add screen wash to the bag which stabilises the water a bit. If I have to use the screen jets I don’t want any of the mixture running onto the paint and leaving a stain which I would have to buff back out again. After all the screenwash has a mixture of chemicals in the product to cut through the dirt and grime. Also in order to help avoid water spots or marking I only use de-ionised water, it’s cheap enough and the de-ionised water is also much better for your car’s cooling as well. I always keep a litre of de-ionised water in the trunk, just in case.

While I was waiting for the cleaners to dwell on the washer bag, I decided that my valve caps were also dirty. I didn’t realise just how bad they were. Only one of the caps here has been cleaned and waxed. Yes, I do indeed wax my valve caps too.

With the hood up I thought that the underside looked a little dull, so I waxed that as well, just because I can. I also think it’s quite a cool picture too.
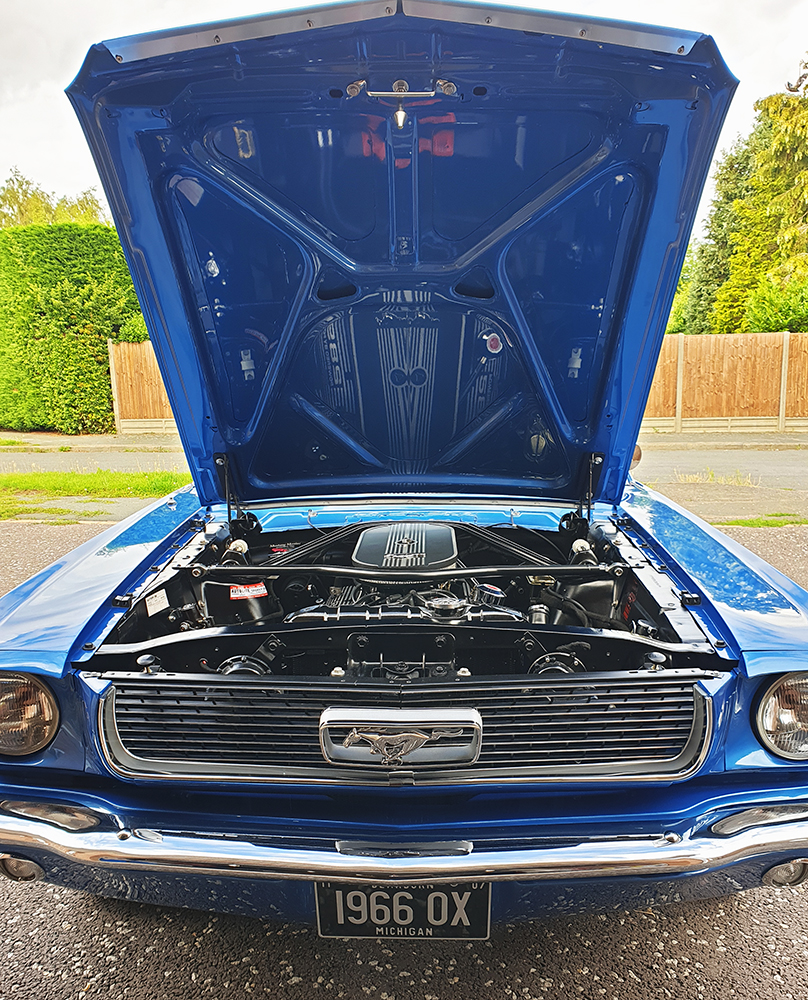
What turned out to be an hour or so quick check up turned into a few hours of cleaning. Not that I mind really, just a bit disappointed with myself that I forgot to do it. It must be my age 🙁

Will I get to a car show this year? Will mother nature be cruel and rain on the day that one of the only car shows is due to take place next Sunday? Watch this space and find out!

Share my Content

Don’t Be Negative

After last week’s post I had some great messages left for me and couple of nice emails too, so thank you. It was pointed out that I hadn’t actually posted a pic of the Krooklok in the car. Yep, I missed out one of the main points of what it looked like in the car. So to make amends here they are;

I don’t think it looks out of place either. Those with eagle eyes will spot that the pedal end of the lock is not shiny. Correct and this is something I eluded to in the last post. The metal end will damage paintwork on the pedal so i wrapped a little wire loom tape around it. This is a cloth tape and will cushion the metal on metal. On modern cars where the pedals are pretty much out of sight I wouldn’t need to do that. But as the Mustang pedals are clearly visible from outside the car chips in the black paint would look rather nasty. Also the cloth tape blends well to the pedals too.

While I was in the garage I had a little clean up under the hood, nothing special just a quick detailer wipe over to get some dust off. While I was at it I decided to change something that has been annoying me for quite a while now. This was the Negative battery cable terminal.

OK, so it doesn’t look wrong considering this isn’t the original wire, but a replacement cable for some reason or another. But, it looks sort of period correct so I left it, until now. I sourced a much more stock looking terminal and set about swapping them over.

The old terminal was a simple two screw squash the cable idea, simple enough to remove and will allow for corrosion for the exposed ends of the cable.

The cable separated easy enough and I cleaned it up with a wire brush to get it clean as possible. With the cable cleaned up I got my gas powered soldering iron out to prep the wire ends with some solder. As I was dealing with solder I put the heat resistant pad on the battery to stop any hot drips marking the plastic. The “Tinning” (a pre applied application of solder to aid in the final solder), had to be build up until a nice coating was all the way round the wire. I even cut back the sheath of the cable to expose some fresh wires. I slid a heat shrink tube over the cable which I would use later to give the finish a much cleaner look.

The next step I had to skip a little as I had one pair of hands to take the pics and do the work. I inserted the cable into the new terminal and clamped it in place with the two nuts on the top. Some stray long strands of wire were snipped of flush to the end of the terminal. With the cable in place I used some long nosed mole grips to hold the terminal up so I could fill the gap in the terminal with more solder.

This would give that neat finish I was after and make a great connection to the battery. My Dremel mini sanding discs were used flatten down the end as solder is a soft metal. With the end nice and flat the heat shrink was moved up to the terminal to cover any any gaps from the terminal and wire. Now the cable looks much nicer and neater and more importantly, the original stock look I was after.

I was able to refit the tightening bolt to the terminal and reconnect back to the battery.

The only remaining part now is to put the battery tag back on. I really am looking for things to do on the car now that don’t really need doing – just so I can do it. It only took about two hours from start to finish with the whole thing being cleaned and polished up. Well worth it as the wife was writing lots of lesson plans for her school. I was best out of the way! I think I may tidy up the other cable as well now. Also clean up the mats as they are pretty dirty too.

One of the simple little jobs was to swap out the interior bulbs for the LED equivalent. These included the footwell courtesy lights, and the rear centre console lights. They had the standard tungsten filament bulbs which gave out a warm glow. Not that I disliked it by any means, in fact that was the stock lock, I just wanted the more modern subtle look of a bright crisp white illumination.

The interior LED’s give out about three times as much light and shows of the internal colour scheme a bit better too. The pick above right was taken inside my garage and not outside in the sun.

What’s the next little job? I will think of something. 😉

Share my Content