Stopping With The Times

First post of the year so I wish you a Happy New Year, also hoping that you had a great Christmas and well-earned break too. This year my wife and I decided to ask each other what we wanted for gifts and that we would stick to a reasonable agreed budget between us. The simple reason is that we have spent most of our cash trying to sort our house out and trying to pay some bills off for the materials we used. The wife’s list was around the usual girly pampering lotions and potions as expected. Mine revolves around the Mustang with its own lotions and potions for its pampering. My list only had a couple of bottles from Auto Finesse I wanted to try out, which I will review throughout the year with the other products I have to review, around twenty in fact that I haven’t as yet reviewed. To make up my options for the list I wanted to update the garage and a little gadget for the car, both of which she bought for me. 😀

As my Mustang just fits in the garage with about an inch at the front and just a few inches to the rear. I can park the car pretty well, but I am paranoid about hitting the back of the garage wall for obvious reasons. To try and protect the car from such an event the wall now has foam pipe lagging stuck on the wall with a large Snap On floor pad on top of that. To stop in the right place I normally rely on the good old-fashioned hanging ball to touch the windscreen and works perfectly every time, but it doesn’t look pretty.

I have been looking on-line for parking aids; tyre ramps, laser, twin lasers and ultrasonic variations. Lasers looked like to much of a hassle and didn’t give much of a visual aid. Tyre ramps would get in the way and could be moved when the car wasn’t on them, so that left ultrasonic. There are so many variables on the market, traffic light style or single red LED varieties. I liked the look of was the twin sensors and a box mounted at eye level that gave a count down to the final position.

The set up needed a flat surface or bumper to work correctly. The mustang has very little in the way of a truly flat surfaces. The only relatively flat surface I could think of was the number plate. Some of the other sensor styles need a minimal distance of 12″ or so. This particular model needs a minimum of 6″ inches and takes the closest of the two readings. The sensors will activate when they detect movement and the count numbers display. So you park the car where you want and a number will be displayed. You then drive to that number and stop. Simple.

I made a few test locations and pushed the car out and back in again a few times. Each time the box did exactly what it was supposed to do, counted down. From the back of he car I pushed the car forward and stopped at the mark ’07’ (inches). Perfect. It doesn’t look neat at the moment as I want to make sure the positioning is correct before I tidy it up properly.

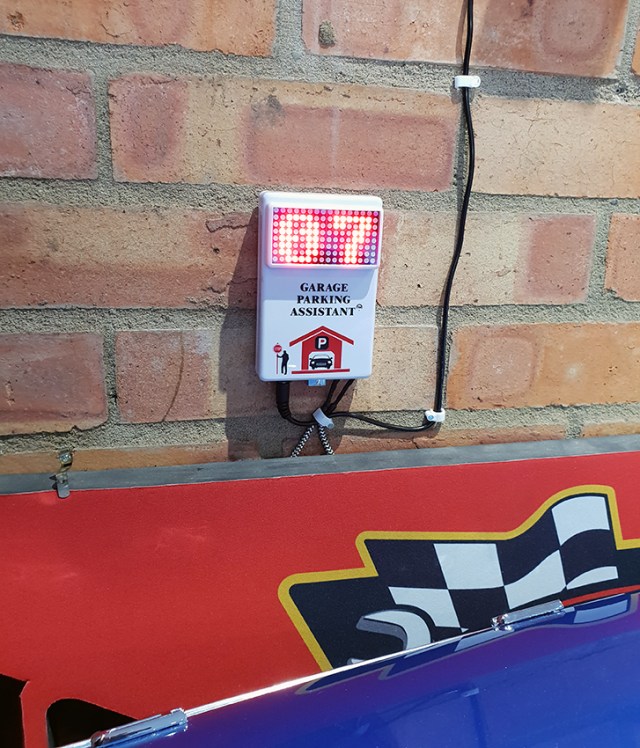
How close do I have to park to the wall? This close!

I have written a review of the product and installation here. Or it can be found under the Accessory menu.

Now my sense of direction is legendary, it’s so bad I get lost going home! Honestly it’s true. With that in mind, the other item I wanted was a something quite common in modern cars which is a bluetooth connection, but not that common on a classic Mustang. There are multiple ways around my little issue, a new technology radio made to look old – an expensive option. A new modern replacement radio that needs a hole cut into the dash – a lot of damage to the original dash, but can be cheaper. Or a halfway house that I have; an original Mustang radio adapted. My particular radio was sold to me as working when I bought it from the USA via Ebay. By the time I got the radio and was able to test the unit it certainly didn’t work anymore. 😠 Anyway, a contact of Mustang Maniac helped me out by connecting an input from a 3.5mm jack plug wire. This means that an ipod or phone needed a physical connection. It worked fine, but I wasn’t a lover of having a wire from the dash, blame my OCD for that. Then a friend of mine then told me about this gadget that connects a bluetooth dongle receiver and then inputs that signal into the radio, a similar setup to what I had, although he had a modern radio. This means that I could connect my phone for music, or more importantly, a Sat Nav turn by turn prompt. I already have a great Tom Tom Sat Nav which I could stick on the window, again my OCD didn’t like it and so I had it mounted on the centre console, the trouble with that is that I had to look down at it now and again as I couldn’t hear it over the engine noise, not exactly safe. With this new option I could have my radio on connected via bluetooth to my Samsung S9+ phone using Google Maps with voice turn by turn. The built in dash speaker is much louder than the Tom Tom unit so I would be able to hear what direction I needed to now. I could have speakers in the door, in the kick panels or in the rear parcel shelf. Again all of which my OCD won’t allow of course. Now I have a tiny receiver hidden in the glove box that just needs to be turned on and off I go.

It works and I love it. I have also written a review of it here.

So my old school Mustang still looks stock, but now the media function has been upgraded into the modern world again. This latest upgrade goes with the other modern goodies like my LED lights front and rear, modern wire loom with blade fuses, electronic ignition, LED dash bulbs, voltmeter etc.

Any other good gadgets out there I need to know about? Please let me know. This List idea works great as you get what you want and not a pair socks to go in the draw with the rest. In fact I got a pair of socks as well – but they had the Shelby Logo on them so they are acceptable. 😀

Share my Content

Clocking Alternators

When I first started the restoration of my car back in 2011 I had no working electrical parts at all when I bought the car. Firstly there was a fire under the dash were the nutter who owned the car before me had wrapped a fuse with tin foil for some reason. Secondly the original alternator had rusted up and I didn’t trust it. So the only option I could see was a replacement wire loom from American Autowire for the Ford Mustang. Their recommendation is to use a one wire alternator. The choice was limited at the time as a result, so the best option I found was Tuff Stuff. I purchased a standard v belt in chrome with a 100amp rating at the time.

However there was a problem with the terminal for the single positive wire. The stud it connects to sits about 1/4″ away from the block even at the maximum distance on the standard alternator bracket. These pictures of the stud in the normal position for Tuff Stuff alternators.

Initially I had my alternator bracket custom-made to move the alternator much further away from the block with a longer belt to make it work and be safe.

This was fine at the time, but the step for the belt clearance was now in the wrong place which meant that the bracket was just a millimetre away or so from the edge of the belt. This occasionally rubbed as you can see below. I kept a very close eye on the belt for signs of fraying or any damage to the belt. None of which has happened as a result of this modified bracket I might add.

Later on while browsing the net I didn’t realise that the case on these alternators could be adjusted by ‘Clocking’ or ‘Indexing’. Basically this means that you can move the body case around to where you want the stud to be by moving the front fittings. Nowhere could I find a step by step guide on how to do it.

Note: not all alternators can be ‘Clocked’ and you should check before you try doing it.

The only thing I found was these instructions from Tuff Stuff. Note ‘point 7’ mentions the use of torque settings for tightening the centre pulley nut. Interestingly Tuff Stuff use both terms ‘Clocking’ and ‘Indexing’ in the same document.

Nowhere is this ‘torque’ setting documented on the Tuff Stuff website, so I contacted Tuff Stuff for their ‘help’ and advice via their message process, for what good it was. Their automated response said I would ‘get a response within twenty-four hours’. After a few days nothing, so I tried again with a different email address. They responded the next day where they just sent me the instructions above with no words within the body of the email. My response was immediate back to them, stating that I already found the document on their website and asked again specifically for the torque settings. Their response with the following:

On 4 Oct 2018, at 14:12, Matt Oliver <matt@tuffstuffperformance.com> wrote:

We use an air wrench to put on all of the pulleys here. Thank you for your business. Have a great day!

Matt Oliver
Tech Manager

Hardly helpful when they say you should “torque to settings” which they obviously don’t do themselves. Not exactly confidence inspiring by any shape of the imagination, not to mention poor documentation.


So, with the lack of information I decided to do it myself!

As I had already fitted the alternator, the process below also shows the removal. If you have a new alternator you can skip these first few steps on removing the alternator and go straight to the ‘Clocking‘ process below.

  • First things first is to disconnect the battery.

Disconnect the single wire from the back of the alternator. Remove the tension bolt for the alternator which fits inside the bracket’s slot gap. Then loosen the hinge bolt at the top for the alternator. Unhook the v belt and remove the hinge bolt fully, taking the weight of the alternator remove it to a work bench.

Figure 1


My research and a warning;

If you read some of the forums out there on this subject, they say that you can undo the four case bolts and move the back around then retighten. This saves the hassle of undoing the rotor nut. WRONG. This could damage the springs and brushes internal components within the rear housing. You should only clock/index the alternator by moving the FRONT housing part of the case only.


‘Clocking’ process – also called ‘Indexing’

With the alternator on its side we will need to lock the cooling fan in place. I used a long-handled probe between the fins and resting on the bench surface. A screwdriver could also do the job.

The fins are not evenly spaced, and you will need to find the best place to wedge your locking tool in place. This should be on the same side (left) looking from the front of the alternator when you are undoing the rotor nut counter-clockwise.

The best way to remove the rotor nut is to use an impact wrench. I used my cordless Snap-On 3/8 impact driver with a 15/16ths impact socket. It’s for this very reason that people incorrectly move the back part of the case around, just because it’s easier.

Holding as much of the unit still as you can, buzz the nut until it’s undone. Once the nut has been removed take out the locking bar you have used.

With the nut fully removed depending on your pulley type, (remove the parts one at a time, taking note of how they fitted together). Remove the spring washer next, then remove the v pulley from the face plate, followed by the polished face plate.

The final part is to slide of the fan itself. You will notice it has a key way cut out, but there is no key way on the rotor shaft itself, just a plain round shaft as shown. You can clearly see the uneven fan spacing here that I mentioned earlier.

There are four case bolts 5/16th which need to be loosened from the back of the case, I used a ratchet to break them free before using a cordless screwdriver to undo the rest. The bolts are quite long seated into the front half of the casing.

Once the four bolts are removed, hold the case together while resting the alternator on its back with the rotor facing up.

Gently separate the top from the stator (the black plates between the top and bottom half of the case). Lift up the top part of the case to a max of 1/4″ without disturbing the stator. Turn the front case by 90deg increments to where you need it to be. The pics I have marked below showing the gaps between the case during the indexing process.

Re-align the two halves of the case again and lower the top part of the case back down.

With the top is in place, hold the case together to stop it moving and turn the alternator onto its side again, finger tighten the four long case bolts back up. Spin the shaft to make sure that there is no snagging and spins freely.

Check that he rear stud is where you need it to be, perhaps do a dummy fit to the engine if required. Once you are happy with the location, tighten the case bolts back up. Do not over tighten the four case bolts, I recommend using the manual ratchet for the final tightening.

Spin the shaft once again to make sure it’s all still free spinning.


While the alternator was apart I took the opportunity to clean the case and the front sections. I was not happy to find bits of the chrome flaking of. I used Auto Finesse metal polish to remove the marks on the chrome and then Auto Finesse mint rims wax to seal the chrome.

I didn’t clean the spring washer or the back of the locking nut too much. The simple reason is that friction is required for the hold all the components on the rotor shaft.


Refitting The Parts

At this point you could replace the pulley style if they is your intention to change the look or function to a Serpentine setup maybe.

Replace the fan onto the shaft first making sure the fins are facing backwards.

Next make sure the cover plate is fitted the correct way round with the dish section fitting inside the fan recess.

Next is the v belt pulley that will sit flush onto the face plate, again the raised section fitting into the recess of the face plate now.

Slide the spring washer into the shaft and into the v pulley recess. Finally the nut is fitted and finger tightened for now. Spin the rotor to make sure all is free and not snagged anywhere.

Now insert the locking tool you used earlier on the other side (right) between the fan blades to hold the section still once again. Now re-impact the nut clockwise back into place securely.

Remove your locking tool and recheck that the whole section spins freely again.


Refitting the alternator

Place the long pivot bolt and washer into the pivot section of the alternator and through any spacer required to align the pulleys up correctly to the lower crank pulley. Finger tighten the bolt for now into the engine block. See ‘Figure 1‘ above.

If you are mounting the alternator bracket for the first time, lightly tighten the bolt above the main crank pulleys to hold the bracket in place, but movable to locate the tension bolt.

Next insert the tension bolt and spring washer through the bracket slot into the alternator case. Slip the v belt over the pulley. See Figure 1 above.

Pull the alternator to tension and tighten the tension bolt just enough to hold the alternator in place for now. There should be 1/4″ to 1/2″ movement up and down on the belt. I prefer the twist method for the belt, twisting the belt 90deg in the middle between pulleys.

Once you are happy then fully tighten the tension bolt, Pivot bolt and the bracket bolt if needed.


At this point I took the time to clean up the cables up before refitting them. Connect the one wire back to the alternator stud and tighten up. Reattach the battery connection.

Start the car and make sure that you are charging correctly and that the belt is not slipping on the pulleys.

At this point I tidied up all the cables around the solenoid, the battery cable to the alternator, the cables for the engine block and starter motor so it all looks neat and tidy again.

That’s it, all done and took three hours in total which included the cleaning, rewrapping of cables, photos for this walk-through and tidying up of cables. I also have to clean all my tools after I have used them. It’s all part of my OCD problem regarding my tool box. I intend to get the proper bracket and belt shortly, but it’s not important right now as it still all works.

As far as I know, this is the only guide for a Tuff Stuff alternator clocking. I hope it helps somebody else out there. Apologies for the more tech styled post, but I had to share it. 🙂

Share my Content

What Do I Carry?

A little while ago I was going to make a post about what I carry in my car’s trunk after I was asked at a previous car show. This got me thinking that I should do my own post and help other future classic car owners. I started to prepare for it but didn’t post until now.

It seems as though great minds think alike as I was beaten to the post by a fellow blogger and friend of mine Dennis from https://customsclassics.wordpress.com/  who had already asked the question from his readers, it’s well worth a look at his diverse and interesting Blog.

I was also very interested in what other people carry with them for emergencies or in their “skeleton” tool kit as I tend to refer to mine as. But, I am very much under the impression that if you need heavy-duty tools then it’s not going to be a quick fix by the side of the road anyway, don’t even try, just get it transported back home and do it properly.

So just what do I carry?

Tools:

Spanners; this is a Snap-On set of seven imperial spanners in a tool roll. The tool roll also has a standard pair of pliers and a Stanley Knife. The zip section holds a couple of heavy weave cloth rags and some latex gloves.

Small socket & screwdriver set with 1/4″ drive; this is a metric and imperial set of sockets with a ratchet screw driver style handle. These sockets go up to 13mm and 1/2″ respectively. Obviously these small sockets are not for any real load bearing fasteners. The handle also has a set of bits for the screwdriver all housed in a neat case.

Socket set; this is a larger set of metric with a pretty  average ratchet handle for 3/8ths drive. The set also has a set of long-nosed pliers, an adjustable spanner, a pair of mole grips, a pair of wire cutters and a small set of small metric Allen keys. This is not Snap-On quality set like the stuff I have at home, but this is more like the weekend mechanic set that will last some grief, to get you out the tight spot in order to get you home, all held in a nice blow moulded case. Within this case I have added a 14mm spark plug socket, ideally I need a thin-walled version with a universal joint at the top for those awkward 3,4,6 and 7 cylinders. A length of coiled wire could always be useful if you have a break in a wire and some electrical tape.

There is a Snap-On on magnetic torch with multi LEDs or a spot beam, a quick access knife from Craftsman.

As my car has now been upgraded with regards to the wire look I carry a selection of modern blade fuses with a couple of extras for the more loaded fuses.

All these items are held secure in a Mustang tote bag that sits on the left side drop off point in the trunk. Thanks to Adam at Mustang Maniac who gifted that and some other goodies for a rather big birthday milestone! Let’s just leave that one there shall we?

As the car is an automatic you can’t bump start the car, so you need power to start it. So I carry this portable charger that not only starts the car but also charges other devices such as mobiles etc. I reviewed the kit previously, click here for the link. It has to be one of my favorite gadgets to be honest.

I carry a kneeling pad just in case the ground is stony and/or to protect any decent clothing I could be wearing. Can anybody guess what year I purchased this pad?

To give you a clue, I was at that amazing F1 circuit before it all changed, where Nigel Mansell won the race, the legendary Ayrton Senna was second, and the future seven time world champion Michael Schumacher was third. What an amazing race and a perfect podium line up for me. All my heroes on one awesome podium.

I also carry a car seat cover in case I get dirty, that will protect the seats until I get home or changed into something clean again. The cover which rolls up quite small, is a rather nice Limited Edition in blue with white stripes, that was given to me by my friendly Snap-On rep. I had a little bit of spending spree with him after a great haul of Snap-On credit vouchers I had been given for gifts over the year. I also sold a kidney, left arm and left leg for the other stuff I wanted, after all I still need the right leg for the gas, and the right arm for the gear shift so I couldn’t sell those! Only joking – it was both kidneys and my liver! But hey, it was worth it.

The spare wheel has modern scissor jack underneath it and a wheel brace with an extendable handle.

Fluids:

The fluids are very important in old cars and need to be checked regularly, so I carry a litre of Kendal 20 – 50W oil, some lead replacement additive for the fuel and a two litres of plain water for the radiator or the water washers. I make sure that I always check my levels before every single trip I make.

Fuel. If I am going on a long(ish) journey I will take a spare one gallon can of fuel. I didn’t post a pic of it as everybody knows what a plastic fuel can looks like. Mine is a nice new silver one. Although it has fuel in it I won’t leave it in there for a long time, I use it up after a few months then replace it just to make sure the fuel doesn’t go off!

Cleaning:

When travelling to car shows I always take a small selection of essential cleaning products. That is a case with the top up cleaners.

If I turn up and the car is dirty I can waterless wash the car very carefully with the Meguiar’s Wash & Wax Anywhere, (review to come). But before I do that I will dust the car down with a genuine California Duster to get all the dust and debris of the car. If the car is clean I will just do a quick mop over with the Meguiar’s Ultimate Detailer, review to come.

Under the hood is the Meguiar’s Engine Dressing (review to come), and the tyres are also catered for with the Meguiar’s Endurance Tire Gel (review to come).

Glass is looked after by the pretty awesome DoDo Juice Clearly Menthal (review here), and I carry a little pot of DoDo Juice Future Armour (review to come) for that extra sealer if required.

The essential part I will never travel without is the Gibbs Brand Lubricant. (Review here). The only thing to remain is the handful of latex gloves to keep clean, not that i use them for detailing the car.

In case it rains I carry a Chemical Guys Wooly Mammoth drying towel (review to come), and a selection of micro fibre cloths for those wipe on and buff off products. At a push they can also be used for cleaning. Last but not least is a roll of blue paper towel.

I’m not sure what could happen, but I try to cater for most eventualities. The micro fibre cloths are for cleaning but could be used for cleaning if I had to of course.

The last non essential thing is my show board. I am in the process of making my own stand for it.

What do you carry, or recommend for me to have in my little skeleton kit, did I miss anything?

Share my Content

Security Measures

This time of year is amazing for a few reasons, the first is the start of the warmer weather here in the UK, hopefully followed by a nice summer. The second is the Car Show season is underway as I mentioned before. The third reason is can’t wait for the Hay Fever to kick in and make me feel rubbish, joke! Still, I can’t think of anything nicer (car related), than driving to a classic car to show, parking her up and have people appreciate all your hard work. A sense of pride comes over every owner of their much-loved and cherished cars, that’s regardless of the car’s make, age or condition. But, there is one thing that worries me now and that’s security.

I have been talking to a couple of owners of some UK Ford owners at shows and the buzz word is “GPS”. No, I don’t mean the fact people use their SatNavs to get the shows, but more so what happens during and after the show. The very worrying story going around is that a particular car is target by organised gangs who are on the look out for quick sale car, or for some specific cars to be sold on as parts. Some of these car’s parts are worth more as “breaking” than the whole car to sell it complete, with the added risk of selling on an obviously stolen classic car. These top quality original parts are sold on to unsuspecting owners, not knowing that the parts they have bought have been stolen from such other classic cars.

How do they do it?

The answer is just to simple. These gangs are using small GPS tags and hiding them on your car during the show. Somebody could be talking to you while the other places the tag on the car without you knowing. When you leave the show they will track the GPS tag to the place where the car is kept. They then make plans on how to steal it at a later date.

There are some gadgets on the market that detect these sort of things by detecting transmissions of frequencies. They vary in price considerably and I bought one of the cheaper ones. Believe it or not it works! I was going to do a review of it, but not sure if it’s worth while as it’s so simple.

You turn it on and adjust the sensitivity and then wave it over your car. Yes you may look a little strange doing it. What I tend to do now is drive off and find a quiet place then pull over and check. This gadget is the size of a pack of ten cigarettes and has a long aerial to pull out for detection. The unit has a rechargeable battery inside that lasts for ages, wave it near your mobile phone and it has a melt down. There is another feature on the device to detect pin hole cameras by reflection using the red filter to look through. I’m not bothered with that to be honest. So now I carry one of these with me in the car now and check when I leave the show. Over kill? I suspect so, but to safe is better than sorry!

I’m waiting for the next car show and I had a little brain wave while in my garage. I was cleaning my toolbox while looking for things to do in the garage. When I decided to protect the paint! This toolbox was bought for me as Birthday present and Christmas together as they are pretty close together just after the wife bought the project car for me. The tool box was a second-hand purchase, in near mint condition. It was more than we wanted to pay, but it was worth it for the relatively small bargain amount. The guy wanted a very quick sale as he was moving and needed the money, I was just lucky to be looking on eBay at the right time when I saw it and “Buy it now” button was pressed. So just like my car this toolbox is very sentimental to me, almost as much as my car. At the end of the day, you get what you pay for and nobody can deny the Snap-On quality.

The tops of the draws are the areas I was thinking of, although I clean my tools before I put them away carefully, there may be times where I could chip the paint, as the marks show here from the previous owner when I got the box home. I knew they were there, they are tiny yes, but enough to worry me for accidental damage.

So what was the solution? Vinyl wrap. I looked around for some ideas and came up with Carbon Fibre. I worked out roughly how much I needed and ordered some quality wrap and not the cheap stuff. If I didn’t like it, I could remove it and it was going to be back to where it was. The ideal size was going to be five centimeters to allow the cover to the front, over the top of the draw and secure at the back. An old hardwood shelf made an ideal cutting top with a scalpel and a spirit level for a straight edge to cut the strips.

Degrease the draws with cleaners and allow to dry. Peel of the backing from the wrap and carefully to stick to the front of the draws on top of the chrome trim. Using a hairdryer heat up the wrap until it’s soft to allow you to bend the wrap smoothly over the angles and to make the glue more tacky. From the very front edge press the wrap down evenly to remove any wrinkles or air bubbles. Trim the ends up as you need to.

Then with the firmly down on top heat the back edge and repeat.

I am really pleased with the results and it doesn’t detract away from the Snap-On look.

So the before and after? Good job or pimped it up to much. I could have used clear or a plain coloured wrap of course. But this was a little different.

So back to securityagain. I have lots of it, including the very simple and brutal chaining of this tool box to the wall, brutal and simple. The other serious measures I have taken will give the game away, but the my car, garage and house are very well protected from low life scum bags who want to steal other people’s property and hard work. It’s not so much the money as it’s all well insured. It’s the fact that nobody can ever replace the sentimental value, or even come close to repaying my physical man hours to restore that car.

Am I just plain ol’ parnoid, or does anybody else have good tips to share with other classic car owners and readers? Are these stories I have been hearing scare tactics or the real deal? Please let me and everybody else know.

Share my Content

Bubble Bath

As soon as the sun is out, the car is out and I drive her whenever I can. As the weather is nice the car is not getting dirty as such, but I noticed a layer of dust on the car after the last rip. So I put the car away uncovered as it was about to rain. Sunday was a glorious day until the evening at least, so made the most of the sunshine and decided to put water on my car for the first time. Usually every birthday, Christmas, Easter or just about any excuse really, people ask me what I want, normally I reply “Snap On”. Over the years I now have a nice collection of tools which have all been invaluable while I was restoring my car. They will always be used for services and any jobs that need doing of course. Surprising a few people last Christmas and my Birthday, I have now started to ask for something different. Now I say “Car cleaning stuff please.” This is just the start of it and I have almost double this little lot now!

clean1

The trouble is that there is so much on the market now when do you begin with it all? On my other cars I used Autoglym and that was always good enough and not to expensive as I didn’t know any better. Since then I have been looking for some real performance products to use on my car. A good friend of mine Craig has been recommending a few products to me and his car is always spotless, another petrol head and a real car cleaning nut. Meguiar’s always seems to be at the top of people’s lists. Since then I have been pretty sad (so I have been told), about this and read hundreds of reviews, watched hours and hours of videos and decided Meguiar’s is what I will go for and the look I am after. Meguiar’s has over two hundred products to choose from, with all this information my head went into melt down to start with. There are cleaners, waxes, polishes, swirl removers, sealers, detailer, quick detailer, restorers, liquid versions, wax versions, spray versions, wash & wax, applicators, mits, cloths, water magnets, premium, ultimate, professional, gold etc. You get the idea. Apparently when you step up from the bucket and sponge scenario and spend real time washing and waxing your car, you are now know as a car detailer. As a result I have bought different makes of products for very specific jobs now. I now have a special bucket that has a grit filter at the bottom, and sponges are a definite no go now. Wash mits are the norm and water magnets instead of old school chamois leathers. The shampoo I used is by “Chemical Guys” called “Glossworkz”. I have even bought a snow foam device for my jet washer.

A while ago now I purchased a cowl cover from Mustang Maniac which is a magnetic idea that stops rain getting into the cowl section. That is the big white thing you see below the windscreen. For some reason I was nervous to put water on the car, I have washed more makes of car than I care to mention, but this was different somehow. A low setting on the jet wash to rinse the car off was where I was going to start.

clean2

The previous wax from Meguiar’s made the water immediately bead away, which made me smile. Next was to foam some “Glossworkz” onto the car, again this ran straight off when it was supposed to foam all over and sTay there. Now I am sure I done it wrong, by the time I found the camera again the foam was disappearing.

clean6

Now came the fully washed and super soft lambs wool wash mit, I pulled it on like a boxing glove and took a deep breath. I dipped it all into my new grit protected bucket with a little more shampoo and started on the roof, hood, trunk and then the sides. Frequently dipping into the bucket and washing out the mit. The car was silky smooth under the mit and glided across the paint.

clean4

Rinse it all down again with the low power jet washer then it time to dry with the “Wooly Mammoth”.

17d78edd435665af

This drying towel is huge, super thick and fluffy, you just lay it on the panel and move it slightly and the water is gone. Amazing, none of the old wipe it, spread it about, wring it out and repeat again like with a chamois leather. This helps to reduce the chances of scratching that precious paint job. Within a minute or two the car was dry, the best part of this bit was that the towel was only damp after all that. Wash & Wax then dry was technically done now, but I wanted to try out a new wax. Meguiar’s Ultimate Wax.

M-ultipastewax7

I intend to review these purchased products properly going forward under their own section on my blog for car detailing products. So, I won’t go into all the boring details just now, but I spent hours applying the wax and buffing it all off, polishing the chrome, cleaning the windows inside and out. Here are a couple of pics of the half and half as I was going along. It’s difficult to show in the pics, but the first is the hood with the wax applied, the second is the half the hood buffed off.

On this pic I dangled the pro series micro fibre cloth to show the depth of shine. But then you can see the top of the house too in the reflection. There are even different quality of microfiber cloths, but is there a difference? Yes, there is when you compare them next to each other.M-ultipastewax6

A perfect day for waxing the car, overcast, warm with a slight breeze. A great day, and a car washed, waxed and buffed to a mirror finish. I started the car up and covered her up in the garage. I was happy if not aching a bit.

As I mentioned earlier, I want to review these products as the choice out there is just min boggling, Meguiar’s, Chemical Guys,  DoDo Juice, Autoglym etc. I will let you know when the first review is posted. If you have any recommendations, tips or secrets you don’t mind sharing please let me know.

Share my Content

Cover Up

My arrival at Mustang Maniac this week was a bit of a shock, as my car had gone. Not stolen or anything like that of course, but the car was not in the garage where it usually is. I had a wander around trying to find it, often interrupted with Adam or Yogi laughing while moving lorries around shouting “You found your car yet?” I knew it the was there somewhere due to the extra work they had been doing in my absence. I eventually found it in a workshop stored next to very well know celebrity’s car all covered up. I bought a cover for the car a couple of weeks ago from Adam to keep it clean rather than the static sheet. Now I’m not sure what the guys had been making their tea with but they were laughing at the “Enos” sticker stuck on the cover. I must explain that “Enos” is Adam’s budget range of parts. To see budget on my car just cracked me up and few words were uttered, but it was a very funny few moments.

The guys had taken the car off the ramps as they needed to get another car up there and my car also needed to have the steering and suspension geometry set up, so it was perfect timing to be fair. The guys managed to set up the geo up after a bit of work with the shims and drove it to the storage shed ready for my visit.

The guys contacted me during the week to say that they had tried to sort out the erratic running of the engine on idle which was pointing to the carb. They tweaked it as much as they could, but it was still not quite right for Adam’s liking. The guys took the old Holley apart and found there were some problems with corrosion and the seals. So the conversation wasa very short one and resulted in a new one, besides the new ones looks absolutely brilliant and better than my old one, a jewel in the crown as it were. This is the same capacity carb as my other one a 600cfm, but a more updated version of it.

airfilter7

The vacuum advance pipe was looking a bit of a mess, so Adam gave me a new one. I offered the pipe up in position and the pipe was going to hit the Monte Carlo bar unless I bent it in strange positions to make it fit.

vacuum3

The decision was to replace the vacuum advance with a ’66 version where a rubber hose connects to the carb and the distributor. The only trouble is that I would have to remove the old vacuum advance valve and fit a new one. That caused a problem with the Pertronix ignition sensor on top of the distributor palte as it overhung the vacuum actuator arm, so it all had to come apart.

With the new vacuum valve in place, the gap had to be reset for the Pertronix ignition. The new distributor cap and rotor arm were clipped back in place, finally push on the rubber hose to the carb and the other end to the vacuum valve. A much nicer looking job I must say.

vacuum4

With the engine now completed again except for the spark plug leads (which will be changed a little later), it was time to move on to something a little more bling.

airfilter9

The problem here is that the I have a left hand drive car in a left hand driving country, in other words i am sitting next to the pavement. Mirrors on the Mustangs at this time were fitted with inside rearview and the driver’s side, which wouldn’t give me much visibility on the roads here. There was of course an option to have the mirror on the right hand side too as an option when the car was ordered. I decided that I would need to have both sides to be safe, so Adam got me a couple of door mirrors out which he strangely had sitting on the side ready. I picked them up and took the to the car and opened the box. Inside was the “show quality” mirror and a paper template which was really nice touch for both sides. I cut the templates out and stuck them to the top of the door where they should go. The templates even had tiny cut outs to fit exactly where the front quarter vents were. I stuck the templates down and looked for the drill.

mirror2

The holes were marked out for the drill locations. I dummy fitted the mirror just to make sure the vent opened and closed without issue which it did of course. Two holes were drilled and I sprayed an anti rust primer down the holes and wiped the excess away.

Between the door paintwork itself and the mirror is a rubber/plastic type gasket. I applied a very thin layer of gasket sealer around the gasket to stop water (if any) running into the whole and making them rust out. Pressing the gasket down over the holes allowed the mirror to be screwed into place which then squashed out the excess gasket sealer. A little Gibbs and a lint free cloth wiped away the excess to leave a nice sealed black gasket that nobody can tell has been sealed at all, if that makes sense? The other box was upside down, I turned it over to find another of the pesky “Enos” stickers on my mirror now. God knows what they have been on today, but it was funny. I would like to point out at this point they are not the “Enos range” here, they are the “Show Quality” versions!

The right hand side was repeated in exactly the same way and looked pretty cool with the mirrors on.

Double checking that the front quarter vents clear the mirrors nicely, it would be a bit late if they didn’t to be honest as I already had drilled the holes.

Inside was finished of by screwing in the rearview mirror which also houses the sun visor stops.

sunvisor2

The carpets were treated to some mats to stop the dirt from the yard, already that had started to do their job. They do look great with the pony logo embossed on them.

Last job of the day was to put the wheel centre caps in place. You have to take the wheel off, screw in a plate to th centre cap and refit the wheel. I went for the plain Mustang logo which matched the wheels. Of course I had to make sure the horses were all in line with the BFGoodrich White Lettering which I still haven’t cleaned up yet.

wheelcap3

All this work brought us to the end of the day where it was starting to get dark. Adam decided we should have an impromptu check of the lights. So I took a few pics with the park lights then the main headlights. I had a little play in Photoshop to make the effects look a little different. I was surprised to see just how much the rear LED’s illuminated the back of the workshop.

lights2

lights7

From a couple of weeks ago I posted “Eye Candy” which showed how to fit the GT Dash into the car’s main dash. I have had a request since then if I can do a walk through for the process. I have split the process out into removing and refitting, then sub sections for various gauges and the process to fit or remove them under the “How To…” menu. Click here for the quick link.

Over the years I have done a lot of work on the dash to get it looking how it should, so I have also got a link here on how to restore the dash gauge set and make an Ammeter to Voltmeter conversion.

Click here for the quick link.

While we are on the subject of requests I have been asked a number of times now about the Drum Brake Pliers I reviewed (Click here) from Sealey and how to use them. I decided to copy the usage diagrams and put them with the Tools Review menu. There are other tools out there that I would recommend over the Sealey tool but the Snap On tool is a lot more money. The majority of the general purpose Brake Spring Pliers look like this so I Hope it helps.

Click here for the diagrams quick link.

Quick links:

GT Dash & Gauges:  http://onemanandhismustang.com/removing-the-gauge-dash-gauges/

Drum Brake Pliers Reviews: http://onemanandhismustang.com/sealey-tools-vs035-brake-shoe-spring-pliers/

How to use Drum Brake Pliers: http://onemanandhismustang.com/how-to-use-brake-spring-pliers/

Next week there are a few more jobs to be done, I hope the main task is the seats. Toby the Trimmer is on the case and should be done with them very soon. Fingers crossed.

Goodnight my little lady – see you next week. 🙂

Share my Content

A Little Spring Cleaning

Spring cleaning during the winter, in the man cave.

Another weekend left to my own devices and I was able to get on with the seats that I had no intention of starting this weekend. Not sure why I started the seats but it’s probably something to do with the fact that the passenger seat was in the way on the work bench. The original drivers seat had collapsed and a good mechanic friend of mine (Will, from Park Garage) done me a big favour and welded the bits, literally six or so bits back together again for me. A quick lick of coloured paint was applied but I wanted to do it once more fully as I don’t intend to take the seats out again if I can help it that is.

I took this picture at the beginning of the paint process but I thought I would share it as little modern photography. I quite like it, even though it is of a driver’s seat frame!

frame springs
seat frame springs

Anyway, the tracks that were holding the seat in place and allow the frame to move were seized up big time. A little treatment with the Gibbs Brand sorted that out, but the old dried grease needed to be cleaned out as it was contaminated with dirt and other undesirable additives. Once that was done the frame was cleaned down of dust and the very light surface rust removed. I sprayed zinc anti rust self etch primer to the frame and the tracks ready for a black satin finish. The parts that I had taken of from the driver’s seat I also cleaned up and coated with Gibbs Brand ready for fitting back. Two of those bits ,the springs had stuck together and had to be bent slightly in order to free them up and make them flexible again. (Note the tenuous link to the spring cleaning here?) While cleaning the tracks out for the seat I used my home-made “Filler Removing” tool that I had made last week.

Note to Snap On (again): I appreciate you are busy this time of year and that you probably haven’t got round to drawing up the contracts just yet, but I am prepared to wait until the end of the year for a fat wad of cash – or just enough to cover my paint job, otherwise I may have to take my designs elsewhere, then you will be sorry. Obviously I don’t want to offer it elsewhere, but you might be forcing my hand here!

As this latest home-made tool is now obviously a multi-purpose tool, I was thinking of renaming it something more appropriate like: “Specific Corrosion Rust Extractor Workers Device, Removal, Insertion, Varying  Equipment Rod” or “SCREWDRIVER” for short! What do we think? (Ahhh C’mon, it took me ages to come up with that! lol) Any other ideas on what to call this special tool I have made?

The pictures here show the primer and the cleaning in progress before the top coats of satin black.

The second coat was applied in satin black and now looks like new. The rails were greased and now they move smoothly with a single finger.

I have a couple of weeks holiday owing to me over Christmas so I intend to tinker around on the car so I am not sure what I will be doing, but I reckon it will be nothing I have planned! I think I may topcoat the inside of the floor pan, not sure yet though. I may do under the rear seats but I am running out of the POR15 paint unfortunately. I hope Santa has at least a 473ml can for me. I have been a good boy.

Quick Link:

I have added the full set of pictures to the Photos Menu – Inside the Car – Seats, or click here for the hyper link.

Share my Content

A Round Of Golf?

Another weekend almost over but I managed to get work done on the car. I also managed to get a service done on the wife’s car, her cherished VW Golf. We purchased all the parts on Saturday morning, the air filter, oil filter, oil etc and I was left to my own devices on Saturday afternoon to do it all while she went out again. It did feel strange having to get my metric tools out from the different Snap On drawer and not the imperial sets though. The air filter was encased in a massive slap of plastic on top of the engine. There were more pipes and wires coming out of the engine than a robot research facility. To get to the spark plugs it was a performance as there was a channel of wires with their own coils attached at the top. They were hidden under another plastic trunking system, that in turn had wires attached to it all over the place. The whole thing was nightmare.

What I am getting at here is the basic principle of the engine has not changed at all. The cylinders are there, the pistons, the spark mechanism etc. OK, the engines may have gotten bigger and smaller, they may have changed shape a little in configuration, the ideal number of cylinders is still in debate. Fuel injection is squirted into the cylinders, four valves instead of two. But why hasn’t technology moved on to the principle itself? Yes we will have electric cars eventually but not for a while yet, that will be a major leap. The Mustang’s air filter sits on top of carburettor held on by a single wing nut, that sits on top of an inlet manifold with four bolts, it draws in fuel and mixes it, burns it then chucks the waste out the back. Fuel injection mixes it with the air and burns it and chucks it out the back. Same thing, OK, so it’s more efficient now, but I feel at home under the hood on the older engine. The new engines have computer this, and wire that, control box this. Are they more reliable? I don’t think so. If my Mustang timing goes out a bit, dust of my timing gun, turn the distributer and re-tighten. Done. New car, download the software, plug-in an expensive decoder, type in what you want. Reset the warning light on the dash. unplug unit and write out a huge bill. Luckily I have a great mechanic Will at Park Garage who looks after my modern cars for me when they play up, but I know he loves the classics too. I’m sure he would rather get a socket set on a v8 header than plug-in a laptop! What has happened to computers in the last forty years? Size of a building to start with, now there is more technology in a cell phone than put man on the moon.

Once tuned up a forty-seven year old Muscle Car will give a vast majority of modern cars a run for their money, even if they don’t it will give you a bigger smile while driving it than a plain old euro box! I didn’t enjoy the round of Golf as I did working on my car. There was no sense of achievement, or is it just me?

Sunday I worked on my car, well the parts in the Man Cave at least. The rain made sure I wasn’t gonna push her out the garage for today anyway. I was just tinkering around and decided to polish the chrome on my factory option aircon unit. That little polish gave me a great idea I will share with you. The front of the unit has the classic “camera case” black dimpled look. It had worn almost down to the bare metal around the dials and the nozzles. Now the chrome sparkles and the black suddenly looks wrong. I had this idea a while ago to polish it with black boot polish, it didn’t work and just rubbed straight off. Can you see where I am going with this now? Today I thought why not spray it? There is chrome lettering on the front as well as the badge. These would need to be masked off to stop the over spray. What black would I use, gloss, undercoat, primer? The original black is a matt black or a dull satin from what I can see. With the decision made I got out some plastic sheets, (ok it was a thin packaging bag), not the paper masking kind like you should use in a spray shop. I used the electrical insulating tape as that can be moved a little in place and was such a smallish area and fiddly to do. I masked it all up and done a tiny test spray with Eastwoods Under Hood Satin black on the back of the unit near the top out-of-the-way. Once it dried it looked brilliant. I completed the masking up at the front, I removed the old air direction nozzles and sprayed the front with a couple of very light spray passes. It still left the dimpled finished as the original had, but just blackened up the front. I still wanted the authentic look and I believe I now have that. All that is left to do is get some artists paints mix up the colour and paint in the colours of the badge. Try doing that on a modern car!

The best part of the whole thing is I found a date stamp on the back of the unit – 28th June 1966

aircon26

 Finished Article:

tape removed

Here are some pictures of the process, the full guide of what and how I did it can be found under the Photos – Inside the Car – Factory Aircon Tidy Up. The pics here don’t really show how thin the paint was as you can see the bare metal underneath.

Quick Link:

Factory Fitted Aircon Tidy Up click here.

Share my Content

Home Made Tool

Recycled wiper to a useful tool

This only going to be a short post, reason being that last week I was working on the wiper motor and fixing it to the car. This post is related to that. The motor worked fine and all was well except that I didn’t have the correct tool for the bezel at the time. So I decided that I would have a go at making one when I had this idea to make it out of the old wiper I was about to throw out. I had previously used the rubber from this old wiper to replace the rear wash on my other car as that one had split. I was in two minds if was going to post this or not so I thought why not. If I didn’t like it I could always delete the post I suppose. I have written up the details on how I made this epic work of art/tool. The link below has the photos I took after the spectacular piece of engineering had taken place. I wasn’t sure it was going to work but I am pleased to say, (can you guess?) it did work and passed with flying colours. I was so pleased with it I even sprayed it black again to make it look good even though it now sits on my tool chest. It’s no Snap-On quality tool, but if I need a mark two I’m not sure what to improve apart from the materials maybe. This was the first real “tool” I have made since I left school a good few years ago. They don’t teach you these things which could be useful, but there again they didn’t know I was going to own a classic Mustang. Nor did I, But I wished I would, that one wish did come true. There was a fair amount of money I did throw down those wishing wells when I past them!

Has anybody else made a tool for a particular job, around the house, car, shed or garden?

The full article can be found under: Reviews Menu – tools – Home Made Wiper Bezel Tool

Quick Link: Home Made Wiper Bezel Tool click here

Share my Content

Secret rules

The weather this weekend for a change has been gorgeous, hot and not a cloud in the sky. Is our summer finally here? A bit late but I will take all the sun I can get at the moment. This Friday evening we got the garden swing seat out from the cover and I was able to evict the cushions that have been squatting in the corner of my shed since last summer. They take up so much room, I could put my Karcher jet washer there, and few power tools in that space. The wife sneaks things into the man cave and puts things on them in her little corner and they fall off. So when I open the door I am greeted by an avalanche of cushions Wellington boots, trowels, hand forks, plastic pots and cardboard boxes from god knows where. The corner of the man cave right near the door. She has the house and garden, I have the garage and the shed – that’s the rules. But women play by a secret dirty secret set of rules that only they know about, they are allowed to put things in my area when they see fit. Yet when I bring in a set of brake springs in the house and sit at the kitchen table ready to treat them, you would have thought somebody had just pushed the nuke button! Trying to explain it’s only a temporary measure seems to add fuel to the fire. Does anybody have a copy of these rules I could look at please, or at least explain them to me. Anyway, while sitting in the swing seat watching the birds and the bees in the garden while sipping on an ice-cold bottle of Bud, I heard the comment, “I think a flower bed would look nice there.” Epic, not. So I chipped in with only if we have butterfly and bee loving plants. With that the Saturday was sealed but I didn’t know it.

Saturday morning and I was straight out into the man cave, I got the front valance out again and rubbed down the filler that has been built up, rubbed down and built up again. The work was almost done when they, being the wife and mother-in-law got back about five hours later. The front valance and grill valance were now ready for their spraying and I was feeling pretty pleased with my little ol’ self.

There were repeated trips from the car to the back garden with plants which were laid out around the area that they wanted the plants to be, yeah I got my bee and butterfly plants “Hot Lips” apparently! They looked quite nice to be fair. Then the shovel came out, from my man cave and the marking of the grass began. As they decided the ground was too hard to dig it was passed to me to dig. Great, the day has been baking in the high twenties and the earth was like rock. I questioned why now and got told the plants would die if I didn’t. I was reminded that I had done my own thing on the car all day so I could now help her do the flour bed. Bearing in mind I looked like I had just been rolled in a giant pack of flour due to the ultra fine dust off the valance while I was rubbing it down. Within minutes the sweat was pouring off me and the dust was now turning into a paste again. Eventually after the new ground was dug up I was released to go and do what I wanted. At that time laying on the grass waiting to pass out seemed like a good idea. But the compost went in the new flower bed, then they got the hand trowel and fork – from MY man cave, and they started to dig the holes only to find out that they could only get down to the rock hard clay that I had got too. So yes, yours truly had to dig the deeper holes for the larger plants.

Sunday was a day of more tiny rub down as I missed a bit to make a final surface prep. The shower curtain went down on the grass and I sprayed the valance and the grill valance, firstly with the Rust Encapsulator I got from Frost, then some grey primer and left them to dry in a shady part of the garden. Then I decided to clean the sauna my man cave out and tidy the Snap-On tool box up a bit. About a month ago when I was bleeding the brakes I needed some very small AF spanners. I bought a set of spanners that were ring one end and open-ended the other. They weren’t very expensive as there is no real leverage required. What I did notice was that they were always falling about and looked a mess in my OCD laid out tool box. I had an idea and looked on eBay where I purchased some carabiner clips like the climbers use for their ropes. Mine was small and not meant for climbing but they sure make a brilliant spanner clip. The spanners come off and go on with no problems and now they are all together! What do you think?

So this weekend was all about compromise, I do the work on the car and then I do work in the garden when the ground is like concrete. The garden it has to be said does look really nice. I sit here thinking; if I didn’t have that beer would I have still had to dig the flower bed? I reckon.

Quick links:

Front valance work updated, click here for link or go to the Photos – Bodywork – Front valance project part 2.

Share my Content