I have been asked if I have any technical diagrams of of Mustang glass fitting. I used these to help with my restoration. These technical diagrams are for a 64-66 Mustang Coupe/Fastback. The 67-68 model is pretty much the same with only slight differences.
I wasn’t sure if I was to split this post into two or not. I eventually decided to keep it all in one place. It might be a bit of a long post but I think it’s worth it. As a follow up to my mega wax comparison test the write up for my comparison of Dual Action polishing pads is now completed. This post has taken me many, many hours to collate and put together, not only for my own sanity of product comparison all in one place, it will hopefully be a help for you as well. That’s regardless of being a Professional Detailer or a Weekend Washing Warrior like me.
There is a huge minefield out there when it comes to buffing pads by various manufacturers for similar products. Although they may look the same they can perform very different tasks. They can do the same things but are different colours, it’s all very confusing. It drove me mad, so what I have tried to do here is create a chart of the most well known manufacturers and their Dual Action pad products. I chose the ‘Dual Action’ variables for a couple of reasons;
1) I have a Meguiar’s MT320 Dual Action tool.
2) Rotary tools and pads are for the experienced user or professionals. Incorrect use can damage your paint job. You have been warned!
I am a weekend washer as I mentioned, I’m not quite up to the professional detailing standards yet, but I keep trying. If I take my car to show or just taken out for a drive, I clean it via quick detailer product when I get to where I’m going. When I get home the car gets a full waterless wash before it goes in the garage and covered up again.
I found many charts and explanations from many sources, but none that done a full comprehensive comparison side by side. My Pad Guide which I collated below is for reference and you really should get the right pad for the right job. The chart here is also downloadable in High Quality PDF as well. 🙂
I have tried to provide links to each manufacturer and the descriptions of their own pad products below. If you find any others that may be of use, just let me know and I will try and add them.
Clicking on the individual links below will take you to that company’s website for more details. Some are great pages with lots of info, some are rather shabby to say the least. I honestly recommend having a look at the links as they will explain in greater depth why you should use their products and for what tasks.
I found a couple of images from the net (below) that are pretty good to explain some of the terminology of this coveted detailing skill. There are many, many books out there and plenty of ‘how to..’ videos on YouTube as well, so I won’t duplicate them here who are much better qualified to explain it than me.
Marks on the paint can be from poor washing routines, bird lime, tree sap, third party damage such as keys or car park dings, damage from hedges when driving to close or stone chips etc. These sorts of damage can spoil the look of your car may require the polishing step. The easiest way to remove these marks are with the DA pads.
First the misconception of ‘Polishing’ and ‘Waxing’ are the same thing! They’re not.
Polishing Pads or Cutting Pads or Compounding Pads,: Choosing your correct pad and polish combo is critical, using a waxing or ‘finishing’ soft or super soft pad won’t do much at all, and you will be there a while wasting your time. The courser polishing pads or ‘cutting’ pads are designed to work the product to the paint and not just apply it.
Waxing Pads or Finishing Pads: Most of the waxing or ‘finishing’ pads are soft or super soft, they are designed primarily to apply the product to the surface and not ‘work’ the product into the paint as such.
A little common sense; before you decide to polish, you must wash the car thoroughly. I won’t go into the full details of how to wash your car, but I will touch on the main points before the polish and the eventual choice of pads. You can use waterless washing if you want of course, but applying waterless washing tends to add an element of protection to the paint.
An ideal prep for a polish is to use a pre washing “Snow Foam” first if you can. This tends to remove the worst of the debris on the car as a touchless process. If you don’t have access to a snow foam, then at least rinse the car first and then wash the car using the two bucket method with a wash mitt, not a sponge. Remember that a good quality shampoo should nourish the paint and prepare it for a wax layering process, it shouldn’t remove the wax that is already on the paint surface. The least amount of contact with the dirty paint is desirable.
Remove any wax that is on the surface of the car’s paint. This is a separate step after washing using a specific product just for that wax removing job. However, some of the cheap and nasty car washing products will also remove the wax at the same time as washing, saving you that extra wax stripping step. Use a proper de-wax wash product like Chemical Guys ‘Clean Slate’ to leave the paint bare to the elements. Don’t be tempted to use cheap washing up detergents to wash the car, as they themselves can also be abrasive and often contain salt.
Once the car is washed clean, there is a step that is often overlooked before polishing; the ‘Clay bar’. This is as it sounds, a piece of soft clay which is flattened out into a thin pad and rubbed over the surface of the paint using fingertips. This clay lifts the stubborn contaminates and they in turn stick to the clay. Use the clay with a recommended lubrication and turn frequently to a fresh piece of the clay when it becomes dirty. If you drop the clay bar, Never Ever pick it up and re-use it on the car, get a fresh piece and continue. If you dive straight into the polishing stage you could end up dragging these foreign particles over your paint making things worse. It’s always best to try and get the paint as smooth as possible first before you tackle that polish stage. I have review links to a great clay bar from Bilt Hamber here and pretty poor clay bar from Auto Finesse here. Choose wisely, not all clay bars are the same, some work and some really don’t. A Clay Bar will also remove wax as well. Rinse the car and dry thoroughly.
Tip: Polishing is an acquired skill and shouldn’t be taken on with a slap dash approach. Go to a scrap yard, get an old fender or hood and practice on that first. Practice on an old car, or a favour to mates old car. With a heavy cutting compound, or an overly abrasive pad along with undue pressure being applied during the polishing process, there is every chance that such an abrasive combination could take the paint of your car. Rule of thumb is that a polish cleans the paint with mild to very abrasive product.
Some polishes are known to have fillers to hide imperfections and to give a richer look to the surface paint of the car. Auto Finesse ‘Tripple’ is such an example or Meguiar’s ‘3 in 1’.
Another step than can be used instead of a polish is a ‘Glaze’. This can be applied by hand or a DA machine. This product is a filler for fine scratches or swirl marks. This will only mask the problem of damaged paint. It certainly won’t cure or fix the problem like a proper paint correction or polish would.
What is Polish and Polishing?
Depending on the paint condition this will determine the pad and polish product you will need to use.
Polish, or sometimes referred to as a ‘compound’ is usually in the form of a liquid which contains a varying degree of abrasive content. The polish abrasiveness is also referred to as it’s ‘Cutting’ strength. During a polish you are in effect removing microns of your paint, the harsher the abrasive or cutting, the more of the paint or clear coat will be removed. Polishing can also restore the shine of the paint on your car from a faded or neglected surface. If you see some slight discoloration, damaged paint from bird lime or similar, or when you think there is a lot of dirt that has got stuck on the surface that won’t be removed after a wash with a good shampoo, it may be better to go for the polish. Small scratches can be reduced or removed after a polish. This can also be known as a ‘paint correction’.
The majority of the time a Polish will require multiple applications of finer or less course cutting polishes and softer pads to obtain that smooth mirror like surface. Rule of thumb, start soft. If nothing is happening go heavier and work back to the light combo again. If the paint is getting to hot – STOP. Many experienced detailers and car body work painters just know what they need to use.
Why Polish?
Simple answer is that if you see scratches or swirls the polishing step could remove them depending how bad they are of course. This would leave a mirror looking paint if done correctly.
How does it work?
The light hits our eyes at strange angles, which shows up as a scratch, blemish, swirl etc. on the paint work. If the paint is smooth with no marks the light is bounced in an even manor. This is explained a lot better with the help of a little diagram towards the end.
What is Wax (ing)
Wax is just a protective coat to protect the paint of your car from the elements, prolong the longevity and lustre. There are two main products, natural and synthetic. Natural tends to offer the best shine with not much longevity. Synthetic offers the best longevity but not quite a good a shine. There are of course mixtures of the two and hybrids. Some of the ‘hybrids’ are now incorporating the ‘ceramic’ technology which is creeping into the consumer market. Natural waxes are often found at high quality car shows or concours events to show the paint to it’s full extent. Synthetics are for generally for daily cars who also want a nice shine. Waxes have moved on with technology, these waxes often come with UV protection to help stop paint fading in sunlight. They last longer, apply easier and offer great value for money, well in most cases anyway.
There is also another step that can be applied, that is ‘Sealer’. this is applied before the wax as it says coats the paint job to protect it better than a wax – so it’s said. Sealers do one job only and not designed for pure shine. More to protect what you already have before the shine is applied.
Waxes come in two main application forms; liquid or paste.
Paste wax or hard wax, is more of the traditional method and often classed as old school. Often requiring application, curing and then buffing to a shine, often repeated to build up the protection or shine. Usually the enthusiasts or connoisseur’s choice. These products are best applied as ‘a little goes a long way’.
Liquid wax or soft wax, is the modern approach. They tend to be quicker, easier and generally don’t require cure time or additional applications, also know as ‘wipe on, wipe off’ products. The down side is that you tend to use more of the product.
Why Wax?
Waxing protects the car from elements and even sunlight. It also makes the car look good and helps to retain the vehicles value.
How does it work?
The wax forms a protective barrier between the paint job and the elements.
There is no right or wrong for the type of waxing you take, what ever suits you. I have it on good authority that there are no differences between the paste wax and the liquid waxes apart from composition. The only real choice you have is what you want the wax to do, last, shine or a bit of an all rounder?
Understanding the paint problems
I found these various diagrams to show what the polishing is designed to do. Make the paint as smooth as possible, then protect it with wax (or sealer).
They say a picture speaks a thousand words and I think these pictures do just that to explain it better way than I ever could.
Some examples of things that can damage the paint and how badly, and yes that does say ‘fingernails’!
As I mentioned earlier on how the eye sees the light. If light reflects badly and is distorted instead of a bouncing straight back, that is when you get to see the marks on the paint as shown here:
Various way to fix this is the buffing with pads to get to the bottom of the damage to leave a smooth even reflective area. As I have already explained, things likes glazes, sealants and waxes can help along with disguising these areas of damage to make the light reflect in a much more uniform manor. Thus making the surface look smooth and shiny again.
Then we get a little more techy with the thicknesses of paint and how the paints are applied. Of course the different applications of paint (Single coat, 2 pack, water based, cellulose etc.), amount of paint applied, types of paint; solid, metallic, pearlescent, matte, special mix custom. The type of primer, fillers, top coats, clear coats all need their own types of care. For some one product may not work the same on another manufacturers paint etc. Some manufacturer paints are known as hard paints, while others are considerably softer. This diagram shows the generic application of thicknesses, these vary wildly depending who done what. Some respray jobs cost £2,000 and others £20,000 and that’s for a good for a reason.
The ‘basics’ of the paint application;
Don’t worry that is as technical as it will get about paint and the theories behind it. After all we are just looking at the comparison of pads to ‘fix’ the paint, according to my very own comparison chart above.
When I mentioned the combination of products and pads above, this is the visual representation of just that.
Not all these DA pads are for polishing or cutting alone. Oh no, Many people use the much softer pads to apply the waxes to the car for a much easier, smoother and even application of wax. I have a link here on 10 wax comparisons in a mega test.
Saturday morning arrived all to soon and this was going to be killer of a day, 9 to 6.30 I virtually never left the stand at all. Like a regimented soldier I stood on duty, One of the other exhibitors had a spare chair which they lent to me and was a real life saver. My feet were killing me and so was my throat. I went in via a different route and took more pictures of different cars.
Saturday evening I popped round to see the Mustang Owners Club Of Great Britain to say hello while they were resting after a busy day too.
The Super Sweet
Later in the day there was a little group of people following a lovely model around, and I thought to myself, “I hope that lot comes over here, otherwise I will miss them”. They did more than that. The photographer approached me and said they wanted to take some pictures of the model with my car. I wasn’t going to say no was I? It turned out the model was absolutely fantastic with a great sense of humour and she kindly allowed me to take pics as well looking at me rather than her official photographer. I took rather a lot of photo’s should we say, hoping to get that one great photo.
Thanks to this lovely lady and model who had time for me at my car, she was professional, funny and courteous. The only down side? I hade to wipe the finger prints of my car. Such was the sacrifice I made in the name of my car.
On the Sunday mornin’ we finished an hour earlier and was also the award day. A good friend of mine Chris Tilley came to replace me by the car so I could have a look around, which was very kind of thim, thank you Chris. I was off like a ferret on a scent looking for more pics. I found the Classic American stand and the car I like the most won it and well deserved, what an amazing car.
I found my friends at Meguiar’s
Then a random selection of some cars that took my eye.
Then a new Hyper car LM69 costing a huge £1m based on the Jaguar XJ13 body and engine.
And the driving position of this car was just mad, almost laying down, lower than a GT40.
Awards
The award was to be voted for by the public, there is a voting form with all the cars on from the stand. You picked your favourite car and you put your name on the back, posted and job done. These forms were on the voting booths with Lancaster staff manning them to help along with trying to also get people to win a car competition. The little white boxed stand had a letter box style opening in the middle that was regularly emptied during the show days. Here is that form;
Voting slip Front
Voting slip Back
There was a winner and two runners up which were to be announced at 2pm on the Sunday. The winner getting a year free insurance and a glass trophy, all very exciting. The pink Morris Minor (one million edition – not the one millionth car) won the show, with the MX5 in second and the BMW in third place. The fact that I didn’t place wasn’t a problem as I enjoyed my time there taking part in a great show – I MUST stress that point again and a superb experience weekend.
BUT – and a very big but…
The SOUR
I have seriously thought very long & hard about this next section and I need your help with it.
Do I leave it here or Remove it?
There was a covering email sent out to the entrants, for joining the show with this clause;
“It’s up to you if you stay with your car the whole weekend or not. Some owners like to stay and chat to visitors, even campaigning as visitors will be invited to vote for their favourite car of the 20 displayed. However, we have had issues with cheating and complaints in the past so please familiarise yourself with the attached terms of entry. Its important we all play nice and enter into the spirit of the event. Those who don’t and breach the T&Cs will be asked to leave the show.”
Those terms and conditions are as follows:
“Terms and Conditions: Votes will be counted and verified by Clarion Events Ltd and the organisers decision is final.
Clarion Events Ltd will not contribute to any transportation or accommodation costs for entrants.
A car can only be entered once in a three-year period
An owner can enter one car per year, but can enter a different car each year.
While the owners can engage and campaign with other entrants and visitors, any form of intimidation, cheating, derogatory remarks or bad mouthing is not tolerated and those involved will be disqualified and asked to leave.
This is not a concours competition. However, Concours winning cars are welcome to enter but should not expect to be judged in the same way.
The competition is presented in the spirit of like-minded enthusiasts coming together to celebrate their vehicles and entrants are asked to keep this in mind when joining the competition.”
Bearing in mind the above statements let me explain a little more, then you can make your own minds up. Perhaps I should just let it go, or try and expose what I saw and witnessed along with others on the stand. This is a true statement:
Friday morning the box of voting forms were brought down to the stand and placed on stand up tables. At which point things immediately started to go wrong. The owner of the Minor took a wad about an inch thick and literally run of with them to club stands, a little later on similar thing happened again. At this point it was mentioned in conversation to the organisers.
I will refer to the organisers as ‘They’ to protect their anonymity, I’m not out to embarrass them, but it was mainly one person in charge.
Then I saw the forms being pre filled in with his own car ticked, when he spoke to people he gave them his pre completed form to be posted at the same time as the person’s own vote. This was on the Friday when I sent messages to highlight the problem as They were not about to see it. Noted here on the Friday messages.
Saturday there was more incidents and there was a large wad of forms placed in the box. This was formally mentioned to the Lancaster people and They when we saw them. Not just by me complaining, but others as well who witnessed it.
Sunday morning I arrived early to catch the owner with a few voting slips taken from the stands an being filled in at a table. I took a photo as he was scrolling through his phone for contacts to fill in. Note; the sideways picture shows the back of the voting slip. The slips shouldn’t even be there.
voting form
Again They were notified by various entrants and complained bitterly. Another entrant was told around lunch time that he and another were going to be disqualified. Maybe told that to us to keep us quiet? I don’t just don’t know, we were then a lot happier that we were on a level playing field for all of us.
At 2pm a celeb who doesn’t need to be mentioned (who obviously had nothing to do with it), gave the usual speech, plugged his tv show etc and then gave the winning award to the Morris Minor. Immediately after the prize giving I showed the picture to Lancaster and told them we had complained about the cheating. The head of the Lancaster I spoke to wasn’t interested and said to me, “I know nothing about it and I just write the checks.” I showed him the photo and screen shots he walked away.
I immediately texted They and sent the picture to which the second screen shot of the messages shows you. They response was obvious this:
“We’ve discounted all the forms that we can see are clearly cheating, same handwriting etc.”
So They did know of the cheating yet allowed the entrants to continue. Thus, They condone cheating entries as They didn’t disqualify him or the other entrant that we didn’t have as much proof only witnesses and verbal communication.
We remained respectful for the presentations like good sports for the event. However after a number of complaints made after the awards I showed the Morris Minors Owner Club the evidence to which they denied it but didn’t look shocked. The Lancaster representative went over to the Morris Owners and apologise for the ‘confusion’.
After a little research on the Lancaster Website this can be found:
“Lancaster Insurance has announced that it will be widening its Morris Minor schemes, further strengthening its association with the marque. The scheme, which is now live, is available for all Morris Minor enthusiasts, of all ages, who use their Morris Minor as a second vehicle with limited mileage. Additionally Morris Minors Owners Club members will be able to take further advantage of the scheme with up to a 25% premium discount available for members as well as the option for multi vehicle, providing one is a Morris Minor. Andrew Evanson, Senior Operations Manager for Lancaster Insurance, comments: “Here at Lancaster we have a close affinity to Morris Minors, with our Car Club Manager even owning several over the years. We’re delighted to be able to arrange cover for all ages providing they are using it in a cherished way.”
So perhaps this is a genuine misunderstanding for Lancaster, maybe they chose to ignore it not wanting bad publicity for a scheme they have.
I will never insure with a company that knowingly knew of cheating but didn’t take steps to follow their own terms and conditions. Remember;
“any form of intimidation, cheating, derogatory remarks or bad mouthing is not tolerated”
I hope this guy can live with himself for knowing that he won only because he cheated!
As this gets posted today, I have also sent an email to Richard Morley the Operations Director for Lancaster Insurance on 14 November 2019 at 13:47
As yet there has been no response from Lancaster Insurance. If I do get a response I will post my email and their response too.
So there you have it, the sting in the tail was deeply troubling and uncomfortable as he was the car next to mine. That’s how I KNOW what went on as he was only a few feet away from me. The atmosphere after the awards on the stand you could cut with a knife, the winning owner disappeared for a while too, perhaps he was busy doing things.
I didn’t enjoy typing that report at all, I take no pleasure from it. But, if he admits he cheated then he is better man than I thought. Not for one minute do I think that will ever be the case though.
Am I a bad person for bringing this up and maybe bringing the show into disrepute? I suspect I will now be black listed for any awards or magazine articles, Not that I care. I’m not in it for trophies (although I have three now but have never posted about them), I just enjoy my car. The Morris Minor club is one of the biggest in the country and that has a lot of weight behind it with all it’s members.
I will say that I am a man of principles – I played fair and I expect others to do the same, after all it’s in black and white that we had to play nice before the show started. I was going to frame my certificate (as we all did), I got for the show as a finalist, but now I when I see it I can’t help but think of the man that got away with cheating at the biggest car show in the country. That grates on me big time. That certificate is now in the bottom of a draw and I doubt it will come out again.
Sour grapes for not winning? Nope not at all, I don’t like cheats. I had a blast all weekend I even met an elderly chap (like me now) with the same surname as me, he also has a 1964 Mustang. What are the chances of that? 😀
Like I said a number of times, a fantastic weekend wonderful people, some great chats, I put faces to names I have often heard about. The Mustang Owners Club visited me, and for some it got better as I lost my voice!
I am also a bit upset that the lovely model is having to sit within the same post as such terrible reporting of the show’s last few hours.
During the last car show of the season a couple of weeks ago I decided that I should spend my ‘pocket money’ on a couple of goodies to prop up my fledgling memorabilia collection. Each show I allocate myself a certain amount of money to take with me for things like memorabilia and car cleaning products etc. If I don’t limit myself I would just spend it on loads of stuff that I really didn’t want in the first place, or on dubiously prepared junk food. I have my credit cards with me just in case I need something worthwhile of course, but cash is king at these shows and you can do a bit of bartering for the best prices.
So my first purchase was the sales brochure for all the ’66 Fords’. I have attached a link to the full brochure here, or can be found under the Articles Menu/Press & Promotional Items on the header. This is an original brochure in fantastic condition with no creases. The staples have gone a little rusty, but what do you expect for fifty-two years old?
The pages are vibrant and full of the classic sales talk of the time like, ‘Stereo sonic Tape System’ and ‘Automatic Speed Control’. This is just little selection of a couple of pages from the brochure to give you a flavour of stepping back in time.
My next item was this great little ‘Ford ’66’ lapel pin. It looks old and feels old, but I’m not sure it’s vintage though. I got myself a nice little deal though as I am now starting to see the same guys selling the memorabilia a bit more often now.
At another show I purchased some Ford tie/hat pins that started my collection of which was these three. I mounted them into a little piece of cardboard to stop the pins getting damaged and keep them together for now, until I find a better storage solution that is.
I have tried to research these lapel/hat pins without much luck so far, so if anybody can point me in the direction of some information or history about them I would be very grateful.
When I was very young I remembered some adverts by Esso. Those ads featured a nameless Tiger, with the slogan that started in 1959; ‘Put a tiger in your tank’.
The various ads run for many years up until the oil crisis in the ’70s where Esso also changed its global name to ‘Exxon Mobil’. There was a set of six tie pins issued and this is the full set.
That ‘Tiger’ campaign remains close to my heart as my dear ol’ Grandfather always used to take me on his rounds then to the Esso station and fill up his lorry on the way home. Some of my earliest memories when I wasn’t even in double figures of age. He would often come out with something cool with the tiger on it, and some tokens to save up for a toy, key-ring or poster of some sort. I just loved this poster at the time.
A little bit of trivia for you;
Exxon Mobil contributes $1 million a year to support the Save the Tiger Fund, which helps conserve Asia’s remaining wild tigers.
My memorabilia is around Mustangs and ’60s Fords for obvious reasons. But, I find myself being drawn back to the things I once had as a kid! There is no logic to my collection strategy, even that is the wrong choice of word I feel. Who knows what I might buy from eBay next!
When I first started the restoration of my car back in 2011 I had no working electrical parts at all when I bought the car. Firstly there was a fire under the dash were the nutter who owned the car before me had wrapped a fuse with tin foil for some reason. Secondly the original alternator had rusted up and I didn’t trust it. So the only option I could see was a replacement wire loom from American Autowire for the Ford Mustang. Their recommendation is to use a one wire alternator. The choice was limited at the time as a result, so the best option I found was Tuff Stuff. I purchased a standard v belt in chrome with a 100amp rating at the time.
Tuff Stuff Rear connections
Tuff Stuff Alternator
However there was a problem with the terminal for the single positive wire. The stud it connects to sits about 1/4″ away from the block even at the maximum distance on the standard alternator bracket. These pictures of the stud in the normal position for Tuff Stuff alternators.
Initially I had my alternator bracket custom-made to move the alternator much further away from the block with a longer belt to make it work and be safe.
This was fine at the time, but the step for the belt clearance was now in the wrong place which meant that the bracket was just a millimetre away or so from the edge of the belt. This occasionally rubbed as you can see below. I kept a very close eye on the belt for signs of fraying or any damage to the belt. None of which has happened as a result of this modified bracket I might add.
Later on while browsing the net I didn’t realise that the case on these alternators could be adjusted by ‘Clocking’ or ‘Indexing’. Basically this means that you can move the body case around to where you want the stud to be by moving the front fittings. Nowhere could I find a step by step guide on how to do it.
Note: not all alternators can be ‘Clocked’ and you should check before you try doing it.
The only thing I found was these instructions from Tuff Stuff. Note ‘point 7’ mentions the use of torque settings for tightening the centre pulley nut. Interestingly Tuff Stuff use both terms ‘Clocking’ and ‘Indexing’ in the same document.
Nowhere is this ‘torque’ setting documented on the Tuff Stuff website, so I contacted Tuff Stuff for their ‘help’ and advice via their message process, for what good it was. Their automated response said I would ‘get a response within twenty-four hours’. After a few days nothing, so I tried again with a different email address. They responded the next day where they just sent me the instructions above with no words within the body of the email. My response was immediate back to them, stating that I already found the document on their website and asked again specifically for the torque settings. Their response with the following:
On 4 Oct 2018, at 14:12, Matt Oliver <matt@tuffstuffperformance.com> wrote:
We use an air wrench to put on all of the pulleys here. Thank you for your business. Have a great day!
Matt Oliver Tech Manager
Hardly helpful when they say you should “torque to settings” which they obviously don’t do themselves. Not exactly confidence inspiring by any shape of the imagination, not to mention poor documentation.
So, with the lack of information I decided to do it myself!
As I had already fitted the alternator, the process below also shows the removal. If you have a new alternator you can skip these first few steps on removing the alternator and go straight to the ‘Clocking‘ process below.
First things first is to disconnect the battery.
Disconnect the single wire from the back of the alternator. Remove the tension bolt for the alternator which fits inside the bracket’s slot gap. Then loosen the hinge bolt at the top for the alternator. Unhook the v belt and remove the hinge bolt fully, taking the weight of the alternator remove it to a work bench.
Figure 1
My research and a warning;
If you read some of the forums out there on this subject, they say that you can undo the four case bolts and move the back around then retighten. This saves the hassle of undoing the rotor nut. WRONG. This could damage the springs and brushes internal components within the rear housing. You should only clock/index the alternator by moving the FRONT housing part of the case only.
‘Clocking’ process – also called ‘Indexing’
With the alternator on its side we will need to lock the cooling fan in place. I used a long-handled probe between the fins and resting on the bench surface. A screwdriver could also do the job.
The fins are not evenly spaced, and you will need to find the best place to wedge your locking tool in place. This should be on the same side (left) looking from the front of the alternator when you are undoing the rotor nut counter-clockwise.
The best way to remove the rotor nut is to use an impact wrench. I used my cordless Snap-On 3/8 impact driver with a 15/16ths impact socket. It’s for this very reason that people incorrectly move the back part of the case around, just because it’s easier.
Holding as much of the unit still as you can, buzz the nut until it’s undone. Once the nut has been removed take out the locking bar you have used.
With the nut fully removed depending on your pulley type, (remove the parts one at a time, taking note of how they fitted together). Remove the spring washer next, then remove the v pulley from the face plate, followed by the polished face plate.
The final part is to slide of the fan itself. You will notice it has a key way cut out, but there is no key way on the rotor shaft itself, just a plain round shaft as shown. You can clearly see the uneven fan spacing here that I mentioned earlier.
notice the uneven fn spacing
There are four case bolts 5/16th which need to be loosened from the back of the case, I used a ratchet to break them free before using a cordless screwdriver to undo the rest. The bolts are quite long seated into the front half of the casing.
Once the four bolts are removed, hold the case together while resting the alternator on its back with the rotor facing up.
Gently separate the top from the stator (the black plates between the top and bottom half of the case). Lift up the top part of the case to a max of 1/4″ without disturbing the stator. Turn the front case by 90deg increments to where you need it to be. The pics I have marked below showing the gaps between the case during the indexing process.
Re-align the two halves of the case again and lower the top part of the case back down.
With the top is in place, hold the case together to stop it moving and turn the alternator onto its side again, finger tighten the four long case bolts back up. Spin the shaft to make sure that there is no snagging and spins freely.
Check that he rear stud is where you need it to be, perhaps do a dummy fit to the engine if required. Once you are happy with the location, tighten the case bolts back up. Do not over tighten the four case bolts, I recommend using the manual ratchet for the final tightening.
Spin the shaft once again to make sure it’s all still free spinning.
While the alternator was apart I took the opportunity to clean the case and the front sections. I was not happy to find bits of the chrome flaking of. I used Auto Finesse metal polish to remove the marks on the chrome and then Auto Finesse mint rims wax to seal the chrome.
I didn’t clean the spring washer or the back of the locking nut too much. The simple reason is that friction is required for the hold all the components on the rotor shaft.
Before
After
Before
After
Before
After
RefittingThe Parts
At this point you could replace the pulley style if they is your intention to change the look or function to a Serpentine setup maybe.
Replace the fan onto the shaft first making sure the fins are facing backwards.
Next make sure the cover plate is fitted the correct way round with the dish section fitting inside the fan recess.
Next is the v belt pulley that will sit flush onto the face plate, again the raised section fitting into the recess of the face plate now.
Slide the spring washer into the shaft and into the v pulley recess. Finally the nut is fitted and finger tightened for now. Spin the rotor to make sure all is free and not snagged anywhere.
Now insert the locking tool you used earlier on the other side (right) between the fan blades to hold the section still once again. Now re-impact the nut clockwise back into place securely.
Remove your locking tool and recheck that the whole section spins freely again.
Refitting the alternator
Place the long pivot bolt and washer into the pivot section of the alternator and through any spacer required to align the pulleys up correctly to the lower crank pulley. Finger tighten the bolt for now into the engine block. See ‘Figure1‘ above.
If you are mounting the alternator bracket for the first time, lightly tighten the bolt above the main crank pulleys to hold the bracket in place, but movable to locate the tension bolt.
Next insert the tension bolt and spring washer through the bracket slot into the alternator case. Slip the v belt over the pulley. See ‘Figure 1‘ above.
Pull the alternator to tension and tighten the tension bolt just enough to hold the alternator in place for now. There should be 1/4″ to 1/2″ movement up and down on the belt. I prefer the twist method for the belt, twisting the belt 90deg in the middle between pulleys.
Once you are happy then fully tighten the tension bolt, Pivot bolt and the bracket bolt if needed.
At this point I took the time to clean up the cables up before refitting them. Connect the one wire back to the alternator stud and tighten up. Reattach the battery connection.
Start the car and make sure that you are charging correctly and that the belt is not slipping on the pulleys.
At this point I tidied up all the cables around the solenoid, the battery cable to the alternator, the cables for the engine block and starter motor so it all looks neat and tidy again.
That’s it, all done and took three hours in total which included the cleaning, rewrapping of cables, photos for this walk-through and tidying up of cables. I also have to clean all my tools after I have used them. It’s all part of my OCD problem regarding my tool box. I intend to get the proper bracket and belt shortly, but it’s not important right now as it still all works.
As far as I know, this is the only guide for a Tuff Stuff alternator clocking. I hope it helps somebody else out there. Apologies for the more tech styled post, but I had to share it. 🙂
As the end of the car show season starts to creep in upon us here in the UK I am slowly turning my attention to all things Mustang in the mean time to give me my daily dose of Mustang I need, just until the car shows start again. The model car I have was posted a few weeks ago and the story behind that, but how about articles. The paper magazines that people had way back then and just threw away as they weren’t going to be worth anything, right? Well not quite.
To set the scene; in 1964 the Ford Mustang sports car, is officially unveiled by Henry Ford II at the World’s Fair in Flushing Meadows, New York, on April 17, 1964. On the same day, the new car also debuted in Ford showrooms across America and almost 22,000 Mustangs were ordered by customers. Ford sold more than 400,000 Mustangs within its first year of production, far exceeding sales expectations.
1) To celebrate such a huge launch at the time three of the biggest magazines at the time all held articles on the Mustang. The Mustang was first automobile to have an editorial feature in all three big USA publication’s April 1964 editions – Time, Life and Newsweek…
2) This was significant as Time and a Life tended to only focus on ‘life changing’ and ‘significant events’. Newsweek was more like a newspaper and was full of current issues and views.
3) The only copies left from those April 1964 issues are because people subscribed to the magazines and we tend to keep old mags!
4) As that generation reached an age when they either downsized or left estates to be cleared, the magazines show up from time to time as part of house clearances.
5) The magazines (Time/Life) tended to get kept and those that survived are in pretty good condition – often still in the original addressed envelope and some even unread.
6) The rarest is the Newsweek copy as it tended to get thrown after reading.
7) Individually, the Life magazine can be bought for a reasonable amount while the Time edition has become extremely rare as the popularity of the iconic first Mustang has grown – particularly after it celebrated its 50th birthday. The Newsweek edition has always been rare and therefore expensive when those copies are found and offered for sale.
8) Together in one collection, the three copies are hard to come by and, if you could find a collector willing to sell all three as a group, the cost would be very significant – well into 4 ($) figures.
9) Rarity can be evidenced by looking for the big three magazines other editions before or after these Mustang editions on a well-known auction site, they are easy enough to find and go for very cheap prices considering their age. The Mustang editions on the other hand are not that easy to find nor are they cheap.
The magazine covers are very well-known especially the Time magazine and Newsweek editions, all these pictures are from my own collection.
These imagines are not for distribution or copying, no copyright infringement is intended. Where applicable the copyright remains with the owner of the works. I am using the images for fair use to show the editorial coverage of Ford’s historical Mustang launch from the World Trade Fair 1964. Under fair use I believe it’s in the interest of the new generations of Mustang owners and automotive historians to see where it all began. Without tracking down these rare, out of print and now expensive magazines, nobody would be able to appreciate the excitement the Mustang launch caused at the time, in my opinion that would be such a shame to loose such great editorial works. These images are to allow you to read the articles whilst considering their historical importance to the automotive world.
What is less known is what those articles actually said. I have taken a few pics of the Mustang articles, and a small sample of the adverts from each of the magazines of that long bygone era.
Time Magazine – April 17th 1964
The article:
Advertisements from Time Magazine;
The magazine still has the subscription card in place.
Life Magazine – April 17th 1964
The article:
Advertisements from Life Magazine;
Newsweek – April 20th 1964
The article:
Advertisements from Newsweek;
Pocket Guides
Something else just as rare as those editions but much less known which I didn’t know existed is the following pocket guides.
‘Visitor’s Guide to New York City & Long island’.
This little a5 pocket guide is full of vouchers and all sorts of tips for the City, subway map, travel information, services, entertainment and surrounding area.
I just love this little booklet as it’s a snapshot in time of New York in 1964.
The last booklet may have come with Newsweek I believe, other than that I have no idea of its origin;
‘What to wear at the fair and what to do when you get there’.
Another little pocket-sized booklet of only sixteen pages and another insight to the fashion of New York in 1964.
All these magazines and guides are just incredible, it amazes me that the paper has stood up to the ravages of time as these editions were disposable and not intended to be kept.
I hope this enables fellow enthusiasts to be able to read the magazine’s articles in full on the Mustang launch and to see just what all the fuss was about way back in 1964.
You see today’s magazines are also on-line and the world can see them pretty much anytime they want to, so those corresponding magazines are no so unique, apart from owning the physical copy of the paper article what ever it may be. Old comics are collectable because of the paper and limited runs, the paper was the only media type at the time to view them, at that time print was king. So some of the early magazines which were intended to be thrown away are collectable for the same reason. Tickets to events at the time or leaflets were not intended to be kept, and after a few years nobody had them. Move on fifty years, the paper or magazines has been used to start fires or wrapping up delicate items when moving home, so the existing copies become even more scarce. Old news papers are exactly the same idea, worth nothing on the day, try and get a back copy for somebody’s eighteenth birthday and you will have to dig deep to get it, if you can even get it. Off course not all magazines are collectable, which is a bit of a contradiction of what I was just saying I know. But the subject matter will be a key factor for such items will determine their collectability. Articles, adverts, cigarette cards, stamps, postcards etc. for such big names like, Marilyn Monroe, JFK, Elvis, Henry Ford, Frank Sinatra, Babe Ruth, Abe Lincoln, George Washington, Dr. Martin Luther King, James Dean, Howard Hughes, Al Capone, Walt Disney, The Beatles, Winston Churchill etc. will command high prices because of who they were. It’s rare that a car can have such an impact on this type of collectable market, yet early Mustang adverts, literature, photo’s and so on can demand some good money. At the end of the day most memorabilia is only worth what somebody is willing to pay for it.
Now I have posted this article maybe I have just made people aware of the values for some of the these items and hang onto them, thus making it difficult for collectors like me trying to get a copy of it and if I do find a copy of the cost has just gone up knowing that I want it. I suspect not, as I just one man and his Mustang who likes to collect Mustang things.
So, have I just shot myself in the foot as we tend to say? 🙁
I have started to venture into the very dangerous and addictive world of Ford Mustang Memorabilia. I waste research many hours on eBay looking for things to add to my collection. I am given things by Adam at Mustang Maniac and also a very good friend of mine Gary W. It’s his fault that I am now spending money to get these little golden nuggets of historic items where I can, instead of buying paint to decorate the house like I promised the wife I would over a year ago. I fact the wife has banned me from going there because I come home with all these ideas of what I can add to my ‘Man-Cave’ sanctuary or ‘garage’, or as my wife tends to call it ‘Garbage’, (a play on garage or trash), due to old collectible oil cans in there, old Mustang parts, memorabilia, books, signs, flags etc.
At the beginning of the year I was a lucky man to be given a AMF Wen-Mac 1966 Ford Mustang GT Dealer promo 1/12th scale model. There is very little information out there on these models such as how many were made, how many each dealer got etc etc. All I know is that I now have one.
The only information I could find by good ol’ Google is pretty common and a little insider knowledge from Gary who gave me my ‘toy’ as it was to be marketed back then, I of course prefer the term ‘model’.
At he launch of the new Mustang in 64, Ford Marketing decided on three promotional products to support the launch: One: was a pretty familiar ‘dealer promo model’ much as other makers had done since the late 50s. Based on 1/25 scale, AMT produced nicely detailed models of both the coupe and fastback for dealers to put on sales men’s desks and to give to certain customers.
AMT went on to produce construction kits. Nowadays, dealer promo models in complete condition can fetch over $100 – even in worn condition. Two: was a child’s pedal car – also made by AMF which sold very well. Original unrestored pedal cars can now fetch over $2000.
Three: was a larger scale model produced by the popular model maker Wen-Mac and featured either a ‘battery electric’ or ‘gas powered (glow plug petrol)’ 1/12 scale model of the 66 Mustang coupe – available in one single colour of red. Featuring in many Mustang media ads, it was a nicely detailed model that a child could use on the lounge carpet with fixable steering and with working headlights. There was a conversion kit for $2.50 to run from ‘electric’ battery power to ‘gas’ for racing buffs that included a tiny gasoline engine and slicks. A pic of a complete model from the net as it would have been then.
A remote-control throttle could also be added. It was $10 extra for all of this in 1966. The model was on sale for $6 at the time or $4.95 during the Christmas season.
In 1967 Wen-Mac also introduced this ’67 fastback model – in light blue.
Both of the models are now very collectable with hard to find complete models in good condition and boxes fetching $150-$200.
My car is in great condition so I can’t complain what so ever. I may look out for a motor one day if I ever see one for sale or take it from a damaged donor model as it were.
The model had a little electric motor (unfortunately mine is missing) that allowed the car to run forwards or backwards. The steering could be set to left or right.
The front and rear headlights were also working when the car ran. Many of the cars have the model engine missing and or the motor for that provides drive to the wheels, sometimes it’s the hood missing too.
If anybody can give any additional information I would appreciate it and will update this page with it.
Of course, if you have any early Mustang memorabilia you want to ‘donate’ to a good home and increase a fledgling collection, – contact me and we can sort something out. 😉
It’s been a long time since I have changed anything or added anything to my car. I was at a car show recently and something caught my eye that I decided I wanted to change. That part was under the hood that nobody would really notice to be honest. That part was hood pin and safety catch. There was nothing wrong what so ever with the old ones what so ever. Except that I thought there was just too much blue and it needed to be broken up a little. It’s standard for the safety catch to be car coloured as mine was. The hood pin itself was fine if not a little tarnished after fifty-two years as it was the original parts.
So I had a word with Adam at Mustang Maniac and he said “You need a little stainless steel, with some nice bolts to go with it, not just chrome.”
The safety catch is held in place just by two bolts and like for like swap out. I got a couple of Adam’s new ‘Ford’ branded stainless steel bolts to go with it all. I just love these bolts which looked even better after a good polish up.
before clean
after cleaning
ready for fitting
Undo the two bolts for the safety catch and it will expose the hood pin itself which again is a simple nut to hold it in place.
The swap out is a simple reverse procedure, hood pin and then the safety catch. You have to make sure the hood pin is set correctly, to shallow and the hood will not close, to long and the hood will bounce and vibrate at speed. I created a detailed page on how to change these parts in detail here, or go to the top menu ‘How To.. Projects/Engine Bay/Changing the hood pin and safety catch’
The difference is subtle yet instantly visible if that makes sense, it also matches the hood lip trim.
Before and after side by side. Just another little something to clean now. 😉
On the ’66 Mustangs all models there hazard switch that fitted as standard. The official place for these to be fitted was in the glove box on the upper left hand corner as in this picture I found on the net for the correct location.
Depending if the car hazard switch was fitted later or somebody on the production wanted to fit it somewhere else, it could have been anywhere. The most common alternative was under the dash on the passenger side, sometimes on the drivers side. When I first got my car there was this random switch that I didn’t know what it was for. It was so rusty I couldn’t read anything and it virtually fell to bits when it was touched, not to mention all the wires were cut from it and been melted due to the under dash fire.
I now realise that this random switch was the original position of my factory hazard switch. Now I had a problem as my wiring loom was an American Autowire upgrade kit and wouldn’t work directly with standard hazard switch and pigtail loom. Another conversation at Mustang Maniac and research came up with an accessory kit for the factory hazard switch. Considering the cost of the wire loom in the first place I think it was a bit much to charge for this extra mini loom in my opinion. Anyway, rant over. Adam made a special order for me and the kit came in a couple of weeks later. I popped down to see the guys and also picked up the switch as well.
The wire loom and switch.
The AA kit is a bridge under the steering column that just connects the male to female and the female to male sections for the column (indicators, horn brake switch etc), with the extra wires running from it for the hazard switch. I have created a detailed walkthrough on how to hit it up here, or got to the main menu ‘How To.. Projects/Electrical/American Autowire Hazard switch installation’.
The switch is great quality and just needed to be assembled.
The wire connections for the AA kit was supposed to fit the original hazard pigtail loom, but as I didn’t have (no need for my fitting), I cut the supplied connector off and fitted some heat shrink tubing to each wire, then the spade connectors with a factory look crimp.
correct length
first crimp completed
second crimp
second crimp completed
I then checked the wiring diagram for the correct fitting onto the back of the switch.
I now had a decision to either replace the switch in the ‘correct’ location, or the position that the car had it fitted at the time. I went for the car’s location at the time. Yes there will be the experts that moan it’s not in the correct place, but I have seen a few cars where this was the ‘original’ location. I also understand that some dealers fitted them under the dash to save taking out the glove box liner as it was easier!
Plugged in connectors with heat shrink tube looked pretty cool, even though nobody will ever see it.
Under the dash next to my aircon on the passenger side there are two bolt holes which were used originally, so there was no drilling or measuring for this project either. A case of bolts through the switch bracket, through the dash holes and the backing plate, nuts on the back of the plate and tighten up.
The last part is to connect up the steering column, this is done last as the live power feed is taken from the brake switch, connecting it up first would mean having live or hot wire about as you are connecting up. Not ideal!
under column connected
column sperated
AA Hazard kit in place
The hazard switch now works without the key in the ignition and with the engine on. The old hazard switches worked by putting the switch on and then indicating to trigger the four way flash. To finish the installation, I spend half hour or so wrapping the new loom extension in factory look loom fabric tape, I find it just so therapeutic.
I just hope I never get to use the hazards for a real emergency. I enjoyed my few hours of pottering around on the car, just because I could.
Thanks to Adam at Mustang Maniac (again) who put the special order in for me so I could get this all working.
My first trip of the year in my car was fine, but I had a few scary moments there and back. There were idiots with no consideration slicing across the front of my car, the other was to avoid all the trenches or pot holes in the road. The roads in the UK are complete joke right now to be honest after the snow, sun and rain. I think that I compressed my spine by an inch and shook a filling out my tooth due to all the mega craters in the road. I guess that’s what you get when stiffen the suspension in order to make the car handle a bit better.
During the round trip I had a thought to myself wondering if these people realise what us Classic Car owners are thinking while we drive along? So, I had a little fun and came up with this little list in my head then wrote it down before I forgot it;
We treat everybody on the road as somebody who can’t drive properly.
We seriously believe that other road users want to crash into us at every junction.
Pulling out from a junction at the last-minute in front of us really is a problem.
We never trust somebody’s indicator as being their true intention.
We give ourselves extra space to the car in front to allow us time to slow and stop as our brakes may not be as good as modern cars.
We give ourselves extra space to avoid the chance of any stones being flicked up causing a stone chip on our paint jobs.
Our paint jobs can cost as much as a small family car.
Stone chips may look tiny to you, but to us they look as big as a satellite dish and just as ugly.
It may look like we are drunk while driving although we’re not. We are avoiding the pot holes in the road, you normal car drivers wouldn’t give a second glance to.
Pot holes are like moon craters or trenches for classic cars.
We spend as much time looking at the road conditions as we do predicting traffic.
If you wish to overtake us we don’t mind, but don’t chop across the front of our car, give us space, see points 4, 5 & 6.
We will avoid a crash at all costs and we will take extra care.
We will avoid mud. That mud stores moisture and starts the rust process off.
We are paranoid about rust. We can hear our cars rusting in the garage!
We don’t drive close to side of the road where there are hedges as they are a potential for paint damage.
We will stop rather than drive past or through a bush or hedge.
We will slow down for large puddles.
We don’t like rain.
We will do everything we can to protect our cars from water damage.
Tailgating makes us nervous, we won’t speed up just because you want to go faster.
Because we tinker around on our cars doesn’t mean anything is wrong.
If you see our car and you don’t like what you see, don’t tell us because we don’t care.
We are happy to talk to anybody about our cars, but please don’t tell what our cars should look like or what we have done wrong in restoring it.
We will drive around endlessly looking for a safe place to park.
If our car is parked somewhere you can guarantee we can still see it.
There is no need to touch our cars.
Finger prints on our paint is a problem for us. We will clean it off.
Leaning on our cars is definitely not acceptable.
The tinkle of zips, belts, buckles or the metallic sound of a ring will damage our paint.
Young children with ice creams are a potential for more unnecessary cleaning.
Dogs using our tyres as a mobile toilet is not acceptable. We will clean it off.
We don’t like parking under trees because tree sap can ruin paint. We will clean it off.
Birds mess on the car will cause serious damage to paint work. We will clean it off.
Dead insects on our cars is unsightly and can cause damage. We will clean it off.
Cleaning our cars is a pleasure and some of our cleaning products can cost as much as a tank of fuel.
The “You missed a bit” cleaning joke isn’t funny, honestly.
No we won’t clean your car when we have finished ours.
Yes we do need to clean our car if its been in the garage, it gets dusty.
We tend not to thrash our cars around just to prove a point for you.
The grip from our tyres may not be as good as modern-day compounds.
A set of traffic lights is not a cue for drag race with you.
The interior of our classic cars are cleaned with the same care as the outside.
Adding fuel to our cars means we will wipe off every single spilt drop.
We carry spare fluids in the trunk for all eventualities under the hood.
We sit by our cars at car shows to keep an eye on our cars.
No you can’t sit in it – don’t ask.
No we won’t start our car up just so you can hear it, wait untill we leave.
There are two prices for our classic car parts, the proper price and the price we tell our partners.
A classic car is not “just a car” to us, it’s a way of life.
I hope I haven’t missed anything and made a few people smile and say – “yep that’s me!” If I have missed something that needs to be on this list, please let me know and I shall amend it. Although this is a little bit of fun, there is also a serious note to the points too. When I see any Classic Car on the road and I am in my daily workhorse car; I give them plenty of room now.
I just couldn’t do a post with no picture of a car that wouldn’t be right.
This is the third and final post of the three from the Classic Car Show Sunday the 18th February 2018 at the London Excel Centre. At the show as per my other posts there was lots of gleaming cars, motor sports was well represented and a VIP was also there for the day collecting his “Icon Award”.
“Should you ever meet your heroes?”
That question has been asked many times and I suspect that there is a lot of various and wide responses, some good and some shattered dreams I expect. Whether it’s a TV star, music star, sportsman, author, radio personality or any celebrity, people will always dream of meeting somebody who inspires them, some of them may be historical figures and some present day. My answer to that question is answered below and a massive tick on my bucket list, which happens to be quite a small list. I’m not actually a lover of the term “Hero” as it sounds like a bit of a obessesion, so the term for me should be “Icon”, but for now we will stick with hero as that is the question.
The 1992 Formula 1 World Champion and Indy Car World Champion 1993, Grand Prix Masters Champion 1995:
Nigel Mansell
I mentioned in the other posts a couple of clues to this post; apart from him sitting in the F1 car in the motor sport post, there was the “5” at the end of the post. Nigel’s Racing number over the years has been 5 where possible and it’s always been a red 5, in fact Nigel now tags his signature with “Red 5“. I started following Formula 1 in the mid eighties during my late teens and early twenties as Mansell arrived on the scene properly. There is so much that has been written about Nigel and his career too much to list here. So take a look on Wikipedia would answer a lot of questions and give you good insight to the man: https://en.wikipedia.org/wiki/Nigel_Mansell
My own top 15 Nigel Mansell Facts:
Nigel is the only man in history to hold both the Formula 1 World title ’92 and the Indy Car Title ’93 with the Newman Haas team, at the SAME time.
Enzo Ferrari personally picked Nigel to drive for the Ferrari team in 1989/90 seasons. Nigel was the last driver to be given that honour before Enzo died.
Mansell and his two sons Leo & Greg took part in the 2010 Le Mans race, the first time a Father and two sons had raced together.
1985 French GP Nigel broke the record for the highest speed crash at 200mph, giving himself concussion at the same time.
Nigel has had a OBE & CBE titles from the Queen.
Nigel’s first F1 race for Lotus was in 1980, he started the race with fuel leak that filled his cockpit. He later retired with 1st & 2nd degree burns to his buttocks.
Last race of the season Melbourne Australia in 1986 Nigel suffered a tyre explosion that ended his chances of being the 1986 World Champion.
Nigel won the 1992 F1 championship with five races to go, such was his dominance of that season.
Nigel won his first ever race for Ferrari. It’s a known fact that the car was not expected to last more than a handful of laps, Nigel even booked a flight home before the end of the race. He managed to keep it going and bring the car home. The Italians nick named him “Il Leone” – The Lion, as a result of his determination.
Nigel is the only man to put a hole in the Phoenix Raceway oval track after a collision at 174mph.
Nigel has broken many bones including his back and his neck in 1977 during a race qualifying session. Doctors told him that he was perilously close to quadriplegia, he still discharged himself from hospital and started racing again a few weeks later. In fact he still races with the same neck brace he used after that crash where he was lucky to be alive.
Nigel was a Special Constable on the Isle of Man for 11 years all through his racing career while he lived there until 1995.
Nigel’s golf handicap was scratch and almost +1, his aim to play in the British Open.
Nigel sold his Woodbury Park Hotel and Golf Club that he built up in Devon for approx £11m.
Nigel’s son Greg was named after his God Father; Greg Norman the golfer and best friends with Nigel.
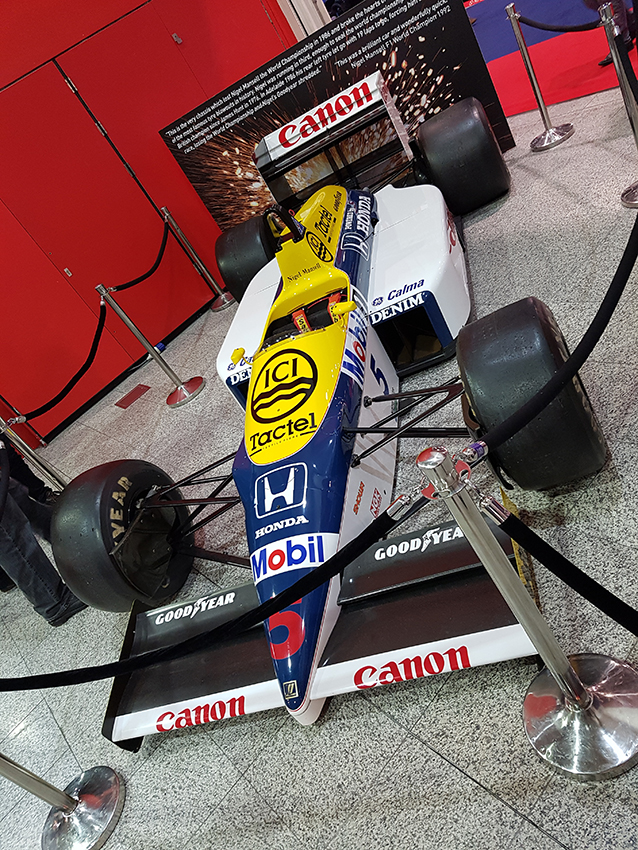
Enough of the facts on with the photos. On the entrance to the show Mansell’s 1986 car FW11 was on display. Mansell failed to win the Championship by just two points with only 19 laps to go. I remember that I was up at stupid o’clock in the morning to watch the race live from Australia, and was in shock and mortified when I saw that rear tyre explode.
Probably nothing like the pain Nigel felt losing the championship. This is that very car and same chassis from that very race.
The show was to have Nigel drive a car down the roadway. His first drive was a beautiful black open top E-type Jaguar. I was a little late getting to the barriers, but being 6’4″ does have its advantages sometimes.
A little later in the day Nigel was to again drive down the road, but this time in a Formula 1 car which just happened to be Michael Schumacher’s old car during the time he was at the Benetton team, which was also on tmy previous motor sport post.
Nigel was allowed to “burn some rubber” and was the only person that day allowed to do so.
On his return trip back he did a donut or two and parked up where he was besieged by media to receive the 2018 Icon award. At this time I was on the bridge over the road and had to zoom in to try to get a picture, so they are little grainy, sorry.
I borrowed this picture from the Excel Centre’s own web page.
Mansell’s career started with Formula Ford where he won the championship in 1977 in this car, he won 33 of the 42 races that season. To fund his racing and dreams of getting his break into Formula 1, he sold his house and all his personal possessions to fund that dream. Once Nigel was in Formula 1 it eventually took him twelve years to realise that dream.
Mansell was snatched up by the late great Colin Chapman in 1980 as a test driver for his Lotus team to start with. Nigel got his break in 1980 in the Lotus 81B here. See also point six of my facts above.
The other famous car that was there for the Nigel Mansell Tribute was the FW14B. This was the car that won the World Championship in 1992. I was at two races that season; British Grand Prix where he won and the German Grand Prix two weeks later where he won again with Ayrton Senna second and Michael Schumacher third. That was my dream podium right there.
A previous revision of this car was also featured in one of the most famous F1 photo opportunities taken. In 1991 Mansell gave a lift the legendary Ayrton Senna a lift back to the pits after his car broke down during the British Grand Prix. Much to the disgust of the marshalls who tried to pull Ayrton from the car. I was at that at that race.
After I had drooled over these cars again Nigel was scheduled to give a couple of question and answer sessions. I got to the stage area a little later than I anticipated due to the amount of people heading in that direction, as a result I had to stand at the back of the crowds. I had to zoom in to the max so a little grainy, but I think you get the idea.
There was a great atmosphere during the talk and Nigel had the audience in fits of laughter with some of his stories. After the allotted time had over ran he sat at a table in order to do an autograph session. The queue for the table was long, as I was standing at the back my plan of action was the direct route to the line. My wife on the other hand-made a tactical dash around people and got their way before I did and was standing in the middle of the line with a daft grin on her face, what a great result. perhaps we may get there before he has to go. Very well-played that girl for getting the spot. 🙂
During the wait for our turn I watched as Nigel shook hands with everybody in front of him and signed everything they gave to him. He took selfies with the children and his older fans. Never once did he complain or refuse having to keep getting out of his chair walk around the table for a picture and back again. I had taken my 1992 Grand Prix race programme with me and my Special Edition Auto Sport magazine dedicated to Nigel Mansell the F1 World Champion 1992.
Now it was my turn, my throat was getting dry and I was determined not to make a fool of myself. I gave my ever patient wife the phone to take pictures. Instructions were simple, just keep taking the pictures. I walked to the table and handed my 1992 race programme to Nigel and he shook my hand and thanked me for coming!
I proceeded to explain that I was at that race. “That was an amazing day, but I have to apologise to you; I was one of the mad nutters that invaded the track after you had won, I’m sorry.” Nigel replied with a chuckle and “So you was one of those were you!” “Yes, but I’m glad I did!” We laughed. Nigel had refered to the track invasion of the fans in a later press interview after the race, it wasn’t good to be honest and a bit dangerous, but “Mansell Mania” had taken over.
I thanked Nigel for his time and we shook hands again. My wonderful wife then gave Nigel my other magazine and he signed that for her (well me actually) too. I took over the phone camera and took lots of pics of their meeting. We both said our thanks again to Nigel and we left the table for the next fans. Unfortunately my wife has vetoed the photo’s of her at the table with Nigel. That decision I have to respect, but this was one of the only pics without her in it that I could post.
I walked away with some serious stupid grin and some disbelief; I had just met my sporting Icon (hero) at long last and it had not sunk in yet.
These were the items Nigel signed for me, he even thought about where to sign the covers.
1992 British Grap Prix Official Programme.
Autosport Special Edition Souvenir Magazine.
Now I feel that I can answer the question I raised above; “Should you meet your hero?”
If it’s Nigel Mansell, then that is big “Yes“.
He was gracious and polite all the time which was everything and a lot more than I had hoped for. That was a huge tick completed of my bucket list. It was all down to the wife who found out that Nigel would be there and could be signing autographs, so it was worth a shot for me. We had a sit down and a drink to get over what had just happened. I still can’t get used to the fact he no longer has his famous moustache. We wandered around for the rest of the afternoon and took the photos for the other posts. I managed to catch up with Adam from Mustang Maniac who was around by the Mustang Owners Club stand ready to take his car back home again after the show. The last part of the As things were running late there was no autograph session. The queue had already formed in anticipation, unfortunately Nigel was ushered away even when he stopped to try to sign some more items his fans had brought in for him. None of that rushing away was his doing and he looked a little sad he couldn’t be there for his fans.
Nigel has always been an inspiration to me for his never give up attitude and sheer determination to get to his ultimate goal. He has and still remains one of the nicest guys in Formula 1.
What an amazing day, one that I will never forget.
As for that track invasion in 1992 that I apologised for; well I was on my way to join these fellow nutters and lucky guys who got there a little before me, but at least I was there on that famous day.
Thank you Nigel “Red 5” Mansell.
Have meet your hero or Icon? what were they like? I have meet a few other “Celebrities” and the odd one was a real idiot and so up himself, I wished that I never bothered to ask for his autograph at the time.