Early February this year I decided to try something different to attend my favourite car show, Helmingham Hall. Normally the entrance fee is £12 per car (driver and one passenger) for this show. There is an alternative which what they call ‘The Tollemache 110’ option. This is for a limited number of cars. One hundred and ten cars max are allowed to park at the front of the Hall, but it comes at cost, quite a lot of cost actually. The plus side is that that you get a tea or coffee, slice of cake for the driver and one passenger plus a commemorative plaque of the day. To pay three times as much entry fee is a gamble, especially when the weather is unknown. Back then I paid the money and hoped the sunshine on the day. My rule is still based on if it rains or I know that it will rain, the car doesn’t come out the garage. So it’s a lot of money to pay and not turn up.
This a show where my good friend Craig joins me for the day, one it’s nice to have company at a car show, secondly he has a great camera and takes much better photos than me. We were swapping messages all week before the show debating the weather, it was going to rain! I have a total of five weather apps I use just for car shows. Four of the five said that there would be light rain at mid afternoon around three for an hour or so, the other one said all rain all afternoon. I decided on this occasion that as it was only light rain while I was there, and not driving there or home, this would be would be acceptable. Craig Turned up at twenty to eight in the morning on a Sunday which felt like the middle of the night. We had chairs, food, coats and camera equipment all neatly packed into the trunk. Craig filmed the car backing out the garage, which I was quite pleased with.
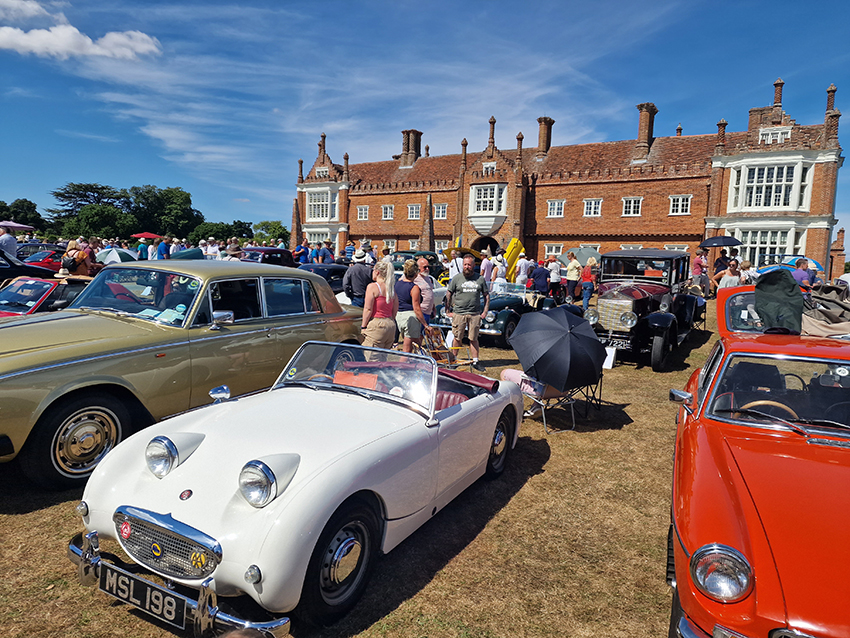
The sun was out and we had a journey of two halves, first to the petrol station where we met up with Craigs other friend who was also going in in Mazda MX5. He followed us to the event which was only around twenty minutes later. It would have been quicker if it wasn’t for the driver in an Austin Healy in front of us thinking he was driving a Sherman tank down a cycle lane. We dived of to some back roads to avoid him and save my sanity. It was longer by a couple of minutes, but it did mean that we had a clear road driving at our own pace. We pulled into the event where we were directed down the main driveway to park out the front of the Hall. We was directed to a great slot next to the path which leads to the main entrance for the Hall. The only down side was that the ground wasn’t level where I parked as it was on a little slope, a small price to pay for a good location.
Once you have parked up, you can collect your show plaque and place it by your car, just a little A-frame with a A4 printed history of your car. The boards can be seen lined up in the above pic, Craig found our board and placed it at the front of the car. He decided to take some photos before the world and his mate were allowed into the show at ten. Even so, it was still busy.
Due to the sheer number of photos, I took over six hundred pics of the one thousand two hundred cars that turned up. For that reason, I will split this show over three posts. Hopefully it will avoid readers getting cramp in their hands scrolling through the all the pics in one go. Like I said Craig’s pics are so much better than mine so here a few to start with. The rest of his pics will also be spread out over the next couple of posts.
In the main archway there there was a table looked after by a woman who took your preferred afternoon spot for tea and cake. We decided at around one in the afternoon would be good. More on this a little later.
We started in the T110 area to the left of the house as you walked out, by now the general public were being let in and it got busy very quickly.
The real thing in White and a replica in red, the ever beautiful Countach.
Then the timeless Ferrari Dino, with a fury passenger.
We the main field was split into years, 60’s, 70’s, 80’s, 90’s and 2000s. Due to sheer number of cars the lines did get a little mixed up. But we started just behind the vendor stalls where the oldest cars were and then worked out way to the far side of the field to the more modern stuff. Well that was the theory, but it didn’t work out practically though.
At the bottom of the field is a large pond getting on for a lake.
Working but up the next rows.
Nearer the top was an area for Hotrods.
After this was the second half of the field and John Grose of Ipswich stand who had a mixture of cars, including a rare Mustang.
After Christmas or a birthday I like to build something to keep me occupied which has become a bit of tradition. This year was no different, this time I was lucky enough to have an expensive engine model kit to play with. This ‘Techning V8 Engine Kit (DM118)’ kit was something I had been looking at for quite a while, but just couldn’t bring myself to pay the considerable amount of £500 for a model kit. However, that is exactly what I got as a gift from my wife and my better half. Although I’m convinced that it was to keep me out of the way for a few days to be honest!
I have reviewed this Techning V8 Engine Kit with full step by step build and instruction guide here. Or you can just copy and paste this link below into your browser:
It’s a long step by step build guide and review, which has taken me a good number of hours to complete. During my research for a kit like this I was looking around for an accurate review from the average Joe on what the model was actually like. I didn’t want a sponsored review giving a one sided favourable response. For that amount of money I wanted an independent build and review, if you were wondering what such a review looks like – I have done it myself.
There were many steps to this build, but I wont go into them all here, otherwise I may just as well copy the review. What I will do is show the more interesting and technical parts of the build.
The kit itself came in metal tin which weighs in at over 4kg! Inside there was three layers of aluminium anodised parts, a manual and plastic building mat, totalling to a little over six hundred and fifty pieces in total.
For the number of parts supplied you need to take into account that each screw or bolt or Allen bolt is counted as a part. So for a valve set that consists of thirty two valves, each with four parts to make the valve – that’s one hundred and twenty eight parts right there. With a few hundred screws on top of that there is much to actually build with engine parts as such. The supplied tools were OK, which consisted of four Allen keys and small cheap cross headed screwdriver. But, I used a precision screwdriver with various bits to get a more accurate control and feel. As the tweezers and fine needle nosed pliers were metal to metal contact I used some heat shrink tubing on the tips to protect the kit parts.
The pistons needed con rods, piston heads and fitting to the crank at the bottom of the engine block. The supplied little pots of lube is a light grease and is needed where any metal to metal contact is made.
The valves needed to be assembled and inserted into the block, all with independent, valve seals, springs and tappets and their own up and down motion. All of them need to be free moving so that the overhead cams can open and close the valves a millimetre or two.
Once the valves are in place a cam seat is required to partially cover the valve stems and allow the mounting of the twin over head cams. There will be two timing chains, so to make them work their are pairs which need to staggered via spacers on each side of the engine block.
The exhausts are fitted to each side of the engine and then the heads are bolted to the top of the engine block.
The back of the kit holds a large flywheel and and starter motor which drives the kit. The front of the kit has a cover even has a proper timing mark.
The timing chains was a bit of a mission to get right, as the bottom crank sprocket and the cams all needed to be correctly aligned via their ‘dots’ before the tensioning guides are fitted and adjusted into place.
There are belt tensioning guides, alternator, water pump, belt guides and crank pullies, oil filter and intake manifold all need to be installed.
There is a nice touch of a couple of rubber belts that are located on the front pullies and need to be installed in the correction orientations and tensioned to enable the passive pullies be turned when the kit runs.
The electrics are controlled by a box which allows for on/off/on via the battery or a powered connection.
The kit takes around two hours to charge with a running time of one and half hours (allegedly). The finished kit looks amazing even when it’s not running.
I created a video of the model working which I will at some point upload to YouTube, hence it has my branding on it ready. With the kit running you can see the pistons moving through the side of the engine block, the valves operating, the water pump moving and the pullies rotating.
This is a seriously expensive model and I would seriously cast a luxury item. In fact that I have paid considerably less for a proper running full sized road legal car. Once they were due for an MOT I just took to them to a scrap yard then bought another. I fact one of my cars was nicknamed ‘Bellamy’ after the famous botanist ‘David Bellamy‘ He was a lovely bloke and spoke of the ‘undergrowth’ or ‘wildlife’. That car had plenty of mould and growths in places that there shouldn’t have things growing on it. It had a full length soft sun roof that leaked like a sieve. But, at that time of my life I was just grateful to have a car, and I use the term ‘car’ in the loosest of terms!
I enjoyed spending a good few hours building that kit across a few days, it took about ten hours in total and almost as long to write about it. I was a surprised to see the gift from my wife and surprised she got it for me as there are a few cheap plastic knock offs of this kit. She did confess that she had seen it pop up on a few feeds when she used my PC that I use here to create my blog. She did really well by getting the right one and especially not paying the full price for it, hence that’s why she got it.
Looking forward to more builds, although I have a the full sized Mustang that needs a couple of little bits that I need to do on it. I will be sharing that with you all before the car show gets underway.
Every now and again I’m lucky enough to speak to professional photographers and videographers. Earlier in the year I was at a show where Matthew Filby (his contact details below) started talking to me about my car. It turns out that he is a professional photographer and was interested in doing a ‘Pro Shoot’ with my car at a nice location. Those type of offers don’t come along very often so I said that I would certainly be up for that and we exchanged details. A few weeks passed while we exchanged a few emails of possibilities of location and dates. Matthew told me that his friend Henry Smith (his contact details also below) was also interested in doing a video shoot at the same time. We eventually found a date that worked for everybody on Saturday 10th August 2024. The weather was a major question mark as the rain had been a little unpredictable the weeks before. However, the seven day forecast for the day was to be overcast, no rain expected.
The morning arrived and I got up to complete cloud cover, with no rain. I made sure that I had plenty of my detailing products and microfibres and set off to the rendezvous at ten am with the guys. The journey was about forty minutes away just outside Thetford Forest, Suffolk, a quiet little place called Euston just past Euston Hall itself. I was early and parked up somewhere that I could wipe the car over from the road dust.
The guys turned up and we had a chat about the plans for the morning. Henry informed me that he had contacted the owner of the Euston Hall prior to todays shoot and that they had granted permission to film there on the grounds. I drove to the entrance of the hall which was only a few hundred yards away that I had just past about ten minutes earlier. The guys got in the car and told me to follow a dusty track up a bit further to a clearing where the shoot was going to take place. We got out and the guys looked around then directed me to a nice little spot that they liked. The spot was by a little cross path, by some trees and a field.
The guys set up their equipment and I asked them if I could take some photos of them, taking photos of my car. They thought it would be a good idea as they didn’t have any shots like that. I have since shared those ‘Behind The Scenes’ photos with them so that they could use them as well for their own media channels. It will be so easy to tell the difference between the Pro shots compared to my amateur Galaxy S24 Ultra photos. The pro photos have luscious rich colours, the blacks are black and are much crisper. We discussed what I wanted and what they had in mind too. I wanted some ‘moody’ looking shots, the rest I would leave up to them. I kept out the way as much as possible while Matthew and Henry got to work. As they were moving around to different locations I asked a few questions (well a lot to be honest) about their techniques and equipment, trying to learn about car photography.
Where Matthew went, I followed like a lost sheep and tried to replicate their photos.
Here are some initial shots of Matthew and Henry doing the distance shots.
Matthew moved to take some more shots between the trees to frame the car.
After the video sequencing for the outside shots were completed, we opened the doors and hood for some engine and interior shots.
Then here was my efforts to replicate what Matthew had taken above.
During the static shoot there was a couple of tractors that passed by, one pass ended up in the video.
After an hour or so and they were happy with their footage, we decided to go to the next location to take the rolling road shots with a drone and moving shots inside the car. I gave them a lift back down the track to the main car parking area where Henry picked up his car. We met back up a couple of minutes later back at the original meeting point for the shoot.
The guys discussed who would drive first, what shots they wanted and how they were going to do it. I sat there watching them rehearse the runs. They managed to do something fancy with the seat belts so they didn’t fall out while going along.
We didn’t have to travel on the main roads to get to the fairly well hidden and out of the way road where we could film the rolling shots. Matthew drove for the video shots with Henry in the back. Then they swapped over for Matthew to take some stills of the rolling car.
Here I took some photos of them taking photos of me. We drove up and down the mile long road a few times. Their hand signals directed me closer, further away, hold station, move over a little, speed up, slow down or give it some gas etc.
For the drone shots Matthew sat with me in the car speaking with Henry on his phone taking the directions on how he wanted the car, faster, slower, over a bit etc. While Matthew was directing me in the car, he also took a few action photos as we turned around and positioned up ready for the next run.
The completed video is below. I would like to post it to YouTube, but I suspect that I may get a copyright strike due to the sound track used. Not that I’m complaining as it’s a classic song.
That just leaves me with the pleasure of sharing their contact details with you as they worked hard on this little project. Matthew’s website is currently under construction, but it will be live soon. I can thoroughly recommend their services:
It was an absolute pleasure to be with the guys for the day. Very professional and knowledgeable about what they wanted and what I was after. Give the guys a look up and tell them that Mart from onemanandhismustang.com sent you!
My good mood was tested to the limit as some road works for a road closure (that wasn’t there when I left) directed me down a country lane. On its own that’s no so bad, but when some stupid, selfish moron driving a beat up Land Rover comes full pelt towards you, its not so good. I had to brake to avoid him by going up a slightly muddy bank. He of course didn’t budge, didn’t give a rats arse. He knew I would bottle out of the head to head. I expressed my displeasure quite vocally and indicated with various hand gestures that he could also move over. He didn’t care about his wreck of a car with dents all over it, where as I do care about my pride and joy. My rage subsided after a few minutes and settled back down to the rest of my drive. I got home and looked at my once very clean car, which I now suspected it would be dirty, I wasn’t wrong. The front left tyre was the dirtiest it has ever been, the rear wasn’t so bad. I spent a good while cleaning the tyres all round, and then started to clean the paint before I put the car away ready for the next show. I couldn’t just clean one wheel as it may look different to the rest and it would certainly trigger my car detailing OCD issues.
They were soon back to normal.
Again, huge thanks to Henry and Matthew for such a great day.
I have been asked a few times how do I tune my carb up. The simple answer is try not to. It’s a dark art that I have mentioned many times before in past posts. Over the course of last weekend I was looking for something that I have lost, last seen in the garage. It’s highly unusual for me to loose anything in the garage I must say. Through my rummaging and looking around I found a printed copy of the Holley ‘Classic’ series carb manual. This print out originally came from a PDF file that I had downloaded years ago and forgot all about when i got my Holley 600CFM carb. My first thought was this would make a good page for some official help with these carbs. Although I didn’t find what I was looking for, I did find something I wasn’t looking for. When I got back inside I scanned all my back up files on my PC and it wasn’t there. I delved deeper into archived drives and searched the back ups of my old mobile phones before they were wiped and traded in. There it was sitting in a download folder from about four devices ago with some other random stuff. I copied the file back to the blog storage and decided to convert the PDF into a page to be viewed on my blog here, or copy and paste this link below into your browser:
The page article is quite long with lots of pictures and a step by step process to follow. It covers the initial installation, removal, adjustments, fine tuning and repairs should you need it. Here are a few screen dumps of the page itself. The original is about sixteen pages of PDF and these few small clips gives you an insight.
There are diagrams and how to install the ‘Classic’ series 600CFM on different makes of cars and setup. There is a wealth of information within the manual regardless of make and model. The Holley 600CFM carb is not proprietary to Mustangs, it can be fitted many makes and models and the variations are covered within the manual itself.
There are clear and easy to use diagrams which help with trouble shooting as well.
To make things easier I have also uploaded the the original PDF file that have re-found and downloaded at the time I got my carb. This can also be downloaded from the button below.
Not all carbs are the same as they have different adjustments, chambers fittings and mountings. However the principle is the same, the fuel and air need to be mixed at idle, normal driving and heavy load or acceleration. The Holley manual gives a good overview of how they work. For basic carbs there are single, two barrel or twin valves and perform the mixing of the fuel and air for for the engine to work. Mostly this style of carbs either two or four barrels are common in standard older road cars, before the introduction of fuel injection processes that are considered to be more economical. What is the difference between the two and four barrels and do we really need another two barrels?
The primary differences between a Holley two barrel and a four barrel carburettor is their design, functionality and application, which will affect the air-fuel mixture delivery to the engine making it more efficient and delivering more fuel and air mix, in turn more power and or torque.
Holley Two Barrel Carburettor
Number of Barrels: As the name suggests, a two barrel carburettor has two venturi or barrels through which air and fuel are mixed and delivered to the engine.
Air-Fuel Flow: It has a simpler design with fewer moving parts and typically provides a lower volume of air and fuel mixture. This makes it suitable for engines that do not require high levels of fuel flow, like those in everyday street vehicles.
Fuel Efficiency: Generally, two barrel carburettors are more fuel-efficient, as they deliver a steady and controlled amount of fuel suitable for normal driving conditions without excessive fuel consumption.
Performance: They offer adequate performance for smaller or less powerful engines and are not designed for high-performance applications. They are often found in standard passenger vehicles, where fuel efficiency and drivability are prioritized.
Holley Four Barrel Carburettor
Number of Barrels: A four barrel carburettor has four venturi, essentially doubling the potential air and fuel flow compared to a two barrel carburettor. This configuration includes two primary and two secondary barrels.
Air-Fuel Flow: This type of carburettor can provide significantly more air and fuel to the engine, which is beneficial for high-performance applications where more power is required, such as in racing or muscle cars.
Fuel Efficiency and Performance: While they can deliver more fuel, four barrel carburettors can also be more fuel-efficient under normal driving conditions because the secondary barrels only open when additional power is needed. This allows the engine to run on the primary barrels during light load conditions, conserving fuel.
Application: Four barrel carburettors are designed for performance-oriented vehicles that require greater fuel flow to achieve higher power outputs. They are more complex, with additional components to manage the secondary barrels’ opening.
In summary, a single or two barrel carburettor is typically used in standard vehicles for everyday use, offering simplicity and fuel efficiency. In contrast, a four barrel carburettor is used in high-performance applications, providing the capability for greater power output and higher fuel flow when needed.
Drag racing cars use high CFM (Cubic Feet per Minute) carbs by default as they deliver more power due to the higher amounts of fuel that can be produced and mixed with more air. Various configurations of carbs on spacers or types of opening in the manifold will produce more low down torque or higher top speed. Drag racing crews often state that carbs use less fuel than EFI (Electronic Fuel Injection). During drag racing the carb valves are held wide open to give the maximum intake of fuel and air for combustion to give power and torque, the racing crews are not particularly worried about idle or general driving. The carb can also be paired with super chargers to compress even more fuel air mix into the engine giving even more power. That is whole nother story for another day.
Carb manufacturers often use similar terminology such as these:
Primary Valves
Function: The primary valves are the main components for regular engine operation, handling most of the air-fuel mixture delivery during idle, cruising, and light acceleration.
Components: They include throttle plates (butterflies) that open as the driver presses the accelerator, allowing more air to enter the engine. The fuel is mixed with this air in the venturi, a narrow section that increases the velocity of the air and helps atomize the fuel.
Operation: These valves open gradually in response to the throttle position, providing a smooth and controlled fuel delivery for efficient engine performance.
When a carb fitted car starts up they are usually running a ‘choke’ to give even more fuel (rich) mixture while the car warms up. This process is normally a mechanical or electrical plate that closes or partially closes the air intake on the primary valves
Secondary Valves
Function: Secondary valves provide additional air-fuel mixture during heavy acceleration or when extra power is needed, such as during rapid acceleration or high-speed driving.
Components: Like the primary side, the secondary side also has throttle plates, but these are typically larger to allow a greater volume of air and fuel mixture when open. Some carburettors use mechanical linkage, while others use a vacuum mechanism to control the opening of the secondary valves.
Operation: The secondary valves open either mechanically (linked to the primary throttle plates via a cam) or via a vacuum system that senses engine load and demand for additional air and fuel. They remain closed during normal driving to conserve fuel.
Secondary cams can be custom adjusted to come on earlier or later as required for the type of power delivery required.
Differences of primary and secondary valves
Size and Flow: Secondary valves are usually larger than primary valves, allowing for increased air and fuel flow during high-demand situations.
Control Mechanism: The primary valves are directly controlled by the accelerator pedal, while the secondary valves may use a mechanical linkage or vacuum actuation to open. This setup allows for a more progressive and efficient increase in power.
Fuel Delivery: The primary circuit handles most of the fuel delivery, ensuring efficient operation under normal conditions, while the secondary circuit kicks in for performance situations, providing an extra boost of power.
Under snap or sharp acceleration there are additional jets that squirt the primary and secondary valves to boost the initial fuel mixture. If this wasn’t the case when the valves open, the initial suck in of air would run to lean and not give enough power to the cylinders.
Manufacturers of Carbs
Holley and Edelbrock are two of the most popular brands of carburettors, especially in the aftermarket performance market. While both companies produce high-quality carburettors, there are distinct differences in their design, tuning, and performance characteristics. I will concentrate on these two manufacturers for now. There are many other specialist manufacturers of carbs for specific types of applications out there as well, but they tend to be much more specialised.
Holley Carburettors
Design and Features:
Modular Design: Holley carburettors are known for their modular design, which allows for extensive customization. They typically feature replaceable jets, power valves, and accelerator pumps, making them highly tunable.
Mechanical or Vacuum Secondaries: Holley offers models with both mechanical secondaries, which are linked directly to the throttle, and vacuum secondaries, which open based on engine demand.
Double Pumper Options: Holley’s double pumper models use dual accelerator pumps, providing an extra fuel shot for aggressive throttle applications.
Pros:
Customization: Highly customizable due to the wide range of interchangeable parts, making them suitable for fine-tuning specific performance needs.
Performance Focused: Holley carburettors are often favoured in racing and high-performance applications due to their tunability and ability to support significant horsepower.
Availability of Parts: Extensive availability of aftermarket parts and tuning accessories.
Cons:
Complexity: The high level of tunability can make them more complex to set up and adjust, which can be daunting for beginners.
Maintenance: Requires more frequent maintenance and tuning to keep them running optimally, especially in high-performance environments.
Edelbrock Carburettors
Design and Features:
Simple Design: Edelbrock carburettors feature a simpler design with fewer parts compared to Holley, which can be advantageous for ease of use and reliability.
Mechanical Secondaries: Typically, Edelbrock carburettors use mechanical secondaries that are linked to the throttle position, providing a more straightforward operation.
Electric Choke: Many Edelbrock models come with an electric choke, which simplifies cold starts and improves drivability in various conditions.
Pros:
Ease of Use: Generally easier to install and tune, making them more user-friendly, especially for less experienced users.
Consistency: Known for their reliability and consistency in performance, with less frequent tuning needed.
Fuel Efficiency: Often more fuel-efficient than Holley carburettors, making them a good choice for street-driven vehicles.
Cons:
Limited Customization: Less tunable than Holley carburettors, which might limit their performance potential in highly customized or extreme performance applications.
Parts Availability: While parts are available, there is a less extensive aftermarket for tuning components compared to Holley.
Summary
Holley carburettors are ideal for those seeking maximum performance and customization. They are well-suited for racing and high-performance applications but require more knowledge and maintenance.
Edelbrock carburettors are user-friendly and reliable, making them a good choice for enthusiasts looking for a straightforward installation and consistent performance, especially in daily drivers and lightly modified vehicles.
There is are parameters to the carb sizing. A to big a CFM will cause ‘bore wash’ where fuel is unburnt in the cylinders and washes the oil lubrications for the cylinders walls. This will also be wasteful of fuel as it’s just being unburnt. This could also cause the engine to flood and some very poor running.
If the carb is to small not enough fuel air mix is provided and will cause poor running even running hot.
I have found some videos of a carb working under loads. These videos show, start up, revving, initial fuel shot under revving, and full throttle. The second video has a whining sound in the background, this is probably due to a super charger. Regardless of the make, the principles of how they work are exactly the same.
Sound On!
Carb Calculations
To fit a carb you can replace the like for like of course, but to get more power you don’t just slap the biggest carb on the engine you can. To big a carb will cause very poor running and give you the exact opposite you wanted and make the car worse. To small a carb will starve the engine of the full power potential. There are various online calculators to work out the optimal CFM carb size you need for a particular engine size, speed and efficiency.
That formula can seem complicated for calculating the correct CFM for carb on a particular engine. Broken down with an example looks like this:
CFM (optimal) = Cubic Inches x RPM x Volumetric Efficiency ÷ 3456.
Any ordinary stock engine will have a volumetric efficiency of about 80%. Most rebuilt street engines with the usual average bolt-ons have a volumetric efficiency of about 85%, while race engines can range from 95% up to 110% efficiency.
Example: Using a 355 CID engine x 5,500 max rpm = 1,952,500
Take 1,952,500 x .85 = 1,659,625
Then 1,659,625 ÷ 3456 = 480 CFM
Even with about a 10% cushion, a 500 CFM carburettor will handle this engine great. If you try this formula yourself, be honest with how much rpm the engine will see. You’d be better off with a carb smaller than needed rather than something oversized that can lead to poor drivability and performance.
Higher Tuning
There are various ways to improve, or fine tune a carb to the exact requirements. This will be changing of ‘jets’ or ‘cams’ as required.
Pilot Jet: Located in the float bowl, the pilot jet provides fuel for starting, idling, and the initial 20% of throttle range. It draws fuel through small holes as air flows through the carburetor.
Main Jet: Larger and usually screwed into the needle jet, the main jet controls the air/fuel mixture from around 75% throttle to full open throttle (100%).
Needle Jet: This critical component controls fuel flow between 20% and 75% throttle. It consists of the hollow needle jet and the jet needle, which adjusts fuel flow as you open or close the throttle.
Air Screw: A small brass adjustment screw near the carburettor inlet, the air screw works with the pilot jet for starting, idling, and initial power delivery (up to 20%). It allows slight adjustments based on atmospheric conditions.
Cams: are a mechanical parts that will determine when (usually) the secondary valves open and close. The cams can be made to bring on the deployment of valves earlier, later, wider or smaller openings.
Float bowls: will determine when the idle reserves of fuel or secondary valves reserves of fuel, again critical for smooth running.
Tip:
More often than not, when playing with carb settings do little bits at a time to see what happens. Ask your self why do i need to adjust the carb, is it running poorly because of poor fuel? Then adjusting the carb to sort it out will all need undoing again when you put good fuel back in.
Don’t change everything in one go as you will be in for a whole heap of hurt chasing your tail finding out what is wrong. Adjusting mixtures can have a similar effect of changing jets. Different cams or adding spacers and altering timings, you won’t know if one item has had a negative effect or a combination of things if the car runs badly.
I have gone into the depths of carbs and how they work, pro’s and cons of spacers, four hole or open hole, EFI controlled versions all in this page here, or copy and paste the link to your browser below.
There is just so much you can talk about and to be honest, and it’s a bit of a dying art to tune these carbs up, screwdrivers, spanners, vacuum gauges, experience, feel of the response in the car and probably most importantly – by ear. Take a look at the page above to see the intricacies of a carburettor.
As I mentioned yesterday, the club stand and VIP area of the show was covered and now it was time to move to the privateer field which was crammed full with some amazing cars. there was a a couple of commercial stands there with the likes of John Grose (Ford) and another second-hand car sales. There was a brass band and long queues for every ice cream van and cold drinks stall you could see. This is just the bottom few rows of cars. It was busy and getting hotter by the minute.
We started at the top of the field and zig-zagged our way through the lines to the bottom.
I put the Mustangs together from this field, including one that has a similar colour to mine that has lots more chrome under the hood.
Perhaps my favourite car from the show is this Aston Martin Vantage, just stunning.
The oddity of the show was this amphibious vehicle and mini boat!
There were some Super cars there I have batched together;
After a long time walking around, hot and hungry we made our way back to the stand for some refreshments.
We left at around three in the afternoon an hour or so before the show closes and we could miss the traffic. There was number of other people thinkin’ as we did and we still had a few minutes queue to get out. Craig was taking videos at various points and I compiled a them together to a single video. Turn up the volume and enjoy!
Thanks to the SXOC for letting us park on their stand and to Craig for the company, amusing comments (one of which was in the video), this video footage and pics! Another great car show with no rain.
I was going to post all about my second to last car show, but I have some exciting news where I have teamed up with Mustang Maniac which I can share with you today. (I have been given permission to use their photos and video.)
Mustang Maniac has developed a replacement standard “T handle” shift lock for the early Mustangs ’64 to ’73.
It’s called the “T Park Lock”
The handle is designed to be a direct replacement part of the original T handle, but will retain that all important stock look. The lock works by putting the shifter into ‘Park’ and simply pressing in the button on the right of the handle. This locks the black button on the left from being depressed and so you can’t move the gear stick into any drivable position and the gearbox stays locked in ‘park’. Simple, but effective. Anything we can do to slow or prevent our precious cars being stolen is worth it. For a relatively small amount it think it’s a must have purchase to be honest.
With the lock in place nobody will really notice any difference from the stock T handle.
When the handle is unlocked the barrel will spring out and stop. With the lock disengaged the chrome of the handle continues on to the lock barrel itself.
When you have unlocked and removed the key (optional to remove the key), you just shift as normal, if you do press the button in while going along, you can still shift to neutral when convenient to unlock again. Or if you prefer drive with the key in the lock simply unlock again when you need to.
The lock comes supplied with two keys and as are unique to that lock, none of the that one key fits all the locks the same!
To fit the lock it’s a two minute job, remove the old handle, replace it with this one and tighten into place. For added security you can place a small drop of glue onto the grub screw to stop it being removed via the allen key. No garage fees to fit, or maintenance. Fit and click.
I have personally been using the prototype of the product for the last few months and it works flawlessly. To see it in action the Mustang Maniac guys put up a video of the lock in action.
I will be selling these and can be purchased here.
You can also see the link under my “For Sale” heading in the top menu bar.
The first car show of 2020 (for me anyway), which took place last Sunday 16th 2020 at Stonham Barns in Suffolk. It took me about twenty five minutes to get there at a gentle pace. I arrived at about nine fifteen and the sky was grey. Forecast was forty six percent chance of rain, I figured it was worth the gamble, I had to go. I parked up with the Bury Retro Car Club whom had a club stand on the tarmac and not grass which is always nice. As I always do when I park up, I wiped the little ol’ lady down with some quick detailer, paying particular attention to the windscreen with glass cleaner. I think the glass had collected more than its fair share of insects for the short trip.
I decided to go and get some photos before the promised rain was due to arrive just after lunch time. With no particular order some cars that took my interest as I wondered around. the sun even showed it’s face for a few minutes now and then.
A while ago I did a little article on the Ford Capri being the UK Mustang here, these photos show the comparison next to each other which was rather nice.
There seems to be a growing trend in the UK for half cars to be the trailer:
More Mustangs including this red ’69 done to concours standards.
VW were out in force and the patina on the beetles was a little extreme, when it’s flaking off.
The rest of the cars I liked:
There was a number of stalls there too, nothing to fancy just the usual auto jumble, which was on the grass just behind the club stand.
Bury Retro Car Club stand:
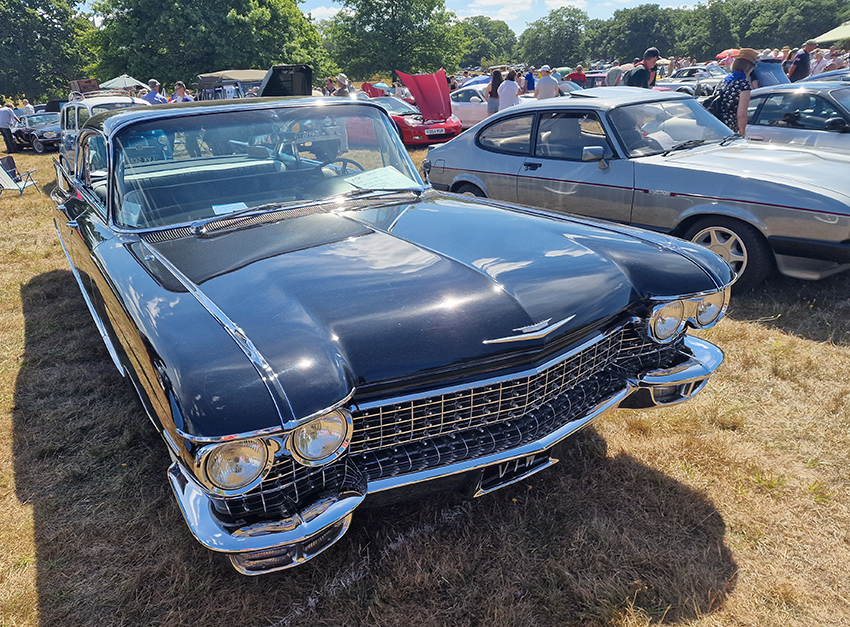
I thought mu car was quite a long car, when compared next to a stretched Caddy – It’s tiny. The front of the cars lined up more or less level.
You can just about catch a glimpse of me chillin out and chatting cars just behind my car.
I took a few pics while sitting in my chair of the new wax I have been using. I did notice the clarity of the shine while sitting there.
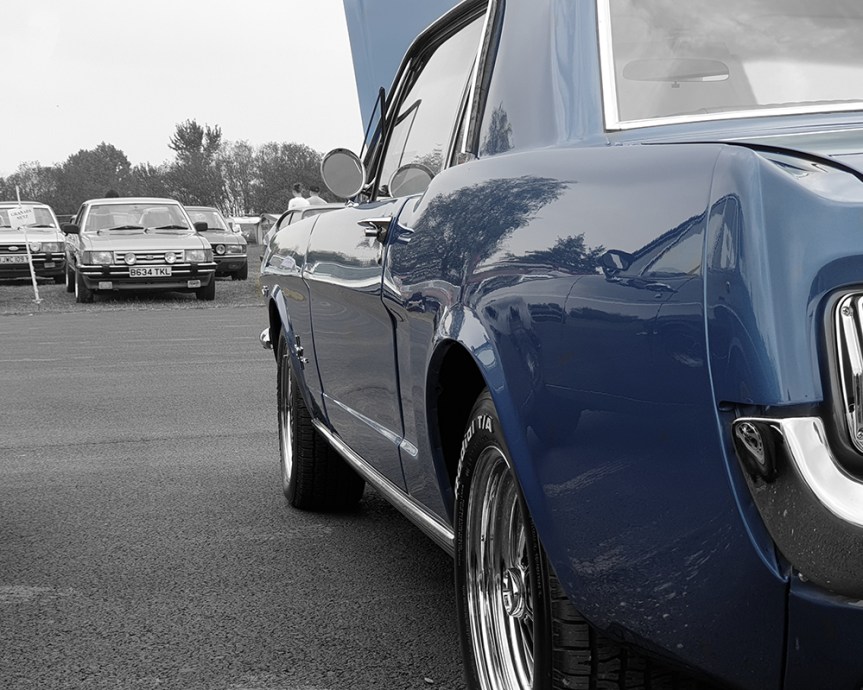
I thought I would play around with the colours a bit on this one, black & white with a little hind of car colour.
I left at three in the afternoon an hour before it was due to shut, the wife had text me to say there was thunderstorms at home. I wanted to get home before the car got soaked.
The clouds were blackening up as I did a very quick wipe over before I covered the car up in the garage. As I got out the car in the garage the heavens opened and it chucked it down. That’s what I call perfect timing, literally thirty seconds from rain.
For once I went to a car show and it didn’t rain, I was well chuffed. What could be better than than? I know – a pic of me in the review view mirror of the Jag XJ6 next to mine! I didn’t move the chair to take this pic I just happened to look up and there I was.
I needed that car show. I just had to get out and catch up with friends again, grab some fresh air and look at cars, lots of cars. I had two offers to buy my car during the day, one which was some bloke takin the p!$$ or trying to wind me up I’m not sure which, the other guy gave me his card just in case I wanted to sell, after asking me some good questions about the history of the car.
There are two more scheduled car shows this year that I have booked in to attend. Will the rain hold off for me so I can get to them? I hope so, with all the rain I got caught in last year, it’s the least mother nature could do for us considering the pandemic we have endured so far.
I wasn’t sure if I was to split this post into two or not. I eventually decided to keep it all in one place. It might be a bit of a long post but I think it’s worth it. As a follow up to my mega wax comparison test the write up for my comparison of Dual Action polishing pads is now completed. This post has taken me many, many hours to collate and put together, not only for my own sanity of product comparison all in one place, it will hopefully be a help for you as well. That’s regardless of being a Professional Detailer or a Weekend Washing Warrior like me.
There is a huge minefield out there when it comes to buffing pads by various manufacturers for similar products. Although they may look the same they can perform very different tasks. They can do the same things but are different colours, it’s all very confusing. It drove me mad, so what I have tried to do here is create a chart of the most well known manufacturers and their Dual Action pad products. I chose the ‘Dual Action’ variables for a couple of reasons;
1) I have a Meguiar’s MT320 Dual Action tool.
2) Rotary tools and pads are for the experienced user or professionals. Incorrect use can damage your paint job. You have been warned!
I am a weekend washer as I mentioned, I’m not quite up to the professional detailing standards yet, but I keep trying. If I take my car to show or just taken out for a drive, I clean it via quick detailer product when I get to where I’m going. When I get home the car gets a full waterless wash before it goes in the garage and covered up again.
I found many charts and explanations from many sources, but none that done a full comprehensive comparison side by side. My Pad Guide which I collated below is for reference and you really should get the right pad for the right job. The chart here is also downloadable in High Quality PDF as well. 🙂
I have tried to provide links to each manufacturer and the descriptions of their own pad products below. If you find any others that may be of use, just let me know and I will try and add them.
Clicking on the individual links below will take you to that company’s website for more details. Some are great pages with lots of info, some are rather shabby to say the least. I honestly recommend having a look at the links as they will explain in greater depth why you should use their products and for what tasks.
I found a couple of images from the net (below) that are pretty good to explain some of the terminology of this coveted detailing skill. There are many, many books out there and plenty of ‘how to..’ videos on YouTube as well, so I won’t duplicate them here who are much better qualified to explain it than me.
Marks on the paint can be from poor washing routines, bird lime, tree sap, third party damage such as keys or car park dings, damage from hedges when driving to close or stone chips etc. These sorts of damage can spoil the look of your car may require the polishing step. The easiest way to remove these marks are with the DA pads.
First the misconception of ‘Polishing’ and ‘Waxing’ are the same thing! They’re not.
Polishing Pads or Cutting Pads or Compounding Pads,: Choosing your correct pad and polish combo is critical, using a waxing or ‘finishing’ soft or super soft pad won’t do much at all, and you will be there a while wasting your time. The courser polishing pads or ‘cutting’ pads are designed to work the product to the paint and not just apply it.
Waxing Pads or Finishing Pads: Most of the waxing or ‘finishing’ pads are soft or super soft, they are designed primarily to apply the product to the surface and not ‘work’ the product into the paint as such.
A little common sense; before you decide to polish, you must wash the car thoroughly. I won’t go into the full details of how to wash your car, but I will touch on the main points before the polish and the eventual choice of pads. You can use waterless washing if you want of course, but applying waterless washing tends to add an element of protection to the paint.
An ideal prep for a polish is to use a pre washing “Snow Foam” first if you can. This tends to remove the worst of the debris on the car as a touchless process. If you don’t have access to a snow foam, then at least rinse the car first and then wash the car using the two bucket method with a wash mitt, not a sponge. Remember that a good quality shampoo should nourish the paint and prepare it for a wax layering process, it shouldn’t remove the wax that is already on the paint surface. The least amount of contact with the dirty paint is desirable.
Remove any wax that is on the surface of the car’s paint. This is a separate step after washing using a specific product just for that wax removing job. However, some of the cheap and nasty car washing products will also remove the wax at the same time as washing, saving you that extra wax stripping step. Use a proper de-wax wash product like Chemical Guys ‘Clean Slate’ to leave the paint bare to the elements. Don’t be tempted to use cheap washing up detergents to wash the car, as they themselves can also be abrasive and often contain salt.
Once the car is washed clean, there is a step that is often overlooked before polishing; the ‘Clay bar’. This is as it sounds, a piece of soft clay which is flattened out into a thin pad and rubbed over the surface of the paint using fingertips. This clay lifts the stubborn contaminates and they in turn stick to the clay. Use the clay with a recommended lubrication and turn frequently to a fresh piece of the clay when it becomes dirty. If you drop the clay bar, Never Ever pick it up and re-use it on the car, get a fresh piece and continue. If you dive straight into the polishing stage you could end up dragging these foreign particles over your paint making things worse. It’s always best to try and get the paint as smooth as possible first before you tackle that polish stage. I have review links to a great clay bar from Bilt Hamber here and pretty poor clay bar from Auto Finesse here. Choose wisely, not all clay bars are the same, some work and some really don’t. A Clay Bar will also remove wax as well. Rinse the car and dry thoroughly.
Tip: Polishing is an acquired skill and shouldn’t be taken on with a slap dash approach. Go to a scrap yard, get an old fender or hood and practice on that first. Practice on an old car, or a favour to mates old car. With a heavy cutting compound, or an overly abrasive pad along with undue pressure being applied during the polishing process, there is every chance that such an abrasive combination could take the paint of your car. Rule of thumb is that a polish cleans the paint with mild to very abrasive product.
Some polishes are known to have fillers to hide imperfections and to give a richer look to the surface paint of the car. Auto Finesse ‘Tripple’ is such an example or Meguiar’s ‘3 in 1’.
Another step than can be used instead of a polish is a ‘Glaze’. This can be applied by hand or a DA machine. This product is a filler for fine scratches or swirl marks. This will only mask the problem of damaged paint. It certainly won’t cure or fix the problem like a proper paint correction or polish would.
What is Polish and Polishing?
Depending on the paint condition this will determine the pad and polish product you will need to use.
Polish, or sometimes referred to as a ‘compound’ is usually in the form of a liquid which contains a varying degree of abrasive content. The polish abrasiveness is also referred to as it’s ‘Cutting’ strength. During a polish you are in effect removing microns of your paint, the harsher the abrasive or cutting, the more of the paint or clear coat will be removed. Polishing can also restore the shine of the paint on your car from a faded or neglected surface. If you see some slight discoloration, damaged paint from bird lime or similar, or when you think there is a lot of dirt that has got stuck on the surface that won’t be removed after a wash with a good shampoo, it may be better to go for the polish. Small scratches can be reduced or removed after a polish. This can also be known as a ‘paint correction’.
The majority of the time a Polish will require multiple applications of finer or less course cutting polishes and softer pads to obtain that smooth mirror like surface. Rule of thumb, start soft. If nothing is happening go heavier and work back to the light combo again. If the paint is getting to hot – STOP. Many experienced detailers and car body work painters just know what they need to use.
Why Polish?
Simple answer is that if you see scratches or swirls the polishing step could remove them depending how bad they are of course. This would leave a mirror looking paint if done correctly.
How does it work?
The light hits our eyes at strange angles, which shows up as a scratch, blemish, swirl etc. on the paint work. If the paint is smooth with no marks the light is bounced in an even manor. This is explained a lot better with the help of a little diagram towards the end.
What is Wax (ing)
Wax is just a protective coat to protect the paint of your car from the elements, prolong the longevity and lustre. There are two main products, natural and synthetic. Natural tends to offer the best shine with not much longevity. Synthetic offers the best longevity but not quite a good a shine. There are of course mixtures of the two and hybrids. Some of the ‘hybrids’ are now incorporating the ‘ceramic’ technology which is creeping into the consumer market. Natural waxes are often found at high quality car shows or concours events to show the paint to it’s full extent. Synthetics are for generally for daily cars who also want a nice shine. Waxes have moved on with technology, these waxes often come with UV protection to help stop paint fading in sunlight. They last longer, apply easier and offer great value for money, well in most cases anyway.
There is also another step that can be applied, that is ‘Sealer’. this is applied before the wax as it says coats the paint job to protect it better than a wax – so it’s said. Sealers do one job only and not designed for pure shine. More to protect what you already have before the shine is applied.
Waxes come in two main application forms; liquid or paste.
Paste wax or hard wax, is more of the traditional method and often classed as old school. Often requiring application, curing and then buffing to a shine, often repeated to build up the protection or shine. Usually the enthusiasts or connoisseur’s choice. These products are best applied as ‘a little goes a long way’.
Liquid wax or soft wax, is the modern approach. They tend to be quicker, easier and generally don’t require cure time or additional applications, also know as ‘wipe on, wipe off’ products. The down side is that you tend to use more of the product.
Why Wax?
Waxing protects the car from elements and even sunlight. It also makes the car look good and helps to retain the vehicles value.
How does it work?
The wax forms a protective barrier between the paint job and the elements.
There is no right or wrong for the type of waxing you take, what ever suits you. I have it on good authority that there are no differences between the paste wax and the liquid waxes apart from composition. The only real choice you have is what you want the wax to do, last, shine or a bit of an all rounder?
Understanding the paint problems
I found these various diagrams to show what the polishing is designed to do. Make the paint as smooth as possible, then protect it with wax (or sealer).
They say a picture speaks a thousand words and I think these pictures do just that to explain it better way than I ever could.
Some examples of things that can damage the paint and how badly, and yes that does say ‘fingernails’!
As I mentioned earlier on how the eye sees the light. If light reflects badly and is distorted instead of a bouncing straight back, that is when you get to see the marks on the paint as shown here:
Various way to fix this is the buffing with pads to get to the bottom of the damage to leave a smooth even reflective area. As I have already explained, things likes glazes, sealants and waxes can help along with disguising these areas of damage to make the light reflect in a much more uniform manor. Thus making the surface look smooth and shiny again.
Then we get a little more techy with the thicknesses of paint and how the paints are applied. Of course the different applications of paint (Single coat, 2 pack, water based, cellulose etc.), amount of paint applied, types of paint; solid, metallic, pearlescent, matte, special mix custom. The type of primer, fillers, top coats, clear coats all need their own types of care. For some one product may not work the same on another manufacturers paint etc. Some manufacturer paints are known as hard paints, while others are considerably softer. This diagram shows the generic application of thicknesses, these vary wildly depending who done what. Some respray jobs cost £2,000 and others £20,000 and that’s for a good for a reason.
The ‘basics’ of the paint application;
Don’t worry that is as technical as it will get about paint and the theories behind it. After all we are just looking at the comparison of pads to ‘fix’ the paint, according to my very own comparison chart above.
When I mentioned the combination of products and pads above, this is the visual representation of just that.
Not all these DA pads are for polishing or cutting alone. Oh no, Many people use the much softer pads to apply the waxes to the car for a much easier, smoother and even application of wax. I have a link here on 10 wax comparisons in a mega test.
During the last quarter of last year, the UK had a few nice days of sunshine and as I had a few days off work owing to me, I decided to use my holiday up. That time was put to good use and completed a little project I wanted to try for myself. It’s often done on YouTube, but not to this degree, I think.
There are often a few car cleaning products compared on YouTube channels, but not ten side by side, with the same testing criteria by the looks of it. When I say “Top Branded”, I mean top manufacturers and their best selling products for normal weekend washing warriors on the street. Those of us who like the best products that work and at reasonable prices using traditional waxes, not the latest in thing of ‘Hybrid’ or ‘Ceramic’ waxes. Lets face it, there are some truly great products on the market at the moment, some of which are even essentials of my own cleaning routines, still. To put this into context there are waxes out there that are expensive for expensive sake, like Swizöl International’s Divine costing £2,150, Brough & Howarth’s Definitive Wax Marble costing £24,000, Zymol Vintage Glaze costing £2,400 or The Ultimate Shine costing an insane £65,000 which can be seen here: http://www.performancemotorcare.com/car-cleaning-product-news/worlds-most-expensive-car-wax/1808
However, there has been (a strong) rumour that the ‘Ultimate Shine’ wax itself is actually made by Mitchell & King in Scotland. I can’t verify this, but can only state what I have read so far. The original mix (allegedly) sold by M & K is called Gold Rush Rally at £75 a pot which is a mere 0.11% of the price! This brings me back to my point, although these ten waxes are (mostly) affordable and will last a good number of applications, they are not in that stupid silly money league. However there is an in-between level of Luxury car waxes such as Swissvax Crystal Rock at £300, BMD Prometheus £120, Auto Finesse Desire at £120 and Mitchell & King’s top of the range wax ‘Lily’ around £600 where only One pot is made a year, or anything in between from M&K for a comprehensive range of waxes between £45 to £600.
I will be reviewing Mitchell & King’s ‘Lily’ in a very special review coming soon. This was purchased with my wife’s very own money for a special Christmas gift. Before anybody asks – No, I’m not on commission or paid by them.
If you can afford those crazy sort of prices I suspect you will get somebody else to clean the car for you. I’m guessing most of those super high end waxes are being applied to Veyron’s, Ferraris or any other super or hyper car where money is no object. Then there is the other end where Poundland stores sell car shampoo for £1. Pure logic dictates that there has to be a difference right? But somewhere in the middle, there is a sweet spot and that’s these sort of products I have reviewed here.
Anyway, back to these standard off the shelf and top selling waxes, I have been very happy with most of these waxes and will continue to use them on my daily cars. Some do a great job and perform well after application. That’s why I really wanted to compare these particular mainstream products. Picking the best of the best that I like, then at a later date this summer step up to the ‘Real Luxury’ car wax to see the real differences, if any. But a couple of these waxes are getting close to treading on the toes of the ‘Luxury wax’ end of the market; Dat Wax and Illusion based on their cost to volume ratio. The scores I have given in the past to some of these products I stand by. At the time I didn’t know any better or had anything else better to compare them against until now that is.
Costs:
Multiple products which varied from a very reasonable £12 to a eye watering £75. All these products I purchased myself, no sponsorship to skew reviews. These are my own thoughts and findings for the products with my own hard earned cash I parted with for each of them.
Meguiar’s :
Gold Class paste £21 for 311g click here for individual review
Ultimate Wax Paste £40 for 311g click here for individual review
Mirror Bright Polish Wax £23 for 226g click here for individual review
Nxt Gen liquid Wax 2.0 £26 for 532ml
Auto Finesse :
Glisten £12 for 500ml
Illusion Show Wax £75 for 150g click here for individual review
Chemical Guys :
Butter Wet Wax £23 for 473ml
Cherry Dripping Wet wax £23 for 473ml click here for individual review
Instawax+ £16 for 473ml click here for individual review
The full video of this test can be found on my YouTube channel orherefor the shortcut or paste the link to YouTube. It’s easier to see what is going on rather than read about it. The video lasts for thirty two mins or so and has be trying to film, commentate, wax and buff all at the same time. I think I pulled it off after a bit of editing.
I have reviewed many products for detailing, especially waxes and quick detailers. Some have been rated 10 out of 10 by me when I tested them. Which at the time was correct as I used the product in isolation. However, there are always those nagging thoughts in my mind; what about side by side comparisons? Are the expensive waxes worth it? Can you tell the difference? I aim to answer these questions the best I can.
When you apply a wax on it’s own you can only gauge by what you are working with, application may be great and buffing at the time. But, you forget how others perform that you had previously used or reviewed.
So; I got my favourite waxes out and decided to compare them. That’s five hard paste waxes – old school and my preferred option. Then five soft or liquid waxes of similar products not made in a wax form.
The top three big boys are Meguiar’s, Chemical Guys, Auto finesse and a wild card of Dat Wax.
There are only really three actual ‘hard’ paste waxes which are the Meguair’s trio, Gold Class, Ultimate and Mirror Bright Polishing Paste Wax (made by Meguiar’s). The Auto Finesse Illusion and the Dat Wax are both very soft butter texture type waxes not quite liquid, but not a hard paste in comparison either.
The Sales Pitch(s):
These are found under each of the reviews I have done to date. See the links above. I still have a proper Glisten review to do and my latest purchase of the Butter Wet Wax.
Each of these products claims to have the best shine possible and protection, but they can’t all be right can they?
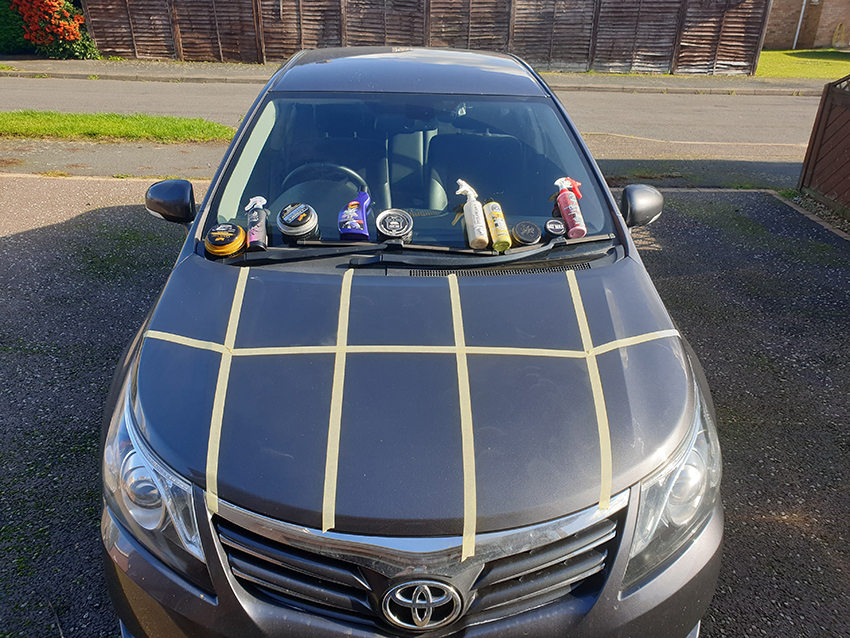
Instructions:
The instructions were followed on the tins and bottles of each product. The donor hood was my 2014 Toyota Avensis in a metallic grey. I divided the hood into roughly ten even sections via some masking tape. The day was overcast and sunny, but not enough to make the metalwork hot to the touch.
The top five sections were for the hard waxes, and the bottom five sections were for the soft waxes.
Top; left to right – Meguiar’s Gold Class, Meguiar’s Ultimate, Mirror Bright Polish wax, Auto Finesse Illusion, Dat Wax.
Bottom; left to right – Auto Finesse Glisten, Meguiar’s NXT Gen 2.0, Chemical Guys InstaWax+, Chemical Guys Butter Wet Wax, Chemical Guys Cherry Dripping Wet Wax.
Application:
The hood was first given a wipe down with quick detailer to get the light dirt off.
The hood was then clayed with Auto Finesse clay bar and a Megs Quick Detailer, not the greatest detailer it has to be said, it’s recommended by Meg’s as a clay lubrication product as well.
The hood was then given a good spraying with 99.9% Isopropyl Alcohol to remove anything left, which was quite a lot based on the clean white 100% cotton cloth.
My fingers dragged and squeaked across the paint, I knew then it was clean. The hood was the taped up ready to apply the products.
Each Product
Rather than going into pages and pages of what I did and how I did it, the video will show you each product as I went along.
Each product was applied with a clean applicator or cloth. The pastes and liquids were left to haze except for the Auto Finesse Glisten which could be buffed off straight away. It took around 15 minutes for all the waxes to cure / haze over.
Each buffing was done with a clean 280gsm microfiber cloth all from the same manufacturer for consistency, the only difference being the colours. I tried to apply each product in the same way, and buff off in the same way. The only difference being the Mirror Bright Paste as that required working into the paint as it was a polish as well. Failing to apply that correctly would have compromised the product. It’s interesting to note that the Auto Finesse Illusion and the Dat Wax never actually hazed over probably due to the oil content not evaporating.
I tried to apply the products to the paint for the same amount of time, and buff to a shine for the same amount of time for continuity.
Each product was only applied once to the cleanest of my paint work I could muster up. That way they all have a same starting point. It was obvious that some required additional coats to get to the desired levels of coverage. But, to be honest, you do need to actually build up the wax layers. It wouldn’t be fair to apply two coats of one and just a single coat of another.
The Video
This is a full half hour video I uploaded to my YouTube channel. The Video has me narrating (some say droning) on what I was doing and what I had found on the comparisons. Put thirty minutes aside and enjoy.
Results:
Don’t get me wrong, I like these products or I wouldn’t have bought them in the first place. I have previously given some of them 10 out of 10 for a review. They are all (mostly) great products from the top suppliers.
HOWEVER; when they are side by side there is a difference and I didn’t think for one second that the results I got were what I was going to predict below, that actually shocked me.
The results I decided to do in three categories. Touch, Shine, Water Sheeting/Beading.
The Touch Tests:
No matter where I go at a car show and my car is all shiny, somebody wants to feel the paintwork. Not sure why, but they do. So I decided to make that a test. No amount of photos will ever show you the feel of a wax.
Process: I had a single cloth soaked with Isopropyl Alcohol that I could wipe my fingers on between each touch test. That way I had no other waxes on my fingers to cross contaminate to the next touch test.
After a single application of the products and allowed to cure then buffed, touch test was ready. This was a simple feel for the surface, was it smooth, was it streaky or still there. My fingers really could feel a difference. The Meguiar’s Gold Class applied an adequate coating, but no doubt about it that it needed two or three applications to become a nice smooth barrier like the rest. It was really odd to feel the paint roughness still though.
I often refer on the video to a wet feel, of course it wasn’t wet, but just sort of feels silky or smooth buttery texture.
The touch test results are for the Pastes waxes:
1) Mirror Bright,
2) Dat Wax,
2) Auto Finesse – Illusion,
4) Megs – Ultimate,
5) Megs – Gold Class
Conclusion for Paste Waxes: The mirror Bright just felt like glass where as both the Dat Wax and the Illusion felt more oily which was to be expected by their constitution to be honest. Some may prefer that type of feel. Ultimate was in no way a let down and felt like the Mirror Bright but not quite as deep feeling as it were. The Gold class could be felt as a coating there but certainly not great on a single pass.
The touch test results for the Liquid waxes:
1) Chemical Guys – Butter wet,
2) Chemical Guys – Insta Wax+,
3) Megs – Tech wax 2.0,
4) Chemical Guys – Cherry Dripping Wet,
5) Auto Finesse – Glisten
Conclusion for liquid waxes: The CG Butter Wet Wax was the clear winner here with the Instawax+ with hardly any difference and a close run for top place. Megs Tech Wax 2.0 felt just like the Ultimate and a glassy feel to it. The CG Cherry Wet Wax was super smooth but just shaded a little by its siblings, a second coat and I would say it would be right up there with the winners. Glisten was on there but felt more watery based and you could feel there wasn’t much of a coating on the paint work, although a little better than then Gold class for a single application.
Overall: There is a difference between the feel of the waxes. The pastes are applying a thicker coating than the misting of Glisten for sure. Especially when you run a finger from bare paint to the waxed areas. It’s a very close thing between the Butter Wet Wax and the Mirror Bright. For a straight forward wax on the Butter Wet takes it, for a little cleanse and slightly harder work the Mirror Bright takes it. The Dat Wax and the Illusion over car show coatings feel like an oily coating to give that much desired consistent smooth look across all panels.
The Visual Inspection
Process: After the applications I was going to look at the colour and how the reflectivity, gloss, depth and warmth of colour of the waxes looked on a paint job. As my car has metallic flake this would be a real tell-tale of shine.
As I mentioned before this was a single application of waxes and inspected from their. The sun was in and out during the inspection. When the sun was out the metallic was made to pop by some waxes better than others.
The results are for the Pastes waxes:
You can clearly see from the top of this picture that the Meguiar’s has warmed the colour of the paint and clear to see.
The results for the Liquid waxes:
This picture shows the same warming glow to the paint from the Chemical Guys Butter Wet Wax.
Conclusion:
As each of these products are now applied they should be performing as a finished product as it were. That’s the look of the waxes once applied and the effectiveness of the waxes.
There IS a difference in the way that these waxes can effect the look of a paint, say on a white car using a yellowish based wax will give a warmer glow compared to a white wax for example. It not as immediately obvious on much darker colours. I picked my Toyota as an example to test for the metallic and the neutral grey. My hunch was correct as the colour differences can be clearly seen.
Consider the look of the paint you require if you are that into it, or not worry it’s up to you.
Overall:
The waxes either the paste or liquid made little difference in the end to the look of the paint. A personal preference obviously comes into play as it does all the reviews. But I found the liquid of the Butter Wet wax and the Ultimate wax paste was virtually undisguisable.
1) (Meguiar’s) Mirror Bright Polishing Wax
2) Chemical Guys – Butter Wet
3) Megs – Ultimate
One thing to remember here, the hard waxes will last way longer than the liquid versions just by the nature of how they are applied. This could be a major factor when considering a purchase – value for money.
Water Tester Sheeting and Beading
Process:
I filled a gallon pot with clean water and chucked it over the car. This would show the clearing capacity of the wax properties for sheeting and beading.
I did multiple tests of the water deluge on the video and it’s very easy to see the differences.
On a personal note: to see the beading looks great as there is a barrier between the paint and the water. But as the car moves it will run off anyway. I prefer to see the water run off the car completely, but ‘Bead Bragging’ rights is a huge thing in the detailing circles.
Why do I prefer to see it all run off? Well if dirt lands on the car or dust it will sit around the beads. Once the beads are gone it will leave a dusty layer looking like a moon surface. With sheeting it will at least be a uniform film of dirt.
For the hard wax beading I found the following;
Meg’s Ultimate Wax
Mirror Bright
Meg’s Gold Class
Auto Finesse Illusion
Dat Wax
For the liquid wax water beading I found the following;
Meg’s Nxt Gen
Chemcial Guys Insta Wax+
Auto Finesse Glisten
Chemical Guys Butter Wet Wax
Chemical Guys Cherry Dripping Wet Wax
For the Overall Sheeting ability I found the following;
Chemical Guys Butter Wet Wax
Meg’s Mirror Bright
Chemical Guys InstaWax+
Dat Wax
Conclusion:
Without a question some waxes bead better than others, Meguiar’s take that crown here with both the paste and liquids.
Large amounts of water should run of quickly, and small rain drops tend to form together until the beads are to big and run off.
A little misting and ALL these waxes will bead very nicely and there isn’t a lot in it at all. In fact I would go far as to say you wouldn’t be able to tell the difference.
Perhaps by full on pour of the water is a little unfair, but the sheeting tests is similar to those used on ceramic coating demos. I was just showing the same type of reaction from a well applied wax.
The difference between the hard and soft waxes is minimal if at all.
Overall:
Such a difficult thing to sum up.
It has to be preference for application. Traditional or old school – Hard wax on, cure and buff off. Great results and little goes a long way. New or time saver – Liquid waxes apply and buff off to a great result. This method tends to use more product, but is cheaper.
Beading / Sheeting, under heavy water its easier to see the ones that deal with it quicker, but allowing for beading they all performed well with the hard waxes being the more consistent beaders.
Scores:
Various out of 10 for these as I have reviewed most of the products before, but more to come soon.
Conclusions:
I’m not convinced that the fine mist spray waxes like Glisten are on a par with the liquids / hard waxes from the other suppliers. Personal preference is a huge factor for application, you either see it as an art form process – hard waxing, or an exercise to keep the car protected and looking good – soft waxes.
Costs between these waxes is insane – £75 for Auto Finesse Illusion that applies beautifully and smells nice looked no different from Chemical Guys InstaWax+ at £16 once both buffed off to a shine.
There is an amount of snobbery regarding brands between users out there. But the big boys vs the cheap end of the market there is a difference no doubt about it. However when you get to these high quality level of suppliers, all their great products in relation to each other there is virtually nothing in it.
Some prefer the wax of ‘So & So’ because it doesn’t streak, but on another car’s paint it may be difficult to buff to a shine. I found that I am using mixtures of brands to get what I want from a detail for a show. No one brand has everything covered better than the rest. You just have to try it for yourselves. If you buy it again then you have a product that works for you. I have a couple of friend’s Craig and David who are both as sad as me when it comes to detailing, we swap products between us to see what we like. I may like the look, but not the process, where as he may like the gloss that I don’t. We have different cars and they are very different colours, white, grey, black, dark blue, light blue etc so we can see the varying results.
I do need to mention that the waxes are dyed. Thats the Chemical Guys Butter Wet Wax after applying it to a car for two coats it looked like had been smoking 60 a day for the last twenty years. Same with the Cherry Dripping Wet Wax which left me with red fingers like I had been picking strawberries all day. Just saying!
So, when I go to a car show and a want a wax on the car not just a quick detailer, then it’s a liquid wax. At home with plenty of time it’s back to the hard waxes. I never thought I would hear my self saying that, but I use both types of waxes now. So I have moved on with the times, I think.
Would I buy them again?
To be fair most of them I would, but not the £75 Auto Finesse pot or the Auto Finesse Glisten, not my favourites to be fair, but both are at the opposite end of the price scales to each other. The hard waxes will last me a good few years yet and will probably still be some left to polish the handles on my coffin when I drop dead! Having to choose, the Butter Wet Wax I would buy again, as I would the Mirror Bright polish paste.
Would I recommend any of them?
Without a doubt some I would; such as the Meg’s Ultimate and Gold Class (when multiple layers applied), Butter Wet Wax and Mirror Bright. However, it’s hard to recommend a wax for £35 for few fluid ounces in a little jar or a £75 for a wax that don’t last long as it’s a “show wax”. Especially if there is no real difference that can be seen straight away after application.
Like I said earlier, I am looking forward to using a premium hand blended quality wax which I will review and apply before some car shows – weather permitting of course. To suppliment this post I have also created a Dual Action pad comparison & guide from the manufacturers. Once I have written that up I will also post that very soon before the car show starts again in earnest. This post may not all be exactly Mustang related, but it could be for any car and I hope useful. I have learnt a lot from speaking to the designers of the products and I will share a little of that information in the next forthcoming posts. I am really pleased to say that the blog is also attracting some car detailers to and not just Mustang fans.
Weekend just gone I attended the Stowmarket Carnival which was held over two days with a classic car section on Sunday. The general public was let in from eleven onwards, but the cars had to be in before nine thirty, although they were still being let in at ten thirty. So, I decided to take my photos sooner than later without too many people around, and before more cars arrived. A nice mix of cars and some top quality restorations on show. It was one of the first days this year I could get my show board out without the wind and rain because the sun was out all day, I even had to apply sun cream, twice! There were stalls, a dog shows, live singing, and a fun fair too.
I follow on Instagram a group of ladies called ‘_modifiedgirls’ and they also have a website called ‘https://modifiedgirls.co.uk/’ I mentioned this because I see a FTO being lovingly cleaned by a couple of ladies. Without trying to appear anything other than a genuine car fan I got talking to Tara Ashton who confirmed that she was a member of the Modified Girls scene. We had a chat about cars and I have to say that these ladies do know their stuff. I also think it’s fantastic to see members of the fairer sex enjoying the car show scene along with the guys. Here is her FTO she rocked up in to the show. I said I would give her a shout out on my blog, consider it done.
This Mk1 Ford Escort GT was a preproduction model and was used by the media to review the car. A nice example with some serious provenance.
There was mixture of a few hot rods, kit cars, more modern cars and some restorations to wonderful standards. Did you know the Fiat 500 number was the engine size in CCs? That’s 500 cc’s or half a litre, for our US friends that’s 30.5Ci Abarth gave the engine a stage 1 modification up to 595cc (36.3Ci) which made 31bhp.
Triumph models were varied, Stag, TR6, Dolomite, Spitfire. I almost bought a Stag when I was looking for a classic car, but when I saw the Mustang, my mind was made up. But I still like the look of those stags. 🙂
Some of the other cars that took my attention, I didn’t bother with the Nissan Skylines, as for the Golf GTI’s, Jags, Vauxhall Corsa etc, I could have gone down the road to the Asda car park and seen as many as I wanted. Is that a harsh thing to say?
From the heading I mentioned wings as well as the wheels. The Saturday they had a fly by of a Spitfire (the classic WW2 plane – not the car being propelled through the air). On Sunday we were treated to a WW2 Lancaster Bomber. If I had of known I would have taken a proper camera not just a cell phone. But I tried my best to capture this incredible plane that did three low(ish) fly overs.
I turned this into a black and white picture, I think it works better than the colour pics. I took a video of he final fly over, the trouble is you just get to hear the fabulous noise.
I took this video of the last fly over, the trouble is that the video didn’t pick up the incredible sound the plane made. 🙁
To finish the post I must be going soft in the head or getting sentimental in my old age. I had a guy Andrew who loved my car and was looking all over it. He made a good presentation to me on why he should sit in my car. I let him sit in it after emptying his pockets of keys etc. so as to not to damage the upholstery, I even took a picture of him in my car, just because I said I would. Consider that done as well.
It was a hot day, but I’m not complaining about the weather for a change. 😀 I spoke to lots of people and had a great day. More of the same next time I hope.