A Little Padding

This week things look as though they have moved on quickly at Mustang Maniac, when in fact the process took a little under a couple of hours for the main project. What am I bangin’ on about? My new dash pad of course. Adam had some of these in stock, but he has pulled the stops out to get me in a Ford tooling dash pad, I have been spoilt. I saw the box and realised that the project was going to take a big leap today. Lots of pictures this time to make up for the previous weeks where I couldn’t take to many as I had my hands full.

The new metal part dash itself has been painted and as yet there is no further hints of the colour scheme inside. Me and Adam have had some long conversations and eventually sorted the colours out and the style. Some of it has been custom-made which have already arrived, but won’t be fitted just yet until all the adjustments have been done.

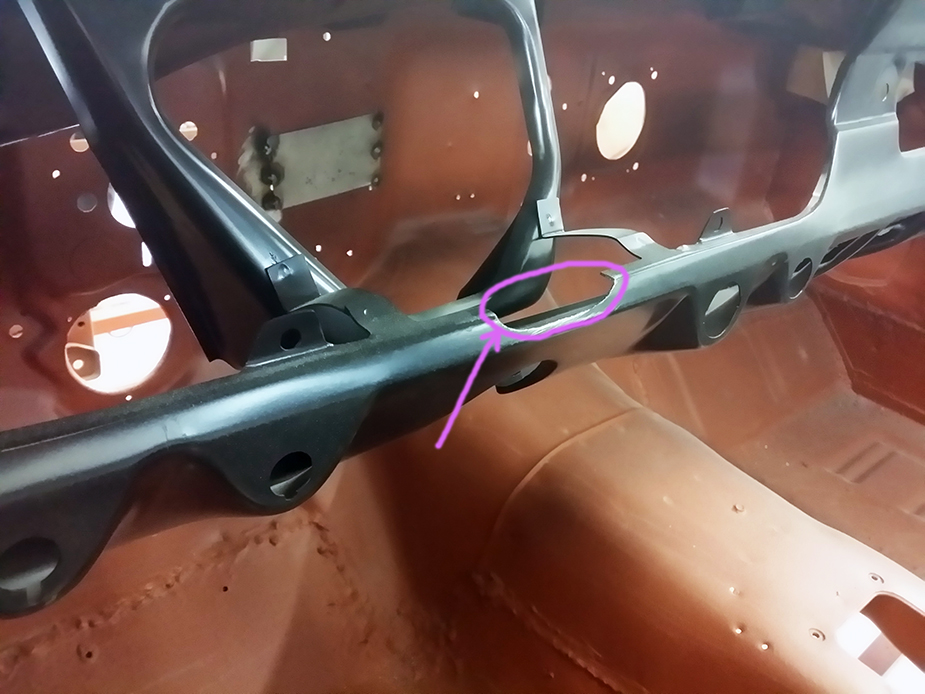
The Dash itself in place by two threaded studs, two in the middle and one on each end of the dash. The washers supplied are quite small so they were replaced with a larger set to spread the tension around a little more evenly.

The dash pad is not very heavy at all but care needs to be taken when fitting to make sure that the pad bolts don’t scratch the metal work. The pad is pushed over the upper supports of the dash to take the weight.

The two centre studs locate just above the radio space. a slight pull down on the pad to open it up a little allows it to slide over the top part of the metal dash. The two end studs will need to be pulled down slightly as well to locate into the holes.

The windscreen part of the dash will need to worked into place under the rubbers to make sure it lays flat. With the studs in place it’s a case of fit the washer and bolts and tighten them up to pull the dash into the metal dash itself. Do not over tighten the nuts.

That is basically it, the next part is to fit the demister vents, these are held in place by two clips each side which are sprung loaded. align the loose material from the dash over the holes for the vent and press into place.

dashpad18

The large hole in the centre is for the original speaker which I will fit. I am not bothered about a noisy sound system, I will have a v8 symphony at my beck and call. On top of all this there is a metal grille, the flutes each side direct the air to the screen. I have not had this colour coded just yet, so it’s still bare metal with only a coating of Gibbs Brand to stop it rusting. The grill was lightly pressed in place not all the way in just o give an idea of the look.

The Ford tooling part fitted like a glove, the before and after comparison.

dashpad16

Next on the list was the cowl to hood rubber seal, this is a simple clip in place with two screws each end on a bracket to hold the rubber up. Offer the strip up and apply a screw to hold it in place. Space out the rubber to the other bracket and make sure it’s even.

The clips have a little movement once in place but could damage the paint work if you are not careful. CLip them into place and add the other screw and tighten up.

cowltohoodseal7

Moving to the back of the car there needs to be a sealing strip to the trunk. This has two purposes, one for the rain, two for the fumes that could be vented back into the car. With the trunk in place and the gaps spot on Adam told me to mask up the location of the brackets on the truck. This would be top and sides on each bracket. Chris gave me a hand to undo the bolts and remove the bolts and flip the trunk onto a the ready-made work table.

The special weather strip adhesive is applied like a contact adhesive. The rubber can only go on one way which is a “c” shape looking at it from the end on. This should be fitted with the opening facing inside each of the contours. Adam advised to mask up the paint work before applying the glue. This will stop the mess getting onto the paint and save many careful hours of removing it without damage to the paint. I had my doubts as I was going to be careful.

A thin-film was added to the rubber and the paint and allowed to go tacky. Chris was holding as I was squeezing the tube onto the rubber and smoothing it out with as gloved finger. No matter how careful you are this stuff goes all over the place. Adam was right the masking tape was taking a bit of a battering at this point. Make sure the adhesive does not get inside the “c” or on the outside as this should be allowed to move to make the seal correctly. At this point as we were working quickly there was no time for the photo’s here. But the rubber was applied from the front to the back following the curves of the trunk. While we were sticking the two together we taped the corners down to stop them moving around until the glue had a chance to set a little.

It was at this point that I started the cowl to hood trim fitting while the glue set. It’s all about the forward planning! When the glue had set a little the masking tape was removed from the paint and re-applied to the corners again just to hold it in place. The rubber is longer than required by around six inches or so, so I cut the rubber as a dead butt fit and glue the ends together to form the seamless join.

While waiting again for the glue to go off again I fitted the door rubbers from a replacement pack.

doorrubbers

Last week I mentioned that I would get some pictures of the weather strip seal around the doors. So as promised here they are.

Next week I am not sure the plan of action, but the Trunk will go back on then mess around with the gaps again. The dash will need the glass to dash trim fitted. which will require some drilling! Slightly nervous about drilling so close to glass and on top of my new dash.

Share my Content

The Engine Is Back In

During the week I was sent a teaser picture by the guys from Mustang Maniac. What was that picture? It was of my engine. Now there is nothing new about that, as I have posted (quite) a few of them myself, but this was a little different. The engine was sitting at the front of my car. The guys were happy that the engine was ready to go in. It was going to be a weekend for me as it was my first engine refit and I couldn’t wait.

enginfit3

On arrival the brake lines were finished and Yogi has excelled himself yet again. Now I love doing the brake lines, but I must admit, Yogi does them better than me. The brake reservoir was in, connected up to the three way splitter box and not the four way original and the pipe work to the disc brakes are now in place. It’s a different car already to look at. I would be happy with the drum brakes and they would work if it was only me on the road. However I am worried about other nutters on the road that do stupid things in front of me. I know I can stop the car where I want to when I want to, but I can’t cater for the excellent braking capability of modern cars, and in comparison my drums were not going to be able to stop me as fast in an emergency. I always drive with plenty of space between me and the car in front, but you just never know. My new disc conversion will give me that extra stopping power should I need it and safety peace of mind. The brake reservoir now has front and rear split for the brake lines. Should the pipes leak or fail on either the front or back, then I have would have the other independent half to stop me, at some point that is. The original brake booster set up was a single reservoir for all four corners of a drum brake distributed by a three way splitter, so if one corner brake cylinder leaks, then the whole lot gets dangerous. With a brute of an engine like the 289ci you need it to stop as well as get of the line. Drums are notorious for fade when they get hot, on England’s roads the inclines can be quite step, so constant braking down a long hill could cause issues. But in the USA everything is pretty much flat, apart from a few places like San Francisco of course, so it wasn’t so much of a problem then.

Mustang Maniac had ordered me in a particular disc conversion kit that I was after for my car, and it arrived at the end of last week. Yogi and Adam wasted no time in bolting the parts to the car.

The discs are vented and slotted along with four pot calipers for superior stopping power assisted by the new brake booster reinstalled last week.

Once the discs were in place the steering bar, steering ram, tie rod ends, idler arm etc. fittings were all bolted into place. The tie rods were just finger tight as the geometry has to be completed at some point before the road testing. Due to the full three inch opening of my powder coated headers, there needs to be an extended steering ram spacer fitted. I have covered this on a previous photo set, click here for the quick link or look up Steering Ram in the search.

With all the brakes fitted and piped up and the performance springs now in place, the outer shock tower covers could be fitted. This was pretty much the underside of the car completed apart from gearbox, prop and exhaust etc.

Engine Fitting:

The engine was attached to the crane and aligned up to the front of the car. John, Yogi, Chris and Me were all there ready and waiting to put the engine in. I was on crane duty listening to the instructions to lower, push forward or back etc. The guys were either side of the engine bay to guide the freshly refurbished engine in place and trying not damage the fresh paint work. There is a secret to getting the engine in with the hood still fitted and is a closely guarded. Shhh here is some of it! The engine is moved into the engine bay sideways just under the hood, then lowered a little, twist it quarter of a turn so it’s the correct position and lower down again. But I didn’t tell you that! Anyway, as I was on crane duty I still managed to grab a few pics of the process.

With the engine almost in place, the long mount bolts were slotted through to take the weight. I have a few pics here of the engine mounts after their refurbishment, not that you will ever see them, but I will know of course.

The nuts and bolts were finger tightened on and the crane disconnected from the engine. There she was all sitting pretty and ready to go. The tape was still in place over the carb inlet and the old rockers cover still there for now. We will test fire the engine and then replace the rockers with the ones I want a little later. The distributor cap is an old one and will be replaced so it’s only there to keep the insides of the distributor clean too.

With our hard work and with no damage what so ever, John decided to photo bomb a picture for me! 😀

enginfit12Just to keep the silicon pipe work fresh and the engine clean the Mustang Maniac logo heater pipes were just pushed over the water fittings before the final trim ups as they are much to long at the moment.

So there you have it – a major milestone was completed, the engine was in, the heart of the car ready to start beating in the near future. The rear wheels are on the car and the fronts will be on as soon as the steering column gets fitted in place. Then the car will be ready to roll where ever it’s needed to go. I am so chuffed with the results of seeing the painted engine in the engine bay, the brake pipes, the steering and suspension, I can’t find the right words to express it, and that’s a true first for me!

enginfit16

I may be a bit biased here, but I think it looks great even with the old bits still on it. Thanks to the Mustang Maniac guys, yet again.

Share my Content

Ready To Rock

I’m back!  

I know I haven’t posted for a while, but there was and still are very good personal reasons why. So far it has taken me a few days to create this post on and off, that’s when I can even get round to doing it. Rest assured though, I am still here and I will continue updating my little ol’ blog as and when I can, hopefully things will slowly get back to normal then I should be posting more regularly and then back normal. Thanks to those of you that have kindly taken time to email me to ask how things are, I apologise for not posting sooner and disappearing without any warning, but the circumstances prevented me from do so, it was all rather sudden to say the least.

I could have named this post “New Shell” as the car is at a point now where she is ready to go to the paint shop within the next week or so. Compared to the original rusty or distorted metal work, this could almost be classed as a new shell. The Mustang Maniac guys have been keeping me fully updated while I haven’t been able to get down there to do my duties and help out. Thanks very much guys for the updates.

The last piece of work I had done was the hood which took an age to complete. The guys assembled the front of the car and the hood was re-fitted up. Now there was a problem, the leading edge of the hood had been bent down and was hitting the headlight buckets preventing the correct alignment and closure. The hood was adjusted but the fenders and cowling looked very strange regarding the gaps. The hood was taken off and the guys tried to straighten out the bend with partial success, and on the odd occasion it was quite brutally adjusted to align it all back up. But the hood was now sitting to high and it turned out to be quite obvious that the hood was distorted beyond an economical repair. When you are at this high level of restoration you want it to look right especially on such a large panel of metal that you will be looking at all the time you are driving. So a difficult decision was made – it was a new hood to be fitted, it’s a shame the original couldn’t be used. But I fully understand that these things happen during classic car restorations, the guys did try to rescue the hood before it was replaced.  Yes I could have kept the original that sort of fitted and I doubt that many would have noticed, but it would have played on my mind knowing that it didn’t fit 100% correctly with the gaps, I just knew I wouldn’t be happy with it. Like the driver door, it was an awful lot of hard work, but at least I am happy nothing more could have been done to make it fit perfectly. Come to think of it I have seen the odd restored car with worse looking alignments, I dare say some other restorers would have been happy with it. I now have a rather large bare metal piece of scrap.

However, on the plus side it means that my car is now ready to go to the paint shop with new metal that has already been protected from rust. Adam is now just waiting for the paint shop slot to become free in order for my car to go in and be transformed over the next month or six weeks before I see her back. Such an exciting time. I have potentially got the last set of pictures of the car in bare metal before she gets her new colour scheme.

As the car stands the filler work is pretty good, but has been left in a state where the body shop can see what has been done and what needs a final filler coat. Standard practice for the Mustang Maniac guys who seem to do just that little bit more to make sure all the gaps were correct. When the car is back from the paint shop I will then Red Oxide the inside parts that need doing over the black floor pans and the rear chassis legs before the work starts in earnest to put her back together again. I seriously just can’t wait to see her in the new colour.

Photo Menu:

I have tidied up the photo menus to group them together in order to make it more logical to find stuff.

I have added the following these large photo step by steps under the Photo Menu – Bodywork Section:

  • Rear Quarter Panel restoration work, click here for the quick link. (A very detailed step by step)
  • Hood Restoration Work, click here for the quick link
  • Trunk & Tail Light Restoration, click here for the quick link (A very detailed step by step)

I have also updated the Fender Work sections under a single heading to bring it all right back back up to date.

Reviews:

I have added a review of a Neilsen Slide hammer tool, or click here for the quick link.

Share my Content

Smooth Lines

The weekend took an age to arrive be fore I could get down to Mustang Maniac. I have been kept up to date with the progress of my car via teaser emails from John. The car is now in a very strong position to be taken from the supporting jig and mounted onto the transporting dolly or trolley, a big moment for my car. This also frees up the panel shop and the jig for the next little lady who needs it. Now maneuverable, the car can be moved around as required, especially important when she comes to be being painted of course.

On a personal note this was a huge milestone for me as it seems to be less of a permanent fixture in the workshop and shows that the work so far is at an acceptable standard to move onto the next stage.

The car had the fenders attached and aligned up to the doors and the hood. The story as you are well aware by now is to strip down the panel(s) to see what lies beneath the paint and then make a decision on what needs to be done.

dolley4

Last week I stripped down both fenders, things were looking pretty good. The left hand side fender was inspected for the filler prep the few dents were not to bad to look at, but the metal had stretched to a point that it would pop in and out just above the wheel arch with the filler removed, the same scenario as the left hand side door. So the the decision was to replace the wing unfortunately. The amount of filler and man hours to repair the fender was possible, but the man hours to make it paint ready was not going to be viable and the results could be questionable after paint. But, on the positive side this new fender will last the test of time. The new left fender fitting was good apart from the back sculpture of the fender to the door where the gap was a little out, so the MM boys being perfectionists that they are, made a little cutting and fabrication along a little metal work magic from Terry who gently refabricated the correct shape for the door – fender gap.

Terry made the repair to the bottom of the right side fender and welded the freshly fabricated new section as the bottom was a little peppered with rust holes. The repair was ground down and a light filler applied to protect the join. The headlight recess was repaired to make the rusted out odd shaped cable hole circular again via a new drilled out plate that was welded in its place.

The rear quarters were leaded up and rubbed down properly. The rusted parts of the windscreen were repaired with new lead work as the original lead had cracked. More of the same lead and ground out rust parts along the lower water channels to the windows frame at the rear. Once the lead had been rubbed down a final top coat of filler was applied.

With all the panels aligned and fitted the next job was the look and especially the feel of the panels, any minor imperfections were not going to be acceptable by the guys as it would show in the paint, so a little filler would be required which we knew would be the case. The leaded and brazed areas were now given a coating of filler and Terry worked to fill, rub down, add more filler and build it all up again in order to meet their high standards. A spray of dye coat or guide coat, was then applied to the first batch of filler. Later on this would be rubbed down to 500g ready for the fine paint prep work to begin.

Yogi started some filler on the top of the right fender where there were a few minor dents, I was given another master class on smooth filling and rubbing down with the aid of dye coat. It’s really annoying when these guys make it look so easy. The filler was applied so smoothly the amount of waste and rubbing down was minimal. Yogi did get a bit dusty, for which I received some grief I might add, all because it was a Saturday! Sorry Yogi, but it was funny! 🙂

Once I had seen enough to realise that the pecking order had been reasserted when it came to filler work I got on with my job, to remove the last persons efforts of filler work on the hood and see what lies waiting for me under the red oxide primer. The hood was placed on their panel work frame ready to start work as I put on my gloves. I wanted to start on the leading edge of the hood where all the primer was, if it was beyond repair it would be here was it filler or holes? I was about to find out.

As more paint came off and there was only a little filler that was found, the smile on my face got bigger. That was only half the story as the underside could be a big issue. The underside was unbelievably hard to get off, the heat of the engine maybe I don’t know but I was going through stripper like you wouldn’t believe. At 6pm Adam came to see how I was doing and helped me get the last bits of paint off. All was good, except for my back which was killing me.

We flipped the  hood over and the surface had started to get a little surface rust very quickly, so we went back at the surface again with wire wool and washed it all down with a good dose of thinners and a light coating of WD40, just for now. If you look closely at the front edge just to the right of the sculpt line there is a dent, this just happens to be the size of a palm print, common when the hood gets shut apparently over the course of time. But in general I am pleased to say the hood is in good shape. it will need some mastic to bond the frame and the skin together on the underside, but that wont take to long. Chris was back with me for a little while who kindly cleaned up the headlight doors which were in a good condition, so I was happy with that. Thanks to Adam, Yogi and Chris who all helped me out today.

The last couple of bits they had done was the dash and door. As the dash will fit the ’64 – ’66 Mustangs the gauge recess was generic. But, for the five gauge GT dash from ’65 (as an option) to ’66 it would not fit so the small cut out was made to accommodate the larger speedo. I have circled it so you can see it a bit clearer.

dash

The right hand door was lightly shot blasted back to bare metal in order for the light contours around the door cards to be painted properly.

shotblast

Sunday was a day of dusting things off, degreasing the metalwork that had been stored in the man cave and spraying them in them in red oxide, over the top of the anti-rust paint of course. These bumper irons will match the chassis when they are bolted into place.

Yes it’s another big post, but a lot happens in a few days when the MM guys get going. Once the car gets to paint then things may slow down a little and mechanical things will need to be done! quite what that will be I will wait and see.

Note:

McVitie’s Jaffa Cakes and Hob Nob biscuits are a popular choice with the guys, so I am looking for sponsorship from McVitie’s as they go through the stash of supplies I take down every weekend! How much are the McVitie’s shares???

Share my Content

Adding Metal

What a difference a week can make at Mustang Maniac, my car seems to have gone from a shell to a recognisable car in a mater of days, it even has bolts back in it. I have been sent little teaser photos by Adam and John over the last couple of weeks and it seriously wetted my appetite to get down there as soon as I can to start work on her. The car was packed Friday night, the alarm was set a little earlier on the phone and wishing the hours away to the morning. I arrived to find that Adam had been invited to Goodwood Revival so I was left in the very capable hands of John and Yogi. I was taken around to see my car and my jaw hit the floor as the car has a rear end and sides now. Terry has been adding the panels, welding up and doing a fantastic job and his attention to detail is second to none. The pictures here are of Terry working on the quarters with old school techniques rarely found in this Mustang restoration business. Firstly clamping up the panels and the wheel arches to each other for a dry fitting, the trunk lid rested in place for quarter gap positioning. Once everything is place then the top joints welded and brazed in place just like they were from the factory. Many people will just weld and leave it as it will be covered with filler and paint, not these guys though and that is quality of workmanship that they have become respected for. (Please on the pictures to see the full sized versions.)

Do I apologise for such a large picture post? No way!

The other workmanship revolves around the bottom of the roof to the quarters themselves. These are normally butt welded up by some people or even cut around the lead work. But here the lead has been removed, the spot welds removed and the rotten sections removed and re-plated with the original contours. This allows for the full quarter to be to be fitted to the roof section and welded where it’s supposed to be. Terry welds into the original places and then it will be ground down to allow for the full leading to be applied where it will all be covered over and the strength is retained in the car. Many other places will not do the lead work as it’s a fine art and some modern garages don’t use it for daft health and safety reasons.

quarters1

With the quarters in place and fully welded up the next big panel was the trunk lid. With the freshly painted hinges and inner wheel arches they were lightly bolted into place and the trunk lined up to the quarters, once in place its all tightened up. The trunk will lay down under its own weight to allow final positioning of the trunk. Once that is done the tricky and dangerous (if you get it wrong) twisting of the sprung bars into place to keep the trunk open once the key has released the catch.

The next section was the filler and light panel to be fitted. The new rear quarters have alignment holes that need to be located to the light panel to ensure the light housings fit into place as the two halves form both the openings. The panel is then welded to the chassis brackets to give the rear strength.

trunkarea24


Next is the rear quarter links that join the rear panel which are positioned and welded into place. With everything in place Terry then completes the trunk and quarter areas he has done so far with the traditional brazing.

Forward thinking at this point see the guys dummy fit a rear bumper to see where the quarter end caps will sit in relation to the trunk and the quarters. These original fittings are notorious to fit correctly to new panels, but these went on like a dream and only small adjustments needed. The bumper will be able to be moved into the final correct position at a later date. The final panel for the rear section is the back up rear valance. My original was well and truly mashed up on the right hand side as if it had been backed over a rock. It could have been repaired but for the sake of £60 it was decided to replace with a new panel and there is no rust worries either at this point now.

Remove the bumper and then screw the rear valance into place after aligning all the sections up together.

With the welding all completed the seams were sealed up like they were in the factory and it was really was quite brutal in those days and nothing fancy. Terry then added the boot catch to the inner panel and welded it all up. Rear section done.

What does she look like from the side? Pretty darn good I would say. The next stage was to add a little filler to the panels to smooth out any imperfections and apply flexible sealer under the quarter to the sill.

During all of this you may be thinking well what did I do Saturday? The answer was simple, I was prepping the other panels and removing the paint in order for Terry to be able to weld up properly. My tasks this week was to strip the fenders the “A” pillar posts once I had removed the doors, and then start on the roof. A large amount of work, but it all needs to be done so I left very late into the evening, I was physically hurting at the end of the day. The same old story, strip, scrape, strip again wire wool and strip any remaining last bits before a final wipe over with thinners.

The roof tuned out to be a big task. The car is on the jig I couldn’t reach into the middle, even at 6’4″ tall my long arms didn’t make. So I had to balance on the sills hold on and apply stripper and scrape. Now I’m no gymnast and it was quite tricky at times to be honest and I think this is where the fatigue kicked in. But the results were good and the roof came up pretty spotless.

Sunday I have spent most of the day editing these pictures ready for the blog plus the afternoon nap too. Next week – I know what I will be doing, stripping the hood back to bare metal.


Share my Content

The fitted sheet

Friday evenin’ and it started.

I of course refer to the snow, no I am not going to bang on about it again because I am to put it politely, getting a bit sick of it. Everytime I want to do something it snows. The snow has been falling all weekend, it settles then it melts, still snowing then it settles again. Global warming? I think it needs warming up round here, so I better go and start my v8 up with no exhaust and let it tick over for a while! Only joking, so I won’t dwell on the fact its cold, but my man cave looked like a log cabin at one point today with the snow all over it, and it did get worse than this. To prove it I have a little picture of it. I’m sure there are a lot of people worse of than me out there, I hope you are all safe and have had not issues with the “S”. Don’t forget to check on the vulnerable elders, even a pint of milk for a hot cup of tea can help.

Man cave in the snow

Saturday I sprayed the VHT brake caliper spray on the left side front drum which went well, I keept the can in the house overnight in the warm along with the drum itself. I only took it out to the man cave when it was ready for the spray. I pointed my new light at it to keep it warm during the drying phase. It worked a treat. After it was dried to touch, I took it to the garage and put it onto the spindle and packed it with grease. I will allow it to cure for a week before the wheel gets bolted back on. I have already done a review of the VHT Caliper paint under the Reviews – Consumables or click here for a quick link. I also went to fit the brake booster, it was going in OK, but as I was so cold the fingers were having issues holding things properly. I got a bit annoyed at this point and decided to take the hood off so I could get right into the corner. Oh boy, I forgot how heavy that hood was, trying to hold it in place with one hand and undo the nuts with the other was not an easy task. Thankfully nothing was damaged and it came of with a big sigh of relief and a lot of effort. I did remember to put some heavy towels onto the cowl under the hood corners so it would suddenly drop metal onto metal. The hood now sits against the wall ready to be treated, to top it all, hood is of course standing on a nice piece of foam. While the hood is off I took photo’s of the brake lines, (before I re-fitted the booster again), that I fabricated a while ago along with photo’s of the Brake Booster being fitted. After gaining access to the full engine bay the Booster actually went in fine, all was well with the world again. As there is no protection for the engine now from the hood, the dust from the garage could be an issue so I decided it needed covering. Did you know that the fitted sheet from a UK double bed is the same size as a 66 Mustang engine bay and fenders. Next time you play Trivial Pursuit you can maybe win on that bit of knowledge, OK, maybe not. I will be covering the treatment of the hood at a later date with pictures too when the weather gets better as it will need to be layed flat. To show you what I mean about the fitted sheet, here are the before and after pictures. Liking that? OK, Sorry then, but I thought it was a good idea!  🙂

The bits that are sticking up are the hood springs, they are gonna stay like that, due to the fact I want to keep my fingers and they are super strong springs and may have difficulty getting them up again. The scissor action on the metal is sharp and I never put my hands near them, ever! I managed to also remove and re-assemble the Hood catch, the pictures will be added to the photo section as soon as I get them done, they also came up very well. In the engine bay picture you will see the Brake booster in place and the reservoir all connected up. You can find the fitting in Brake Booster Part 3 in the Photo Menu – Engine Bay – Brake Booster Project or click here for a quick link. I have also added a review of the Autolite Group 24 Replica Battery now after a request for it and a few searches, you can find the review under the Reviews – Car Parts section, or click here for a quick link.

All in all I was quite pleased with the weekends work considering it was….. Ha, you thought I was going to say the “S” word, you know “snowing”. Dohhh!

Drive safely.

Share my Content