A Mustang Plaque Idea

This little project has been bouncing around in my head for a number of years now and I finally got round to doing something about it. When my car was restored I kept the original Mustang Coral from the grill for a while even though one of the support legs was broken. But, I repaired it and fitted back to the completed car as i wanted the original on the car, people kept saying “why the old Coral it’s a bit knackered?” Eventually seeds of doubt were sown, then I got worried that the Coral would fracture again and fall off causing all sorts of damage. It was a sad day when I took it off, but I replaced it with a nice shiny one and I stopped getting the same question. So, I still had the original Coral, and some original emblems that were on the fender. Those 289 emblems were pitted and in a poor way but I kept them regardless. To me the “Coral” was the “soul” of the car and that image was to become an instantly recognisable icon around the world. I wanted something different, this was that idea.

Firstly I bought a plinth of wood from eBay that was a few inches bigger than the Coral itself. This can be any wood you like of course, but I wanted something dark(ish) to show of the chrome.

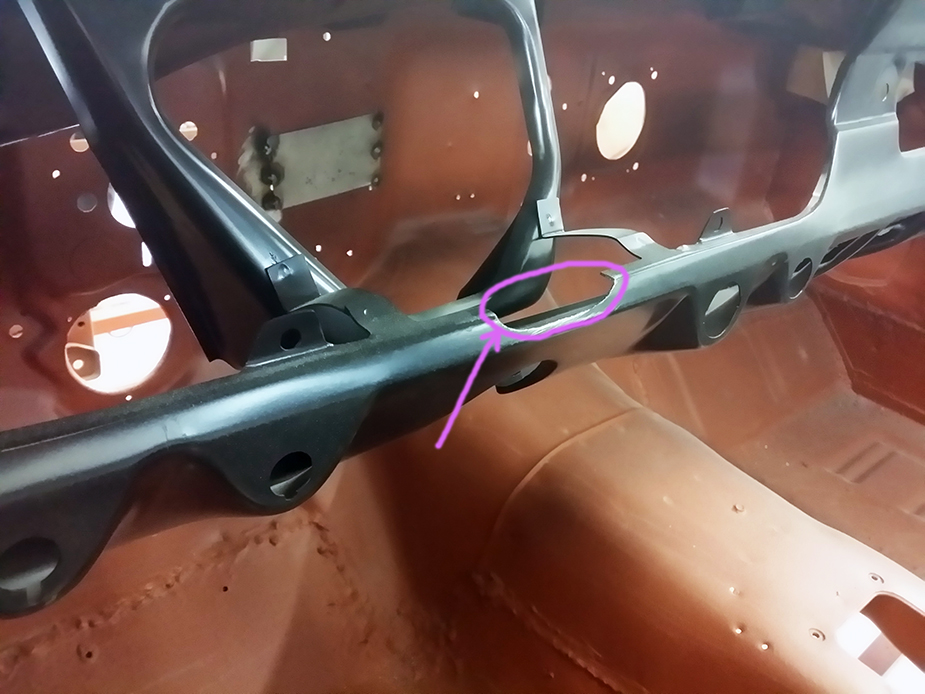
The Coral it sits slightly higher up than the anchor points or legs that secure it to the grill. So if you want the Coral to sit in the middle you need to measure closer to the bottom. You can clearly see the step here in this picture.

In my case it wanted it to sit slightly higher up as there was going to be a custom plaque at the bottom with the car’s details, more on that little later. I measured from the legs to each side the centre point and marked the spots. I used tiny pilot holes to make sure that the holes lined up with the holes on the bottom of the Coral legs. Once everything was spot on I drilled to a larger hole for the screws and counter sunk the holes so the screw head would not sit proud of the wood.

The Coral legs were held to the grill by fine thread screws, but one of the legs had been stripped and wasn’t very good at holding anything. A self tapping screw was the way to go now with the soft metal inside the legs. The depth limit was checked and then cut down the screw had a max depth to hold it firmly in place.

The wood was untreated and would need a coat of varnish. The decision was to go for a quick drying clear satin with a couple of coats all round. Starting on the back to see how it would look and application before the front attempted. To avoid any brush marks a large foam brush was the way to go, that decision turned out to be an inspired choice. An old piece of plastic packaging was used to hold the varnish that I would need.

I have marked the area that was untreated as I was applying the varnish. Once the varnish had dried (which only took twenty minutes a coat), I applied a second coat and allowed that to dry. The process was repeated once the wood was turned over ready for the front and sides.

The front came out really well, perhaps the very fine sand paper of the surface helped with that. The wood’s grain was pulled through by the varnish and a turned a bit darker to compliment the chrome.

From the back of the wood the screws were tightened up to hold the coral in place.

Next up was the V8 289 fender emblem. This was obviously pitted from fifty years of road and weathering, which also had a broken stud on the back. This wasn’t a problem this time as the studs needed to come of anyway in order to sit flush on the wood. I used various chrome cleaners to get it as best as I could, The chrome plating was starting to go thing in few places so I had to be careful.

The emblems are cast and it didn’t take too much to break the remaining stud off with a pair of proper aggressive cutters. As long as the stud was below the surface all would be fine for what I had in mind.

I also have the old original running horse fender emblem from the right hand side that is in effect facing the wrong way when placed anywhere else other than the fender. This too was pitted and a couple of studs on the back broken. The other problem was that it is to big for the plaque so it was to be plan B. I wanted a smaller emblem and that means it was going to be the glove box emblem. This presented two choices; 1) remove the original from the glove box and replace that with a new one. This means the original wasn’t in the car, however I wanted as many of the original parts in the car as possible. 2) put the new emblem on the plaque which then means that it’s not all original parts from the car. As the car is way more important I was to put the new one on the plaque. I could have got a bigger wooden back, but then there would have been a lot of wood and the Coral would seem to be floating around in the middle.

The same principle as the 289 emblem was to snip the studs of the back. The remaining stumps were to be ground down flat with the ever useful Dremel.

Measuring up the plaque for polish plaque for the wood was simple enough, it was to be in the middle of the Coral and look aesthetically pleasing from the bottom. Once that was marked out and temporarily held in place by a little poster tack putty, I could step back and check what it looked like from a distance. Once I was happy with it, just peel the backing of and stick it down into place. Yes I did measure it three times before I marked it out, it would have done my head in being on the wonk or off centre when the OCD kicked in. The metal plaque that I used was ordered from eBay and cost me £2.50 a very modest price indeed. There was a choice of sizes, finish of the metal (brass of silver), font style and the colouring of the lettering being a choice of silver or black filled. I chose to have the simple basics of the car make and model, where it was made, and the date of manufacture or as I like to think – the day she was born. My thinking was that the silver finish would match the polished chrome of the Coral, and the lettering colour would match the metal of the Coral.

“Ford Mustang Coupe”

“Dearborn Michigan”

“11th July 1966”

The positioning of the 289 fender emblem was to be in the middle of the metal plaque height and evenly spaced from the Coral leg to the edge of the wood plaque. My hot glue gun was fired up ready to fill the back of the emblem with hot glue. This allowed me a few vital seconds to get the emblem into the position marks before it cooled and set hard.

The glove box emblem was the positioned at the same height from the bottom as the 289 emblem, but it was again located so that its “looks right” position in relation to the Coral without crowding it, the poster putty being used again. The emblem was again hot glued into place and allowed to cool.

The final result was pretty good and exactly the look that I was after. It’s not to everybody’s taste, but at least I have the “soul” my car proudly on display.

The back of the wood also has some stick on rubber pads, for the “desk tidy” option. Next I will get some flush fit brackets ready to screw to the wall when I figure out just where to display it for best effect. I do have an idea that I will put to the wife first.

Me and the wife have had a number of discussions where it will be hung. OK, it was short discussion with her response was along the lines of; “you will also be hung with it if you put it on the wall above the fire-place.” I think she feels pretty strongly about the positioning of my Classic Mustang Work of “ART” should not be the in the middle of the room!

Maybe she does have a point. But, I’m not so sure though, so back me up here guys!

Share my Content

Badges

I’m back! I know I haven’t posted for a while, but it has only been one month to the day in fact, yet when I see that last post “Merry Christmas..” it seems like forever ago, or is it just me? There is not a lot of things I can post about the car at the moment for very good reasons as it’s all behind the scenes, so more of that in bit though.

As you probably remember in November last year my car was at a Classic Car show in Birmingham on the Mustang Owners Club Of Great Britain exhibition stand. The club has its own magazine called “Round Up” for the club members and they ran an article on the show. My car had a few nice photo’s taken of it and me cleaning it. I’m Sure they won’t mind me posting them here.

mocgbNEC1

mocgbNEC2

mocgbNEC3

mocgbNEC4

mocgbNEC5

I was well pleased when I saw this spread I must say. 😀

The Car Update:

Any vehicle that is permanently imported into the UK needs to have Duty and Tax paid. Unaware at the time when I bought the car this was the case I am unable to register my car for the UK roads because the car has not paid any import duty. Needless to say I wasn’t very impressed with finding this out. But, I put it down to a learning experience now, but I would like to have a conversation with the bloke who sold it to me though. It turns out that in order to put a UK registration plate on the car you need to fill in paper work, lots of paperwork. In the near future once this nightmare is all sorted out, I intend to post an article on how to do it with a step by step process as I go through it. There will be all sorts of useful links where I can find them and hopefully this will help with other people in the same situation.

The first step is to pay the Import Duty and VAT (Value Added Tax) on the car. There are literally hundreds of different categories for items to be imported and choose from. I have been given a helping hand by Mustang Maniac on how to do it all. Once the duties are paid you will get a “NOVA” (Notification Of Vehicle Arrival) certificate. This will state that <said> vehicle has had all import Tax and Duties paid on it. From there on you can fill in more forms to request a registration plate and pay more money for the plate to go on the car. So far to date I have been granted my “NOVA” certificate with all fees paid in full. This single document now becomes a critical part of the vehicle’s history for the UK. I am now waiting for the response from our Government department, DVLA (Driver and Vehicle Licensing Agency) who are responsible for issuing the registration plates for the UK. Some time soon I will be given an official licence registration number allocated to my car. Then I can pay more money with all my paper work to get a “Registration Plate” or badge if you like made up to put on the car.

For obvious reasons I won’t say too much at the moment as it’s all ongoing. But once it has all be completed and I am able to get the car on the road legally, I will do a full update article on what and how it all works.

In the mean time I have been playing in the garage and looking for things to do apart from polishing the car again. I have many left over parts from the restoration, they were either broken, worn out, bits missing from them, burnt out or cosmetically damaged. I found in a box the right hand side fender badge. The pins on the back were broken off and the chrome was pitted and looked rough. I cleaned it up and had an idea for a use for it. Obviously it couldn’t have gone on the car as the paint had come off and I only had one of the pair. So, I bought some model enamel paints as close as I could get to the Mustang Tri Bar colours.

badge5

I painted the badge and it came out pretty good. I could have done it a little neater but I was more interested in the colour match at the time. However, all this messing around is all for a good reason; the badge on the AirCon unit has rubbed of a bit which has the ford Tri Bar colours on it. So now this painted test piece looks OK, I paint the tiny logo in the car as well now. As always I shall bring pictures of it when I get round to doing it.

badge1

I bought some sticky magnetic tape to stick on the back just to see how it would cope and look.

badge2

Then I found something to stick it on, my Blue-Point service cart.

badge3badge4

I do believe I now have a unique Limited Edition 1 of 1 tool cart. I think it looks pretty good, and the best bit is that I can move it around and stick it to anything metal I want and it will become a 3D Mustang badged merchandise. I may even get some more of these emblems from the next car jumble show I go to.

Share my Content

Ready To Rock

I’m back!  

I know I haven’t posted for a while, but there was and still are very good personal reasons why. So far it has taken me a few days to create this post on and off, that’s when I can even get round to doing it. Rest assured though, I am still here and I will continue updating my little ol’ blog as and when I can, hopefully things will slowly get back to normal then I should be posting more regularly and then back normal. Thanks to those of you that have kindly taken time to email me to ask how things are, I apologise for not posting sooner and disappearing without any warning, but the circumstances prevented me from do so, it was all rather sudden to say the least.

I could have named this post “New Shell” as the car is at a point now where she is ready to go to the paint shop within the next week or so. Compared to the original rusty or distorted metal work, this could almost be classed as a new shell. The Mustang Maniac guys have been keeping me fully updated while I haven’t been able to get down there to do my duties and help out. Thanks very much guys for the updates.

The last piece of work I had done was the hood which took an age to complete. The guys assembled the front of the car and the hood was re-fitted up. Now there was a problem, the leading edge of the hood had been bent down and was hitting the headlight buckets preventing the correct alignment and closure. The hood was adjusted but the fenders and cowling looked very strange regarding the gaps. The hood was taken off and the guys tried to straighten out the bend with partial success, and on the odd occasion it was quite brutally adjusted to align it all back up. But the hood was now sitting to high and it turned out to be quite obvious that the hood was distorted beyond an economical repair. When you are at this high level of restoration you want it to look right especially on such a large panel of metal that you will be looking at all the time you are driving. So a difficult decision was made – it was a new hood to be fitted, it’s a shame the original couldn’t be used. But I fully understand that these things happen during classic car restorations, the guys did try to rescue the hood before it was replaced.  Yes I could have kept the original that sort of fitted and I doubt that many would have noticed, but it would have played on my mind knowing that it didn’t fit 100% correctly with the gaps, I just knew I wouldn’t be happy with it. Like the driver door, it was an awful lot of hard work, but at least I am happy nothing more could have been done to make it fit perfectly. Come to think of it I have seen the odd restored car with worse looking alignments, I dare say some other restorers would have been happy with it. I now have a rather large bare metal piece of scrap.

However, on the plus side it means that my car is now ready to go to the paint shop with new metal that has already been protected from rust. Adam is now just waiting for the paint shop slot to become free in order for my car to go in and be transformed over the next month or six weeks before I see her back. Such an exciting time. I have potentially got the last set of pictures of the car in bare metal before she gets her new colour scheme.

As the car stands the filler work is pretty good, but has been left in a state where the body shop can see what has been done and what needs a final filler coat. Standard practice for the Mustang Maniac guys who seem to do just that little bit more to make sure all the gaps were correct. When the car is back from the paint shop I will then Red Oxide the inside parts that need doing over the black floor pans and the rear chassis legs before the work starts in earnest to put her back together again. I seriously just can’t wait to see her in the new colour.

Photo Menu:

I have tidied up the photo menus to group them together in order to make it more logical to find stuff.

I have added the following these large photo step by steps under the Photo Menu – Bodywork Section:

  • Rear Quarter Panel restoration work, click here for the quick link. (A very detailed step by step)
  • Hood Restoration Work, click here for the quick link
  • Trunk & Tail Light Restoration, click here for the quick link (A very detailed step by step)

I have also updated the Fender Work sections under a single heading to bring it all right back back up to date.

Reviews:

I have added a review of a Neilsen Slide hammer tool, or click here for the quick link.

Share my Content

Smooth Lines

The weekend took an age to arrive be fore I could get down to Mustang Maniac. I have been kept up to date with the progress of my car via teaser emails from John. The car is now in a very strong position to be taken from the supporting jig and mounted onto the transporting dolly or trolley, a big moment for my car. This also frees up the panel shop and the jig for the next little lady who needs it. Now maneuverable, the car can be moved around as required, especially important when she comes to be being painted of course.

On a personal note this was a huge milestone for me as it seems to be less of a permanent fixture in the workshop and shows that the work so far is at an acceptable standard to move onto the next stage.

The car had the fenders attached and aligned up to the doors and the hood. The story as you are well aware by now is to strip down the panel(s) to see what lies beneath the paint and then make a decision on what needs to be done.

dolley4

Last week I stripped down both fenders, things were looking pretty good. The left hand side fender was inspected for the filler prep the few dents were not to bad to look at, but the metal had stretched to a point that it would pop in and out just above the wheel arch with the filler removed, the same scenario as the left hand side door. So the the decision was to replace the wing unfortunately. The amount of filler and man hours to repair the fender was possible, but the man hours to make it paint ready was not going to be viable and the results could be questionable after paint. But, on the positive side this new fender will last the test of time. The new left fender fitting was good apart from the back sculpture of the fender to the door where the gap was a little out, so the MM boys being perfectionists that they are, made a little cutting and fabrication along a little metal work magic from Terry who gently refabricated the correct shape for the door – fender gap.

Terry made the repair to the bottom of the right side fender and welded the freshly fabricated new section as the bottom was a little peppered with rust holes. The repair was ground down and a light filler applied to protect the join. The headlight recess was repaired to make the rusted out odd shaped cable hole circular again via a new drilled out plate that was welded in its place.

The rear quarters were leaded up and rubbed down properly. The rusted parts of the windscreen were repaired with new lead work as the original lead had cracked. More of the same lead and ground out rust parts along the lower water channels to the windows frame at the rear. Once the lead had been rubbed down a final top coat of filler was applied.

With all the panels aligned and fitted the next job was the look and especially the feel of the panels, any minor imperfections were not going to be acceptable by the guys as it would show in the paint, so a little filler would be required which we knew would be the case. The leaded and brazed areas were now given a coating of filler and Terry worked to fill, rub down, add more filler and build it all up again in order to meet their high standards. A spray of dye coat or guide coat, was then applied to the first batch of filler. Later on this would be rubbed down to 500g ready for the fine paint prep work to begin.

Yogi started some filler on the top of the right fender where there were a few minor dents, I was given another master class on smooth filling and rubbing down with the aid of dye coat. It’s really annoying when these guys make it look so easy. The filler was applied so smoothly the amount of waste and rubbing down was minimal. Yogi did get a bit dusty, for which I received some grief I might add, all because it was a Saturday! Sorry Yogi, but it was funny! 🙂

Once I had seen enough to realise that the pecking order had been reasserted when it came to filler work I got on with my job, to remove the last persons efforts of filler work on the hood and see what lies waiting for me under the red oxide primer. The hood was placed on their panel work frame ready to start work as I put on my gloves. I wanted to start on the leading edge of the hood where all the primer was, if it was beyond repair it would be here was it filler or holes? I was about to find out.

As more paint came off and there was only a little filler that was found, the smile on my face got bigger. That was only half the story as the underside could be a big issue. The underside was unbelievably hard to get off, the heat of the engine maybe I don’t know but I was going through stripper like you wouldn’t believe. At 6pm Adam came to see how I was doing and helped me get the last bits of paint off. All was good, except for my back which was killing me.

We flipped the  hood over and the surface had started to get a little surface rust very quickly, so we went back at the surface again with wire wool and washed it all down with a good dose of thinners and a light coating of WD40, just for now. If you look closely at the front edge just to the right of the sculpt line there is a dent, this just happens to be the size of a palm print, common when the hood gets shut apparently over the course of time. But in general I am pleased to say the hood is in good shape. it will need some mastic to bond the frame and the skin together on the underside, but that wont take to long. Chris was back with me for a little while who kindly cleaned up the headlight doors which were in a good condition, so I was happy with that. Thanks to Adam, Yogi and Chris who all helped me out today.

The last couple of bits they had done was the dash and door. As the dash will fit the ’64 – ’66 Mustangs the gauge recess was generic. But, for the five gauge GT dash from ’65 (as an option) to ’66 it would not fit so the small cut out was made to accommodate the larger speedo. I have circled it so you can see it a bit clearer.

dash

The right hand door was lightly shot blasted back to bare metal in order for the light contours around the door cards to be painted properly.

shotblast

Sunday was a day of dusting things off, degreasing the metalwork that had been stored in the man cave and spraying them in them in red oxide, over the top of the anti-rust paint of course. These bumper irons will match the chassis when they are bolted into place.

Yes it’s another big post, but a lot happens in a few days when the MM guys get going. Once the car gets to paint then things may slow down a little and mechanical things will need to be done! quite what that will be I will wait and see.

Note:

McVitie’s Jaffa Cakes and Hob Nob biscuits are a popular choice with the guys, so I am looking for sponsorship from McVitie’s as they go through the stash of supplies I take down every weekend! How much are the McVitie’s shares???

Share my Content

New Paint Colour Revealed

The weekend still arrived slower than ever after a Bank Holiday at the beginning of the week. I was excited to get down to Mustang Maniac to see what had been done to my car. The lower cowl was going to be replaced as it had rotted through and that piece of work was known about. With the cowl off the guys could see the fire wall and the back of the dash clearly in daylight. On full inspection of the dash they could see it had gone a little thin underneath and rusted pretty badly all along the inside. A discussion was had to either replace the whole dash, or weld parts onto the old dash. This would mean shaping metal and replacing the radio slot that is always butchered on the classic cars. The decision was made to replace the complete dash, not a cheap option but it was going to be worth it in the long run. As ever Adam had a full dash in stock and was fitted, welded and brazed into place. It’s a little difficult to see black on the dark underside but you can make it out.

The top part of the firewall had to be fabricated as it was little thin in the top crease, so again it was decided by Terry to cut the top off the firewall and replace it with fresh metal and shape it to the new lower cowl. Metal work skills being displayed in all their glory and you can’t even tell it has been replaced.  With the lower cowl now firmly welded in place it was masked up and then given the first of a couple of layers of primer. It was at this point I was sent this teaser photo by Adam to show the primer had been applied to the cowl, this is the first piece of fresh metal to get proper paint.

lowercowlprime

I turned up very excited and itching to see the car expecting to see the cowl in primer. I wasn’t disappointed the lower cowl was painted in the colour that I wanted, Acapulco Blue. Obviously I am biased big time here, but it’s a bit different and a stock ’67 Mustang colour, I am absolutely delighted with it. This was the first time I had seen the colour on my car. A pretty special moment.

I got a bit carried away having a little bonding session with the fantastic paint job much to the amusement of the guys who followed me in to see my surprised look. Adam broke the news to me about the very busy day ahead of me. The trunk was to be removed and then strip it back to bare metal to see if there was any “little surprises” waiting for us as Adam puts it. What he means is, are there any pin holes or rust that have been covered up. I started on the top side and then worked my way to the underside. The underside took a lot longer due to all the corners and curves that made it hard work. I am pleased to say after a few hours hard work that the trunk is solid and no rust at all, except for a two very light surface areas where the paint had chipped off on the top side.

The next job was to red oxide the inside firewall as I had stripped it back to metal last week. The end results are pretty amazing I must say.

I was spoilt this week in my own little sanctuary, a nice guy Chris was given the dubious pleasure of working with me for the day. It’s normally quiet in the work shop, but last weekend it was a nice change to have somebody to share a conversation with all things cars. Chris made a great job of stripping the right side B pillar and the rear panel under the rear screen. Thanks for your hard work Chris. Throughout the day the normal visits from the guys was in full flow and towards the end of the day I was given some “homework” by Adam. That homework was to take home one of the fenders and strip it back to bare metal. Adam was right it was a busy weekend for me with a few more to come like it. Things have stepped up a notch, big time!

Sunday, I got up with a full day in front of me and the backs of my legs aching. My homework was to be completed along with the trunk hinges and sprung bars that connect them to hold the trunk open. The hinges were to be stripped and all paint removed as it has to be painted the same colour inside the trunk. I though I would try to be clever to strip and clean the parts with the sprung tension bars in place. Unfortunately this turned out to be a nightmare so I had to remove the bars.

I held one of the hinges in the vice and lever out the first bar. This was enough to start a cascade of events. The sprung bar unleashed itself like a coiled cobra and the end of the bar slapped me on the left hand at the base of the knuckle, the instant pain caused me to rub my hand as the other bar sprang away hit the man cave rubbish bin, this in turn was sent flying leaving a cloud of old sanding dust and rubbish all on the man cave floor in the doorway. After the initial clean up and the bruise on my thumb and wrist getting darker by the minute, I took the hinges back outside to complete the strip down. Both hinges came out pretty well and I was well pleased. To protect the inside of the hinges I gave a coating of Eastwood Rust Encapsulator to prevent additional rust on the inside of the hinges. The sprung bars were given an undercoat of red oxide and then a top layer of silver.

The homework was a dilemma, how to remove the paint from the fender. I decided on my Dewalt dual action sander with a 100grit discs. I intended to go down to the undercoat and then use a lighter and lighter grades to get to the bare metal. Some of it went to plan and some of the paint came straight of and I went to the metal. I will have to fine buff the tiny swirl off the metal work now this weekend. The purpose of the homework? to see if there were any little surprises waiting for me. I am pleased to say I didn’t find any on this original panel so far. I still have the top edge to complete but that could be later in the week or next weekend.

A big update again and a lot has happened, I intended to post on Sunday as normal. But, I had so many pictures to edit it was very late to start writing this little lot up. Forgiven?

Quick Links:

Right fender work to treat the inside click here

Share my Content

To The Scrap Heap

Well it’s the second week in succession I haven’t managed to get to my car and it feels very strange now. But things have not been allowed to stand still at Mustang Maniac, the guys have been turning bits of my car into scrap! Of course I knew what they were going to do it and why. The left side rear quarter panel which was in the worst condition and the outer wheel arch have been cut away to leave an exposed rear chassis. The full quarters have to be unleaded from the rear roof supports. Once that is done then the “B” pillar posts spot welds are drilled out along with the spots for the outer wheel arch. The panels were cut away in small easier to manage sections and thrown unceremoniously into the scrap bin.

leftrearquarterscrap
Considering these were the original quarters then it’s hardly surprising they have gone rotten in the usual place around the arch itself.

LeftRearArchRust
To remove the quarters correctly the car should be bolted to a proper jig to stop any movement, if anybody offers to do it without a jig beware! The panel was removed then the outer wheel arch.

The lead has to be removed, cleaned up, preped ready for the full quarter to be re-fitted. In these pics you will see the lead being worked by Yogi.

I replaced the hinge pins a while ago (click here for the link) so there is no movement on the doors which is always a good idea when doing this type of work in order to avoid the door dropping on the hinge. You will also notice that the doors are still in place for a good reason, with the rear quarter removed from the car, the door is now the only constant to work from at this point, you will need as little movement as possible, hence the hinge pin replacement I completed a while ago because I knew this work was coming up. The full replacement quarter panel would need to do the same obviously but in reverse, matching up to the door now. Any misaligned panels at the rear will be multiplied considerably due to the length of the door and the fenders themselves. By the time you get to the stone bumper guard and the bumper itself, depending how bad the misalignment is, it could be enough to stop the panels being bolted back together again. The very common mistake is to take everything of the car and then weld the quarters on. The panel alignment should always be worked from the back going forward, the fenders and hood will have to line up correctly with the doors and hence the rear quarters. This is a very timely and tedious but critical part of the process, get it wrong and the car will look very odd. Or even worse, if this type of work is done without a purpose-built jig, beware!
Once the arch and the quarter were out-of-the-way, the old rotten section of the chassis rear left leg was to be cut away at the point where there is plenty of good metal.

A butt weld is not acceptable due to the stress on this part of the chassis so the guys make up a heavy plate which is to fit inside the original chassis leg and the new section of replaced chassis. The new section of rail was welded to the plate and the joint welded together to give the support for the welds and new rear rail.

With the chassis rail now in place the trunk cover panel section was placed over the rail and welded into place to offer more support and look a lot nicer in the trunk area.

I dare say I will have more red oxide painting to do when I am down at Mustang Maniac again to match it all up.

Share my Content

Good Ol’ Plan B

This weekend has been all about getting stuff off.

This weekend I am not sure what has come over me, I don’t know if it was the sunshine for most of the week and now it’s the weekend that got me in this mood. I think I have taken more bits of the car now than when I got it! The front valance is off (click here), the radiator valance is off, the hood catch is off (click here), the front drums are off again (click here) and then I started on the inside.

So the inside, has not got a headliner, no dash cover, no driver seat, steering wheel off, no rear parcel shelf and no dashboard again. The seat was removed as I needed clear space to get to the wires and under dash work. The seat frame had collapsed and my mate Will at Park Garage repaired it for me. The headliner, will be one of the last things I get for the inside. The dash is now out again so I can get to the wiper motor a lot easier. The wiper motor was burnt and melted, which I knew about when I went to look at the car and took a look under the dash. The bloke I bought it from said it wouldn’t take much to put right. Oh, how little I knew then. The fact this classic car restoration thing is supposed to be a learning curve for me turned out to be a reinforced concrete wall that I had run into head first just after I got the car. I now have manuals and I now have people in the know at Mustang Maniac who help me out with parts, advice I need and parts I should have but don’t even know it – yet. Sometimes it feels like trying to run up the playground slide in the wet! Don’t tell me you never don’t that as a kid. 🙂

What am I on about this weekend? I decided that the next job is going to be the wiper motor replacement, the fact the wipers are stuck half way across the screen annoys me and the fact I have not tidied up the wires since I re-wired her annoys me. The reason I have not tidied the wiring as I knew the wiper motor had to come out sooner rather than later, this weekend was that time. My research tells me it was going to be a difficult job so I put it off for as long as possible . At the Enfield Pageant I purchased some stubby spanners with this job very much in mind as well. Armed with my selection of spanners, screw drivers, pliers, various assorted ratchets & sockets, WD40, torches and just about anything for four bolts or three if I was lucky! The wiper motor is held to a bracket by three insulated bolts to a bracket. The bracket is held in place by four bolts. Two bolts at the top behind the dash and two at the bottom right up under where the brake pedal is located. Plan A: Wiper motor off, job done. Plan B: Bracket off not ideal but it won’t come to that.

So I sat down crossed legged on the floor pan and started to investigate. It was dark – torch (Snap On magnetic) sorted. It was very tight in there and I couldn’t see where I needed to go, extending mirror – sorted. 7/16ths stubby spanner to the inside of the bracket – nope! The arm of the back of the motor was sitting right on top of the nut I was trying to get too. Plan B was lookin’ ominous for implementation. Idea, Plan A/2, remove the arm then I could get to the bolts, I went to remove the nut on top, job done. Just had to lift up the arm of the motor spindle and I was in there. Nope, it weren’t gonna move. Poxy Plan B it was going to have to be. Remember what they said on YouTube – clips at the bottom and clips at the top. They will be a pain but can be done. There it was clip at the bottom, screwdriver in second attempt to open the clip success. I smiled. Then the top wiper arm pivot clip. What clip, there is no clip. So I cleaned the top up of grease and grime and repositioned the mirror. Moving the fingers to the top I felt it and my heart sank. A C-clip was on the top. It was turning quite freely and laughing in my face of concentration and patience. I tried long nose pliers and circlips pliers. No way, so I had to resort to improvised Plan B/2. This involved a weird contortion of the left arm and a small screw driver to lift the clip up on one side. But I had to have my other hand through the radio hole to hold the clip still from  spinning. So there I was hands in the dash head trying to look through a letterbox of a dash-board and a steering column jammed just under the collar-bone. Eventually after an unknown amount of efforts one side lifted up and then it pinged up into my hand. Ha, who’s laughin’ now then clip? There is no way that little swine that still has my flaring tool part is gonna have this bit as well. OK, so I bent it a bit but it was off, I straightened it with pliers and it is fine again. The wiper arms came of no problem after that, they were able to be moved quite freely once they were disconnected. Now the four bolts for the bracket top two were simple and the bottom two were a bit of a pain. To cut a long story short I have posted a guide on the process here, or go to the Photos – Inside Car – Wiper Motor 2 Speed Project. Once I eventually got the bracket out it was time to take it back to the man cave, I uncrossed my legs and then it hit me, cramp in my leg. I couldn’t stand up or get out the car, I had to spin round on my back an straighten the leg up towards the rear window with my head under the dash next to the brake pedal. The pain subsided and it was time to get out of the car. I was crossed legged for almost two hours according to my clock on the wall. I knew my legs were getting a bit numb but my concentration had taken my mind of it all.

The parts were taken back for photographing for the steps. Sunday I managed to get out the power assisted steering pump as well as this has a leak from the seal at the front of the pump, I will need a new one of these too. I have also got a set of photos for steering pump removal here, or go to the Photos – Engine Bay – Power Steering pump. So If your reading this Adam, I think you know what I need, a two-speed wiper motor, wiper under dash loom and a power steering pump for an Air Con fitting car. The wiper motor was worse than I expected, here is a couple of pictures of the damage to the wiper motor, other parts of the wiring loom were like this as well and can be seen in the original wiring pictures.

loom plug melted
loom plug melted
damaged and melted
damaged and melted

They don’t tell you in workshop manual give yourself a break to avoid getting cramp! The do’s and don’ts of wiper motor removal.

Do take a break, and don’t sit there too long with your legs crossed. Will I get the clip back on? I hope so and to be honest a bit worried about it, this time I will not sit crossed legged for too long, but I will keep my fingers crossed!

Quick links:

Wiper 2 Speed Motor Removal – here

Power Steering Pump Removal – here

UK Registration Plates & Dates – here

Share my Content

Ford Capri our UK Mustang?

Comparison Of  the Ford Mustang and the Ford Capri

The history of the Ford Mustang is well-known, and I have a few articles on this blog about the years and specifications. During a recent walk around the Classic car show I was taking some photos and spotted a similarity or two with the Mustang and Capri around the 1968 mark. The Capri was finished for a special preview in Bonn, Germany on 21 January 1969 and went on for a press release on 24 January at the Brussels motor show. The car was on the forecourts 5 February 1969. Was this car destined to be the UK Ford Mustang? I have been trying to find details of the designer but not much luck so far does anybody have any information I can add to my Article?

Ford Capri was a name used by the Ford Motor Company for three different models. The Ford Consul Capri coupé was produced by Ford of Britain between 1961 and 1964. The Ford Capri coupé was produced by Ford of Europe from 1969 to 1986. The Ford/Mercury Capri convertible was produced by the Ford Motor Company of Australia from 1989 to 1994.

The Capri name was also used by Ford’s Lincoln-Mercury Division on six different models which did not bear the Ford name. The Lincoln Cosmopolitan Capri from 1950 to 1951; the Lincoln Capri from 1952 to 1959; the Mercury Comet Capri in 1966–1967; and three different generations of Mercury Capris from 1970 to 1994.

I have created an Article for the Capri History and the Mustang comparison under the Articles section of click here for the quick link which was compiled from various web pages.

Anybody seen these side vents before? The center line running down the side of the car? Shape of the back section, replace the upper side vents with glass?

The wheels being different on the Mustang as a 5 Lug design and the Capri 4 Lug design, but they look pretty similar at a glance. The Capri front wing or Fender badge is in the same location as the Mustangs too.

Am I imagining this or is there a definite link or coincidence? I can’t track anything connecting the Mustang and the Capri from Ford. Who designed the Capri was he on the Mustang projects as well?

Share my Content

The fitted sheet

Friday evenin’ and it started.

I of course refer to the snow, no I am not going to bang on about it again because I am to put it politely, getting a bit sick of it. Everytime I want to do something it snows. The snow has been falling all weekend, it settles then it melts, still snowing then it settles again. Global warming? I think it needs warming up round here, so I better go and start my v8 up with no exhaust and let it tick over for a while! Only joking, so I won’t dwell on the fact its cold, but my man cave looked like a log cabin at one point today with the snow all over it, and it did get worse than this. To prove it I have a little picture of it. I’m sure there are a lot of people worse of than me out there, I hope you are all safe and have had not issues with the “S”. Don’t forget to check on the vulnerable elders, even a pint of milk for a hot cup of tea can help.

Man cave in the snow

Saturday I sprayed the VHT brake caliper spray on the left side front drum which went well, I keept the can in the house overnight in the warm along with the drum itself. I only took it out to the man cave when it was ready for the spray. I pointed my new light at it to keep it warm during the drying phase. It worked a treat. After it was dried to touch, I took it to the garage and put it onto the spindle and packed it with grease. I will allow it to cure for a week before the wheel gets bolted back on. I have already done a review of the VHT Caliper paint under the Reviews – Consumables or click here for a quick link. I also went to fit the brake booster, it was going in OK, but as I was so cold the fingers were having issues holding things properly. I got a bit annoyed at this point and decided to take the hood off so I could get right into the corner. Oh boy, I forgot how heavy that hood was, trying to hold it in place with one hand and undo the nuts with the other was not an easy task. Thankfully nothing was damaged and it came of with a big sigh of relief and a lot of effort. I did remember to put some heavy towels onto the cowl under the hood corners so it would suddenly drop metal onto metal. The hood now sits against the wall ready to be treated, to top it all, hood is of course standing on a nice piece of foam. While the hood is off I took photo’s of the brake lines, (before I re-fitted the booster again), that I fabricated a while ago along with photo’s of the Brake Booster being fitted. After gaining access to the full engine bay the Booster actually went in fine, all was well with the world again. As there is no protection for the engine now from the hood, the dust from the garage could be an issue so I decided it needed covering. Did you know that the fitted sheet from a UK double bed is the same size as a 66 Mustang engine bay and fenders. Next time you play Trivial Pursuit you can maybe win on that bit of knowledge, OK, maybe not. I will be covering the treatment of the hood at a later date with pictures too when the weather gets better as it will need to be layed flat. To show you what I mean about the fitted sheet, here are the before and after pictures. Liking that? OK, Sorry then, but I thought it was a good idea!  🙂

The bits that are sticking up are the hood springs, they are gonna stay like that, due to the fact I want to keep my fingers and they are super strong springs and may have difficulty getting them up again. The scissor action on the metal is sharp and I never put my hands near them, ever! I managed to also remove and re-assemble the Hood catch, the pictures will be added to the photo section as soon as I get them done, they also came up very well. In the engine bay picture you will see the Brake booster in place and the reservoir all connected up. You can find the fitting in Brake Booster Part 3 in the Photo Menu – Engine Bay – Brake Booster Project or click here for a quick link. I have also added a review of the Autolite Group 24 Replica Battery now after a request for it and a few searches, you can find the review under the Reviews – Car Parts section, or click here for a quick link.

All in all I was quite pleased with the weekends work considering it was….. Ha, you thought I was going to say the “S” word, you know “snowing”. Dohhh!

Drive safely.

Share my Content

Bumper Stone Guard

I have been out all day, OK, I was out till it started to get dark.

I was working on the Bumper Stone Guard from the front of the car, This bit of work need to be in two very distinct parts; the inside rust protection and then the outside cosmetics. For Part 1 I had rubbed it down, treated it and put the first coat of POR15 on it. All seems to have gone well and I am please with the results today. The metal was in great condition when I got down to it under all the dirt and grime. I will apply the second coat tomorrow ready for me to do a bit of work on it next weekend on the outside. I have called it (yep you guessed it) Stone Bumper Guard (part 1) the photo’s and process for what I did is under photos, or click here.

I have added an RSS feed if you dont want to keep visisting the site, that way you never miss a post and can visit when you can. I have been asked to put quick links at the top in the “home” bar. consider it done!

Hope your having a good weekend and got everything in place ready for the holidays!

Share my Content