Now we are at the end of the car show season it’s time to put my pride and joy away and tuck her up for the winter. This is more important than the hotter climates like the USA or Europe. The point is that when you pull the car back out again the car has been as protected as it possibly could have been. I have been asked a few times what my process is over the winter.
One of the most important things I do is to make sure the car is running on fumes. This is due to the fact that the ethanol fuels will ‘go off’ after a few months as it absorbs the moisture from the air. My car tends to run like a bag of nails when the car starts if it has fuel that has been standing. It seems that my carb settings and timings are sensitive to bad fuel, as a result I only use Shell V-Power premium fuel. It’s more expensive but the car does run so much better for it. I do have a five gallon jerry can that I fill up with fresh fuel when I need to move the car again for the first time in the new year.
The classic Mustangs have a lot of chrome and unless protected that chrome could start to pit, usually down to moisture and humidity. I have in my garage a dehumidifier and a radiator with an independent thermostat which keeps the chill away from the garage. The theory is that the car never goes below freezing. I have written an article about humidity and car storage here.
The thing to consider is the environment where the car is to be stored. A decent amount of dry air circulation around the car, and in an ideal situation not standing on a cold concrete floor as this will cause damp issues rising up to the car. I have laid some heavy plastic tiles which insulates the cold floor and the car which I also wrote about here.
First and most obvious is to wash the car, but make sure it’s thoroughly dry, especially if you don’t have a dehumidifier before you put the car away. Use a dedicated car blower if you can rather than a drying towel.
I then wax the car with a longevity wax rather than a show car wax. This will form a micro barrier to the elements, not that it should be needed in a climate controlled environment. It doesn’t matter what wax you use just something to protect it. I used Chemical Guys Quick Detailer P40 this year as the car had a wax a couple of weeks ago. So this was a top up more than anything as this product has a level of carnauba wax as well.
The big piece of work is the wheels. These wheels are chrome and need proper protection. I always clean them and apply a wheel wax during the car show season. But over the winter there is a little process I follow. I clean the tyres and the chrome as normal then I apply a squirt of Gibbs directly into the join of the wheel at the top and allow it run down to the bottom where it will puddle. WD40 or similar will do the same thing. You want enough to penetrate into the gap all the way round but not wate it so it runs out. Don’t wipe it away, just soak up the excess as it pools at the bottom. You won’t be able to get the wax right where you want it, so a penetrating product will get where you cant.
With the excess spray wiped away it was time to protect the chrome. I use Angel Wax Bilberry, it smells wonderful and gives great results. This wax is much softer than normal paint wax and is just like spreading a room temperature butter.
Ideally you will allow the product to cure and then buff it away. I apply it liberally but I don’t buff it completely away. This will leave a thicker barrier than you really need, but I just like a thick layer. This will make the chrome dull, but just make sure the wheel is fully coated.
The rubber tyres can be susceptible to cracking and I over apply an amount of Meguiar’s Endurance tyre gel. This product protects the tyres and keeps the rubber nourished. Applying this much will usually give rise sling as the car rotates. But as the car is now stationary it won’t be a problem. While you are at the wheels check the tyre pressure to make sure they are correct so they don’t deform.
If you have metal dust caps like I do, before putting them back on, squirt a tiny amount of WD40 or similar product that will make sure the cap doesn’t corrode metal to metal.
Glass is given a good clean, to make sure nothing is stuck and will be difficult to remove after a time of being laid up.
Where the rain or water car wash water can get into the car I make sure there is some water repellent applied. This is especially at the end of the rain drip rails that goes into the rear quarters. I squirted an amount onto the drip rails so it follows the same path as the water.
As the doors will be shut you don’t want the weather seal to stick and possibly tear when you go to open the door again. I use a Chemical Guys Tyre + Trim Gel which is dry to the touch almost straight away. I could have used this on the tyres obviously, but I prefer the Endurance.
It’s applied around the door frame and also to the rubbers under the door. Around the screen glass both front and rear there is a layer of black mastic, not how they came from the factory, but it seals the windows properly. The top right photo below shows an arrow where the before and after on the sealant.
The two images above is the trunk area where the before and after can be clearly seen as it’s applied. For the chrome trim and the wipers these are given a a layer of wax, again not buffed to a shine. Before shutting the car up, open the windows a little so that the car doesn’t sweat and go mouldy. Allowing a change of air will help prevent this as well. Having an open ventilation into the garage can have a minor advantage for fresh air, but it doesn’t allow for the dehumidifier to control the moisture in the garage environment.
The battery trickle charger CTEK MXs 5.0 is connected as I always do when the car is in the garage.
I removed the screen washer bottle and rinsed it out and hung it up to allow it to dry. Previously I have left water in the bag and it had gone bad and stank with things trying to grow in it. I had a bit of a job to get it clean again, I won’t be making that mistake again.
Inside the car is a quick vacuum out. I tend to keep a couple of old air fresheners for the winter, give them a quick spritz them with Mitchell & King Leather scent. I hang the air fresheners back in the car being sure to make sure they are free hanging and not touching anything. Inside the car I tend not to pull the parking brake on as this may seize in place. If you’re worried about the theft you could use a T Park Handle lock here for a bit more peace of mind.
Finally the car cover goes on and the humidity gauge goes on top of the car in the middle to get the average reading of the garage. the sweet spot is 50%, with a couple of percent either side.
Last thing is to turn the dehumidifier on which I have already got set up from the previous years which sits around the fifty percent mark all year round now. On the back of the unit there is a filter which is removed, cleaned and replaced. It doesn’t hurt to squirt a little air freshener towards the back of the unit in order to give it a little freshen up.
I do have a little tip regarding the dehumidifier, hang an air freshener near the unit, this will fill the garage with your scent of choice. The downside is that the freshener tends to get dried out fairly quickly due to the functionality of the dehumidifier.
With the car now laid up for the winter I still tend to open the garage up in the nicer weather once or twice a month to let some fresh air in and make sure there are no leaks and that the dehumidifier and the the battery trickle charger are still working ok.
When the new season starts I have to remove all the waxes, and the over application of trim on the paint. this isn’t much of an issue as I give the car a service, grease, check the brakes, full valet and good once over before the first show anyway.
I hope that helps a little and gives you some tips to store the car short term.
Looking forward to the first car show of the year today so I spent yesterday afternoon giving my car a final wax and once over to check fluid levels, tyre pressures, lights working etc. as you normally do after a winter lay up. All was good except the fuel was a bit rubbish and was not running nicely. Over the course of the winter lay up, I tend to run the tank down low with some fuel stabilisers in it too. The car fired up second time around after pumpin’ a little more fuel into the carb from the first turn over.
The go to wax of choice is Mitchell & King ‘Lily’ which I love and used on her as a treat.
I went to bed fairly last night and thought I would look at the Stonham Barns ‘Kustom Kulture’ car show webpage to check what time I could get there for the gates opening; all was good, ten till four. The alarm was set and by the time the alarm went of I hadn’t had a great sleep. I looked out the window which was grey and overcast, but no rain was forecast, in fact the sun was due to come out. I was tempted to flop back into bed and grab a lay in. But, as it was going to be my first show of the year I made the effort to get ready and went to the garage. I turned on the dash mounted GoPro and fired her up. I needed some fuel on the way to the car show and headed to the planned stop at the Shell garage for some V-Power fuel. As I was filling the tank a rather nice McLaren 720s pulled in next to me. We were chatting about cars and the fuel we were putting in – we both agreed it’s more about the ‘smiles per gallon’. He told me he was off to a track day, where if he gives his car a thrashing around the track he gets 2mpg where he drain the fuel tank in 18minutes! But, he said he’s not looking forward to changing the ceramic brake set up as it costs a staggering £22,000. I took the picture below left handed as I was filling up, so it wasn’t a to bad an effort considering, although not centred as I would have liked.
I paid at the counter and looked for a packet of jelly babies to enjoy at the car show. I continued the drive to Stonham which was about ten minutes from the petrol station, enough time to have a quick blast to clear some of the old fuel out which helped, still not perfect, but getting better. Strange, not many cars near the village as I normally see, so I suspected that my timing for arrival was perfect. As I got near the show there was the expected queue but moving fairly quickly, just normal daily cars, not old school or pre 1973 as the requirement said. I pulled in the gates and there was a single bloke directing the traffic straight into a field for the car boot show. I stopped and said “No I’m here for the car show”, his couldn’t give a sh!t attitude was, “It’s cancelled mate.” Stunned and quite aggravated I turned around in the car park to start the journey home. There was a couple of chances on the way back to clear the carb a bit and the running was improving all the time.
I got home to park up on the drive and wiped the car down before moving her back into the garage.
So my first car show was cancelled and the sun was out. So why was it cancelled? I checked the website when I got in, nothing about it being cancelled, it was still on. I reluctantly logged onto Facebook to see if anybody mentioned it. Somebody had posted that it was cancelled due to a water logged field. Yet the cars were being parked up on field next to it.
I’m not impressed that they didn’t update their webpage, I HATE Facebook at the best of times so I don’t rely it – ever. Not everybody has a personal Facebook profile where they share what they had to eat this morning and other such trivial rubbish. (Rant over). I must concede that on this occasion checking Facebook would have helped.
Underside
A couple of weeks ago I applied some Lanoguard to the underside of the car and reviewed it here. Or, look for it under the “Rust Treatment” menu on the header with my other rust reviewed products.
The process is dead simple and took around half an hour to do the underside of the car. Just remove any old surface rust and spray on to coat and protect the car.
Before pics of the axle with the POR15 paint on it has a semi gloss look to it.
Then after the application had fully cured, about one week later or so according to Lanoguard, it looks like this:
The slightly rusty U-clamp bolts have changed back to their more natural colour without the slight surface rust on them now. So far I’m pleased with the results and how easy it was to do. In fact if you have somebody who wants to help out with your project car, this could be a great way as you can’t really go wrong with it. Tell them where to squirt and let them get on with it. In fact I’m now going to buy some more to treat the underside of the wife’s car too.
To sum up the day, I got up early so missed out on a Sunday lay in, I missed out on a car show and now I’m pretty sure that I’m gonna be asked to help my better half in the garden. 🤦♂️ I’m sure I can find something in the garage that needs cleaning to avoid that one! 😉
Next week another car show, in fact two on the same day so I will choose which one to go to, providing it’s not raining and not cancelled, so hopefully I can kick start my car show season properly.
As for the Jelly Babies, they’ve all gone now as I was eating them while typing this post up.
During the last quarter of last year, the UK had a few nice days of sunshine and as I had a few days off work owing to me, I decided to use my holiday up. That time was put to good use and completed a little project I wanted to try for myself. It’s often done on YouTube, but not to this degree, I think.
There are often a few car cleaning products compared on YouTube channels, but not ten side by side, with the same testing criteria by the looks of it. When I say “Top Branded”, I mean top manufacturers and their best selling products for normal weekend washing warriors on the street. Those of us who like the best products that work and at reasonable prices using traditional waxes, not the latest in thing of ‘Hybrid’ or ‘Ceramic’ waxes. Lets face it, there are some truly great products on the market at the moment, some of which are even essentials of my own cleaning routines, still. To put this into context there are waxes out there that are expensive for expensive sake, like Swizöl International’s Divine costing £2,150, Brough & Howarth’s Definitive Wax Marble costing £24,000, Zymol Vintage Glaze costing £2,400 or The Ultimate Shine costing an insane £65,000 which can be seen here: http://www.performancemotorcare.com/car-cleaning-product-news/worlds-most-expensive-car-wax/1808
However, there has been (a strong) rumour that the ‘Ultimate Shine’ wax itself is actually made by Mitchell & King in Scotland. I can’t verify this, but can only state what I have read so far. The original mix (allegedly) sold by M & K is called Gold Rush Rally at £75 a pot which is a mere 0.11% of the price! This brings me back to my point, although these ten waxes are (mostly) affordable and will last a good number of applications, they are not in that stupid silly money league. However there is an in-between level of Luxury car waxes such as Swissvax Crystal Rock at £300, BMD Prometheus £120, Auto Finesse Desire at £120 and Mitchell & King’s top of the range wax ‘Lily’ around £600 where only One pot is made a year, or anything in between from M&K for a comprehensive range of waxes between £45 to £600.
I will be reviewing Mitchell & King’s ‘Lily’ in a very special review coming soon. This was purchased with my wife’s very own money for a special Christmas gift. Before anybody asks – No, I’m not on commission or paid by them.
If you can afford those crazy sort of prices I suspect you will get somebody else to clean the car for you. I’m guessing most of those super high end waxes are being applied to Veyron’s, Ferraris or any other super or hyper car where money is no object. Then there is the other end where Poundland stores sell car shampoo for £1. Pure logic dictates that there has to be a difference right? But somewhere in the middle, there is a sweet spot and that’s these sort of products I have reviewed here.
Anyway, back to these standard off the shelf and top selling waxes, I have been very happy with most of these waxes and will continue to use them on my daily cars. Some do a great job and perform well after application. That’s why I really wanted to compare these particular mainstream products. Picking the best of the best that I like, then at a later date this summer step up to the ‘Real Luxury’ car wax to see the real differences, if any. But a couple of these waxes are getting close to treading on the toes of the ‘Luxury wax’ end of the market; Dat Wax and Illusion based on their cost to volume ratio. The scores I have given in the past to some of these products I stand by. At the time I didn’t know any better or had anything else better to compare them against until now that is.
Costs:
Multiple products which varied from a very reasonable £12 to a eye watering £75. All these products I purchased myself, no sponsorship to skew reviews. These are my own thoughts and findings for the products with my own hard earned cash I parted with for each of them.
Meguiar’s :
Gold Class paste £21 for 311g click here for individual review
Ultimate Wax Paste £40 for 311g click here for individual review
Mirror Bright Polish Wax £23 for 226g click here for individual review
Nxt Gen liquid Wax 2.0 £26 for 532ml
Auto Finesse :
Glisten £12 for 500ml
Illusion Show Wax £75 for 150g click here for individual review
Chemical Guys :
Butter Wet Wax £23 for 473ml
Cherry Dripping Wet wax £23 for 473ml click here for individual review
Instawax+ £16 for 473ml click here for individual review
The full video of this test can be found on my YouTube channel orherefor the shortcut or paste the link to YouTube. It’s easier to see what is going on rather than read about it. The video lasts for thirty two mins or so and has be trying to film, commentate, wax and buff all at the same time. I think I pulled it off after a bit of editing.
I have reviewed many products for detailing, especially waxes and quick detailers. Some have been rated 10 out of 10 by me when I tested them. Which at the time was correct as I used the product in isolation. However, there are always those nagging thoughts in my mind; what about side by side comparisons? Are the expensive waxes worth it? Can you tell the difference? I aim to answer these questions the best I can.
When you apply a wax on it’s own you can only gauge by what you are working with, application may be great and buffing at the time. But, you forget how others perform that you had previously used or reviewed.
So; I got my favourite waxes out and decided to compare them. That’s five hard paste waxes – old school and my preferred option. Then five soft or liquid waxes of similar products not made in a wax form.
The top three big boys are Meguiar’s, Chemical Guys, Auto finesse and a wild card of Dat Wax.
There are only really three actual ‘hard’ paste waxes which are the Meguair’s trio, Gold Class, Ultimate and Mirror Bright Polishing Paste Wax (made by Meguiar’s). The Auto Finesse Illusion and the Dat Wax are both very soft butter texture type waxes not quite liquid, but not a hard paste in comparison either.
The Sales Pitch(s):
These are found under each of the reviews I have done to date. See the links above. I still have a proper Glisten review to do and my latest purchase of the Butter Wet Wax.
Each of these products claims to have the best shine possible and protection, but they can’t all be right can they?
Instructions:
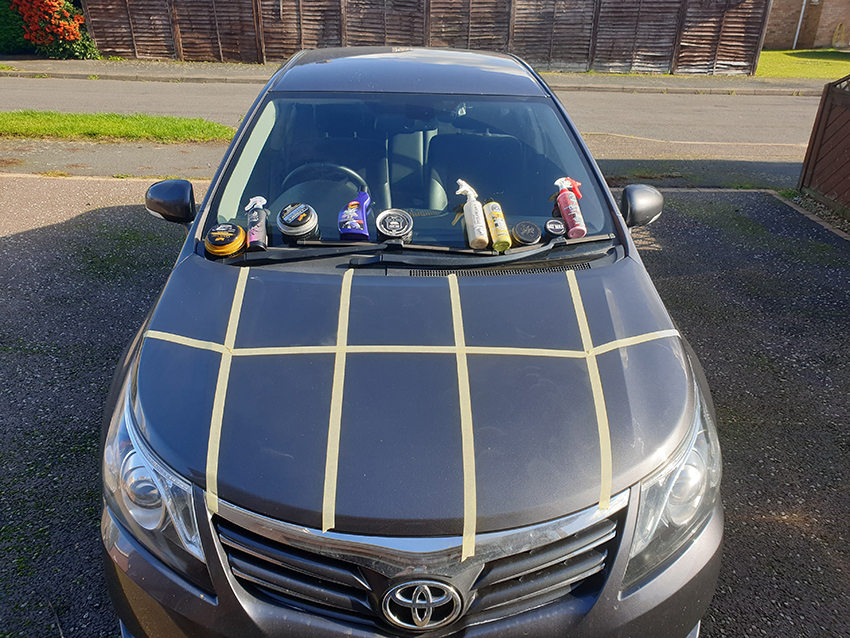
The instructions were followed on the tins and bottles of each product. The donor hood was my 2014 Toyota Avensis in a metallic grey. I divided the hood into roughly ten even sections via some masking tape. The day was overcast and sunny, but not enough to make the metalwork hot to the touch.
The top five sections were for the hard waxes, and the bottom five sections were for the soft waxes.
Top; left to right – Meguiar’s Gold Class, Meguiar’s Ultimate, Mirror Bright Polish wax, Auto Finesse Illusion, Dat Wax.
Bottom; left to right – Auto Finesse Glisten, Meguiar’s NXT Gen 2.0, Chemical Guys InstaWax+, Chemical Guys Butter Wet Wax, Chemical Guys Cherry Dripping Wet Wax.
Application:
The hood was first given a wipe down with quick detailer to get the light dirt off.
The hood was then clayed with Auto Finesse clay bar and a Megs Quick Detailer, not the greatest detailer it has to be said, it’s recommended by Meg’s as a clay lubrication product as well.
The hood was then given a good spraying with 99.9% Isopropyl Alcohol to remove anything left, which was quite a lot based on the clean white 100% cotton cloth.
My fingers dragged and squeaked across the paint, I knew then it was clean. The hood was the taped up ready to apply the products.
Each Product
Rather than going into pages and pages of what I did and how I did it, the video will show you each product as I went along.
Each product was applied with a clean applicator or cloth. The pastes and liquids were left to haze except for the Auto Finesse Glisten which could be buffed off straight away. It took around 15 minutes for all the waxes to cure / haze over.
Each buffing was done with a clean 280gsm microfiber cloth all from the same manufacturer for consistency, the only difference being the colours. I tried to apply each product in the same way, and buff off in the same way. The only difference being the Mirror Bright Paste as that required working into the paint as it was a polish as well. Failing to apply that correctly would have compromised the product. It’s interesting to note that the Auto Finesse Illusion and the Dat Wax never actually hazed over probably due to the oil content not evaporating.
I tried to apply the products to the paint for the same amount of time, and buff to a shine for the same amount of time for continuity.
Each product was only applied once to the cleanest of my paint work I could muster up. That way they all have a same starting point. It was obvious that some required additional coats to get to the desired levels of coverage. But, to be honest, you do need to actually build up the wax layers. It wouldn’t be fair to apply two coats of one and just a single coat of another.
The Video
This is a full half hour video I uploaded to my YouTube channel. The Video has me narrating (some say droning) on what I was doing and what I had found on the comparisons. Put thirty minutes aside and enjoy.
Results:
Don’t get me wrong, I like these products or I wouldn’t have bought them in the first place. I have previously given some of them 10 out of 10 for a review. They are all (mostly) great products from the top suppliers.
HOWEVER; when they are side by side there is a difference and I didn’t think for one second that the results I got were what I was going to predict below, that actually shocked me.
The results I decided to do in three categories. Touch, Shine, Water Sheeting/Beading.
The Touch Tests:
No matter where I go at a car show and my car is all shiny, somebody wants to feel the paintwork. Not sure why, but they do. So I decided to make that a test. No amount of photos will ever show you the feel of a wax.
Process: I had a single cloth soaked with Isopropyl Alcohol that I could wipe my fingers on between each touch test. That way I had no other waxes on my fingers to cross contaminate to the next touch test.
After a single application of the products and allowed to cure then buffed, touch test was ready. This was a simple feel for the surface, was it smooth, was it streaky or still there. My fingers really could feel a difference. The Meguiar’s Gold Class applied an adequate coating, but no doubt about it that it needed two or three applications to become a nice smooth barrier like the rest. It was really odd to feel the paint roughness still though.
I often refer on the video to a wet feel, of course it wasn’t wet, but just sort of feels silky or smooth buttery texture.
The touch test results are for the Pastes waxes:
1) Mirror Bright,
2) Dat Wax,
2) Auto Finesse – Illusion,
4) Megs – Ultimate,
5) Megs – Gold Class
Conclusion for Paste Waxes: The mirror Bright just felt like glass where as both the Dat Wax and the Illusion felt more oily which was to be expected by their constitution to be honest. Some may prefer that type of feel. Ultimate was in no way a let down and felt like the Mirror Bright but not quite as deep feeling as it were. The Gold class could be felt as a coating there but certainly not great on a single pass.
The touch test results for the Liquid waxes:
1) Chemical Guys – Butter wet,
2) Chemical Guys – Insta Wax+,
3) Megs – Tech wax 2.0,
4) Chemical Guys – Cherry Dripping Wet,
5) Auto Finesse – Glisten
Conclusion for liquid waxes: The CG Butter Wet Wax was the clear winner here with the Instawax+ with hardly any difference and a close run for top place. Megs Tech Wax 2.0 felt just like the Ultimate and a glassy feel to it. The CG Cherry Wet Wax was super smooth but just shaded a little by its siblings, a second coat and I would say it would be right up there with the winners. Glisten was on there but felt more watery based and you could feel there wasn’t much of a coating on the paint work, although a little better than then Gold class for a single application.
Overall: There is a difference between the feel of the waxes. The pastes are applying a thicker coating than the misting of Glisten for sure. Especially when you run a finger from bare paint to the waxed areas. It’s a very close thing between the Butter Wet Wax and the Mirror Bright. For a straight forward wax on the Butter Wet takes it, for a little cleanse and slightly harder work the Mirror Bright takes it. The Dat Wax and the Illusion over car show coatings feel like an oily coating to give that much desired consistent smooth look across all panels.
The Visual Inspection
Process: After the applications I was going to look at the colour and how the reflectivity, gloss, depth and warmth of colour of the waxes looked on a paint job. As my car has metallic flake this would be a real tell-tale of shine.
As I mentioned before this was a single application of waxes and inspected from their. The sun was in and out during the inspection. When the sun was out the metallic was made to pop by some waxes better than others.
The results are for the Pastes waxes:
You can clearly see from the top of this picture that the Meguiar’s has warmed the colour of the paint and clear to see.
The results for the Liquid waxes:
This picture shows the same warming glow to the paint from the Chemical Guys Butter Wet Wax.
Conclusion:
As each of these products are now applied they should be performing as a finished product as it were. That’s the look of the waxes once applied and the effectiveness of the waxes.
There IS a difference in the way that these waxes can effect the look of a paint, say on a white car using a yellowish based wax will give a warmer glow compared to a white wax for example. It not as immediately obvious on much darker colours. I picked my Toyota as an example to test for the metallic and the neutral grey. My hunch was correct as the colour differences can be clearly seen.
Consider the look of the paint you require if you are that into it, or not worry it’s up to you.
Overall:
The waxes either the paste or liquid made little difference in the end to the look of the paint. A personal preference obviously comes into play as it does all the reviews. But I found the liquid of the Butter Wet wax and the Ultimate wax paste was virtually undisguisable.
1) (Meguiar’s) Mirror Bright Polishing Wax
2) Chemical Guys – Butter Wet
3) Megs – Ultimate
One thing to remember here, the hard waxes will last way longer than the liquid versions just by the nature of how they are applied. This could be a major factor when considering a purchase – value for money.
Water Tester Sheeting and Beading
Process:
I filled a gallon pot with clean water and chucked it over the car. This would show the clearing capacity of the wax properties for sheeting and beading.
I did multiple tests of the water deluge on the video and it’s very easy to see the differences.
On a personal note: to see the beading looks great as there is a barrier between the paint and the water. But as the car moves it will run off anyway. I prefer to see the water run off the car completely, but ‘Bead Bragging’ rights is a huge thing in the detailing circles.
Why do I prefer to see it all run off? Well if dirt lands on the car or dust it will sit around the beads. Once the beads are gone it will leave a dusty layer looking like a moon surface. With sheeting it will at least be a uniform film of dirt.
For the hard wax beading I found the following;
Meg’s Ultimate Wax
Mirror Bright
Meg’s Gold Class
Auto Finesse Illusion
Dat Wax
For the liquid wax water beading I found the following;
Meg’s Nxt Gen
Chemcial Guys Insta Wax+
Auto Finesse Glisten
Chemical Guys Butter Wet Wax
Chemical Guys Cherry Dripping Wet Wax
For the Overall Sheeting ability I found the following;
Chemical Guys Butter Wet Wax
Meg’s Mirror Bright
Chemical Guys InstaWax+
Dat Wax
Conclusion:
Without a question some waxes bead better than others, Meguiar’s take that crown here with both the paste and liquids.
Large amounts of water should run of quickly, and small rain drops tend to form together until the beads are to big and run off.
A little misting and ALL these waxes will bead very nicely and there isn’t a lot in it at all. In fact I would go far as to say you wouldn’t be able to tell the difference.
Perhaps by full on pour of the water is a little unfair, but the sheeting tests is similar to those used on ceramic coating demos. I was just showing the same type of reaction from a well applied wax.
The difference between the hard and soft waxes is minimal if at all.
Overall:
Such a difficult thing to sum up.
It has to be preference for application. Traditional or old school – Hard wax on, cure and buff off. Great results and little goes a long way. New or time saver – Liquid waxes apply and buff off to a great result. This method tends to use more product, but is cheaper.
Beading / Sheeting, under heavy water its easier to see the ones that deal with it quicker, but allowing for beading they all performed well with the hard waxes being the more consistent beaders.
Scores:
Various out of 10 for these as I have reviewed most of the products before, but more to come soon.
Conclusions:
I’m not convinced that the fine mist spray waxes like Glisten are on a par with the liquids / hard waxes from the other suppliers. Personal preference is a huge factor for application, you either see it as an art form process – hard waxing, or an exercise to keep the car protected and looking good – soft waxes.
Costs between these waxes is insane – £75 for Auto Finesse Illusion that applies beautifully and smells nice looked no different from Chemical Guys InstaWax+ at £16 once both buffed off to a shine.
There is an amount of snobbery regarding brands between users out there. But the big boys vs the cheap end of the market there is a difference no doubt about it. However when you get to these high quality level of suppliers, all their great products in relation to each other there is virtually nothing in it.
Some prefer the wax of ‘So & So’ because it doesn’t streak, but on another car’s paint it may be difficult to buff to a shine. I found that I am using mixtures of brands to get what I want from a detail for a show. No one brand has everything covered better than the rest. You just have to try it for yourselves. If you buy it again then you have a product that works for you. I have a couple of friend’s Craig and David who are both as sad as me when it comes to detailing, we swap products between us to see what we like. I may like the look, but not the process, where as he may like the gloss that I don’t. We have different cars and they are very different colours, white, grey, black, dark blue, light blue etc so we can see the varying results.
I do need to mention that the waxes are dyed. Thats the Chemical Guys Butter Wet Wax after applying it to a car for two coats it looked like had been smoking 60 a day for the last twenty years. Same with the Cherry Dripping Wet Wax which left me with red fingers like I had been picking strawberries all day. Just saying!
So, when I go to a car show and a want a wax on the car not just a quick detailer, then it’s a liquid wax. At home with plenty of time it’s back to the hard waxes. I never thought I would hear my self saying that, but I use both types of waxes now. So I have moved on with the times, I think.
Would I buy them again?
To be fair most of them I would, but not the £75 Auto Finesse pot or the Auto Finesse Glisten, not my favourites to be fair, but both are at the opposite end of the price scales to each other. The hard waxes will last me a good few years yet and will probably still be some left to polish the handles on my coffin when I drop dead! Having to choose, the Butter Wet Wax I would buy again, as I would the Mirror Bright polish paste.
Would I recommend any of them?
Without a doubt some I would; such as the Meg’s Ultimate and Gold Class (when multiple layers applied), Butter Wet Wax and Mirror Bright. However, it’s hard to recommend a wax for £35 for few fluid ounces in a little jar or a £75 for a wax that don’t last long as it’s a “show wax”. Especially if there is no real difference that can be seen straight away after application.
Like I said earlier, I am looking forward to using a premium hand blended quality wax which I will review and apply before some car shows – weather permitting of course. To suppliment this post I have also created a Dual Action pad comparison & guide from the manufacturers. Once I have written that up I will also post that very soon before the car show starts again in earnest. This post may not all be exactly Mustang related, but it could be for any car and I hope useful. I have learnt a lot from speaking to the designers of the products and I will share a little of that information in the next forthcoming posts. I am really pleased to say that the blog is also attracting some car detailers to and not just Mustang fans.