Last weekend I had the chance to use my new bit of detailing equipment. The particular item isn’t my first venture into this area of car detailing. I’m talking non-touch drying or air blow drying.
There are various methods to dry a car after a good wash and shampoo pampering;
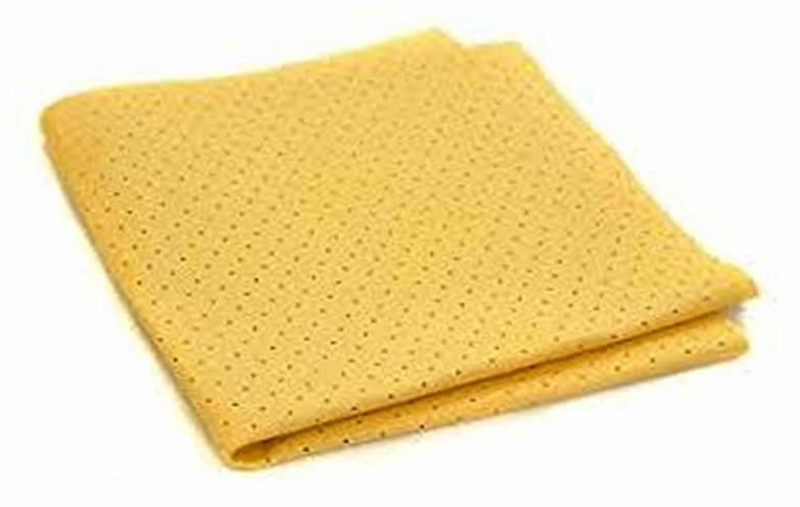
Chamois leather, old school method.
Pros:
Great for large surfaces
Very efficient at absorbing water
Only one is required to dry your entire vehicle.
Cons:
Requires water to use, not ideal for waterless eco-friendly sprays
Potential to scratch vehicle if used incorrectly
Dries hard, not as convenient to store
Synthetic Chamois Leather, modern take on old school
Pros:
Great for large surfaces and small areas
Very efficient at absorbing water
Softer than traditional chamois
Easier to store
Cons:
Needs water to work, not for waterless washing
Potential to scratch vehicle if used incorrectly
Needs regular rinsing and wringing to use
Micro Fibre Towel, modern technology
Pros:
Great for large surfaces and small areas
Super efficient at absorbing water
Comes in many various sizes
Varying levels of plushness
No need for water, ideal for waterless cleaning
Can be used inside and out
Cons:
Cheap cloths can leave small fibres
Can leave streaks
Easy to store
Air Drying, dedicated air stream (hence non touch)
Pros:
Great for large surfaces, gaps and small areas
Very efficient at drying
No water spots
Non Touch drying
Cons:
Needs electric power to work
Can blow lose debris on the car if used incorrectly
Bulky to store
Expensive
Can be noisy
My new equipment is the Carbon Collective Air Force 1 Car Dryer Limited Edition (but only the colour) where I just completed a full in depth review. Carbon Collective are better known for their quality coatings and treatment products more than their accessories. This car drying unit of theirs is a cylinder design which is very similar principle to a follow along vacuum cleaner, but it blows air instead of sucking up dirt. The point of this unit is blow a filtered jet of air over the area to be dried. Not just a car, but anything that needs drying like; motorbike, cycle, household use, boat etc.
The forced air stream will dry the area without the need to touch the paint so it won’t cause any marks or swirls on the paint from the drying process itself, unlike a chamois or microfibre drying towel which could introduce swirls or marring. Not wanting to repeating myself too much (from the review here), there is a 5m mains cable, a generous reinforced 5m hose, adjustable air flow dial and an optional fan heated function. The base unit has lockable casters in each corner to stop or allow movement as required.
The nozzles are silicon tipped so any accidental contact with the surface being dried will not mark it. Each of the fittings has a bayonet style locking feature with a sealing ring to stop any unwanted air direction. With a maximum of seven cubic meters per minute being forced out through a small nozzle opening it needs to be securely held in place.
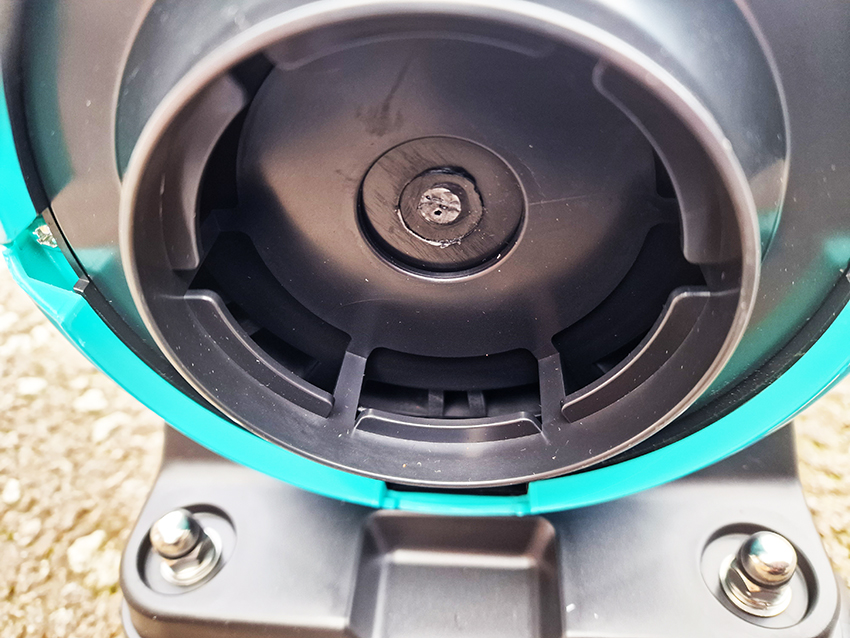
Perhaps the most important thing about this product is the filtration. Not one filter, but two, even though the accompanying book of words states one filter. If air is being sucked into the unit that low to the ground, then accelerated out with 900g of force, then any debris moved at that speed has the potential to be literally fired at the paint work. Think of hail stones, but on a much smaller scale. The removable filters are washable or cleaned with an air line.
Am I converted to this ‘non touch’ method? Well yes. Apart from the cost of running a 2800w motor and potentially a 600w heating element on top of that at the same time. The cost of running this for one hour (as this is published) will be approximately one British Pound per hour. Saying that when being caught out at a car show when it rains then the microfibre towel is still used of course.
I have lost count of the number of times I have gone to wax a car and found a water drip or a water spot left on the paint surface, it’s rather annoying at the best of times. This process does away with that as the air gets into the gaps and hidden areas where the water can sit. The down side is getting the equipment out, setting it up and putting it away again. Compared to taking a drying towel out the storage draws wipe over the car and put the towel in the washing basket when finished, there is more to it. But, the air drying is more thorough, providing you make it more thorough.
You will need to be careful with the air stream at the lower parts of the car not to blow loose debris around and potentially back on the car. Turning down the air force can be a real help under the wheel arches or on wheels etc. Once you master the technique is great. Probably not for the average weekend washer of the daily family car. But for a detailer this is a great addition to the detailing inventory. Not the cheapest of items, but I will get good use out of it.
I tried to film the process with hand on the phone and the other drying in the left hand video. The right hand video is just to show the force of the air from the wide opening nozzle blowing water around on the floor.
I do have another blower which is hand held MetroVac Air Force Blaster Sidekick SK1.
This is a 950w single hand held unit which has advantages and some disadvantages over the Air Force 1. I will get round to reviewing this bit of equipment very soon.
Nearly back to starting car shows again, and looking forward to that and getting some fresh air, well as much fresh air as you could get around classic car fumes! 😉
My last post I mentioned that I would be doing more reviews and I have started that by adding a few more products to the Detailing Menus at the top. I had the option to use a couple of products that I hadn’t actually purchased. This is a first for me as I always by my products with my own money, that way my reviews are totally impartial as I don’t have to please any sponsors because they gave their products to me free.
The first review I did was a sponge that costs £22! Now that’s a lot of money for a sponge regardless of what is called, in this case Ultra Black Sponge made by the very respectable ‘Rag Company’ who make some awesome products. Their latest sponge is a very dense foam with a series of parallel cuts as part of the ergonomic design. The sponge is getting plenty of hype on a few detailing websites as being the next best thing for car wash detailing. Click the image below or here to be taken to my review of this rather unique sponge.
I used the sponge in conjunction with a product made by P & S. Their (new product to me), Absolute Rinseless Wash which is designed to be a just that. Wash the car and dry it off. If you are looking to reduce the amount of water used to clean your pride and joy, then this is for that ‘gap’ between a full wet wash or a totally waterless wash. Again for a full review of their product click here or click the image below.
A little spoiler alert, I only liked one of them!
A couple of years ago I exhibited my car at the Classic Car show at the Birmingham NEC, for the Pride of Ownership category. I enjoyed the show over three days, I meet some great people and also meet a few cheats as well for the voting. As I was with my car I didn’t get to see much of the show itself. I fancied going along this year as a spectator to have a proper look round at the cars and any reason to part with some of my hard earned cash. That was until I looked at the prices! I think somebody is smoking some plant extracts to come up with these prices.
How can they charge this amount? Quite easily so it seems. Yes, I get the insurance, and venue has to be paid for. The vendors will pay even more for their pitches. The cost of food up there is super stupid, (I always took my own for that reason). My question is are we, that being the classic car owners or enthusiasts, being taken for a ride to go to these types of shows? I believe so, and as a result I won’t be going this year sadly or any other years until the prices are more reasonable. The prices shown above are just the cost of the tickets to get in. On top of that the cost to travel there and back, oh plus parking of course which means I have to sell a kidney to fund. I appreciate the cost of living is going up, but now rather than this being a nice day out to look at cars, it becomes a bit of a luxury event. That makes me sad to be honest.
Am I being a bit tight with money or is this a general opinion? I have also noticed a trend for this year’s car shows; the exhibitors are being asked to pay £10 for a ‘ticket’ to attend the show. The public get in free to see the cars! It has to be said that I honestly don’t mind paying a bit for charity from the entrance fee, but without the cars – there is no show. I know a couple of people who have voted with their wallets and not gone to some of the shows this year where high entrance fees are charged. Perhaps charging just a couple of pound for the public and exhibitors is the way to go? What do you think?
I have been asked a few times about snow foam when I have been to car shows. I do use it now, depending on the product and how you use it can make a nice difference or leave you bitterly disappointed. When i started out with snow foam I just didn’t get it, what was I doing wrong? Combinations of equipment and product trials I eventually managed to get results worth talking about. I decided to create a little article of my own which I hope will help and guide you through the pitfalls and hype between products, or why we even consider using it. I mean it wasn’t around fifteen years or so ago so do we need it and why?
Snow foam looks amazing from a distance and often gets a few looks when you use it. Before this step was introduced, you used to get as much car shampoo bubbles on the paint to wash it right? This cleaning process has now been separated out into two steps. The snow foam and the shampoo. We will only be dealing with the shampoo step here.
Put very simply snow foam step is there to reduce the likelihood of damage to the paint during the cleaning process, a “Pre Wash” non touch step. This snow foam process is not necessarily restricted to car detailers or professionals, but also the weekend washer.
When you wash a dirty car with a sponge or a single bucket wash, the chances are that you could introduce paint damage by microscopic particles damaging the surface of your paint as they cling to your sponge or microfibre wash mitt. The deeper the damage, the worse the paint will look. I have explained these principles in depth on another article here and how to fix them. The basics are highlighted in the picture below to show the varying degrees of damage.
Common Terminology:
Pre-wash: A treatment that helps to make contact washing your car easier and more effective.
Non Touch: Cleaning without any physical contact with the paint.
Contact Wash: Any part of the washing process that touches your paint.
Contact time: How long your cleaning solution is in contact with the dirt on your car.
Dwell Time: How long the product needs to be left in order to work its magic.
Foam Consistency: Thick snow foam clings to cars, so it has a high contact time. Watery snow foam will dribble off your car, less contact time and won’t be as effective.
Cling: The ability of the product to stick to the panels without falling off.
Dilution: Reduction of concentrate to make the correct mixture operate effectively without waste.
Canister: The container where the mixture is held.
Snow Foam lance: A special nozzle for your pressure washer that turns the snow foam liquid into a thick foam. Also referred to as Snow Cannon, Snow Gun etc.
Nozzle: The end of the lance/cannon/gun which controls the amount of product and how it applies the foam to the car.
pH neutral: A substance which is neither acidic nor alkaline but chemically neutral.
Water Spots: The marks left behind from the hard water drying out on the paint work.
We know that (contact) washing a dirty car will make it look better, but done wrong that short term cleanliness will be taken over by swirls, marring scratches etc. So before you even think about putting a wash mitt or similar cleaning item, the less debris that there is on the car, the better.
This is where ‘Snow Foam’ comes in. The snow foam is designed to cling to the paintwork, which will in turn moisten and loosen up any of the surface dirt. When you rinse and wash off the snow foam it should take the dirt and grime with it. This in theory will leave you with a much cleaner surface to clean with significantly reduced chances of damage to your car’s paint job.
The ideal scenario is a foam that will dwell on the paint for a while, then roll off the paint prior to rinsing taking the dirt with it.
How does a Snow Cannon work?
In a nut shell; the water pressure from the jet washer creates a syphon that lifts the snow foam mixture from the canister via a pipe into the pressurised water stream. The wire mesh inside the the cannon body agitates the mixture up into foam. More water the less dense the foam and will lasts longer. The nozzle is the key as to how the foam is sprayed onto the car, anything from a jet spray to a wide angle fan. These cannons can vary from £15 to £100 depending on style, fitting(s) and quality of build.
Misconceptions:
+ The thicker the foam the better.
To a degree this true, but what is the point of a great foam if it sticks to the car, but doesn’t clean it? If the snow foam is more like a bubbly water and bounces straight of the paint then again it has done no good. There is a happy medium based on the car’s requirements and is explained a little further down.
+ PH Neutral is a must.
If you start researching snow foams, at some point the chemical composition will show up. So all you really need to know is the difference between pH neutral and non-pH neutral (or alkaline) snow foams.
The pH obsession has arisen due to information propagated by self-professed experts on the internet. In actual fact, most damage to car finishes is caused by tiny particles stuck onto a road film or dirt that cause abrasive damage when being removed by washing with mitt or sponge. Thus inducing the swirls, hologram, scratching and paint wear depending on the severity of damage to the paint.
Even some manufacturers of ‘ceramics’, last stage products and waxes insist on a pH7 (neutral) shampoo or cleaners.
This intrigued me, so after a quick bit of Google research it showed me that the normal range for rain water is pH 5-6. (Look it up if you don’t believe me! ‘pH balance of rain water’.) This is one of the main reasons that your car wax/sealants tend to loose their effectiveness over time and need reapplication.
+ pH Differences
A pH neutral snow foam is generally gentler on your car’s paintwork, so it’s worth getting if your car is valuable or needs to look its best for a special occasion. This comes at a cost as heavy debris is still there.
A normal or regular alkaline snow foam isn’t quite as good for your paintwork, but it is more effective at removing dirt. However, you can easily mitigate some of the effects on your paintwork by giving your car a proper wash and wax, though, which will put a new layer of protective wax onto your car. If you have the protection on the car, the alkaline snow foam won’t remove the wax protection or touch the paint anyway. It’s certainly not a caustic mixture for your car.
The damage from a heavy alkaline product is; caustic soda (sodium hydroxide). This can dull and leave paint finishes matt and lifeless when used on a long-term basis.
Perhaps you may need two types of snow foam, regular maintenance wash for light soil using pH neutral product, and a stronger alkaline for the heavier soiling when needed.
+ You need a jet wash or pressure washer
Nope. The jet wash is not the be all and end all of the snow application to the car. Some snow foams are quite happy to be applied by a hand held pressure pumped bottle. As long as the foam product is the correct dilution, is applied to the paint and allowed to dwell before its removal – then its job is done.
+ All Snow Foam lances are the same
Nope. They come in all shapes and sizes. Some brass body, some made of cheaper metals or plastic. You get what you pay for.
Honestly, I had a Karcher cannon that could barely muster a lather no matter the product. The Autbrite snow cannon with the same mixture was an incredible difference. My only advise here is to make your choice wisely.
+ You must use Snow Foam
Well sort of. You could use some good quality shampoos at a push. But their pre-wash cleaning ability is not as good as the snow foams. Most car shampoos tend to have additives to allow slick washing and glide the cleaning applicator (mitt of sponge) over the paint and a level of protection. It’s best to get a product designed as a snow foam.
Types of Snow Foam:
Apart from the pH values as we have discussed above most snow foams are pH neutral. The main differences are the cost per litre when mixing for the dilution ratio. The cling properties which varies a great deal, their proclaimed cleaning properties, colour and the scent. Some of these scents are sublime; water melon, lemon, citrus fruits, strawberries, cherry, beer etc. Or nothing if just want a no gimmick product that does the job. I have used a few in my time:
Some have been worse than useless, some have been better than others and one is my now go to product.
Application:
Mix your snow foam as per the manufacturers recommendations. This is usually a ratio of around 1:10 or 1:20 etc. some are even 1:100.
Next attach the snow lance to the jet wash, adjust the mixtures and apply (if needed). This will take a little tweaking for the ideal balance between dilution ratio, the water pressure, size of the nozzle and the product you are using.
Different products on the same foam cannon will be very different and need further adjusting to suit.
Most of the products advise not to allow the product to dry out. The product can be affected by the Sun, warm paint, wind rain etc. Most manufacturers go on to say apply ‘in the shade’ and ‘apply to cool paint’ etc in order to mitigate the drying out process of the product.
Always start from the bottom and work up. The huge majority of debris and soiling is on the bottom half of the car. As you get to the top less show foam is needed.
Types of application.
A snow foam application will solidify into nothing eventually and slide off the car. If the snow is to thick it will fall of the car (no clinging properties) in clumps before it has had a chance to work. So, thicker is not always better. But it does look good below.
After a few minutes of dwell time it will look less impressive.
Some of the poorer week applications look half dead before they are applied and very watery. These products tend to run off and dry out very quickly.
If the product starts to dry out, there is no harm in reapplying more.
Some of the better quality products have ‘wetting’ agents in them to aid in keeping the product wet on the paint to avoid it drying out. This product application is a little thin now, but was taken after a few minutes. Although below looks less, it has in fact been doing it’s job well and was staying like this without additional applications.
Once the dwell time has elapsed, rinse of with a medium force jet wash. You can then wash the car as normal to avoid any water spots.
Results:
The results vary considerably by product. I have some before and after pics to show what it was before the application and what was there after rinsing.
Here is a very well known market leader product that has a very good cling and thick foam. But, it left a film of dirt and didn’t wash off the dirt.
Another very well known brand but is a cheaper product. Thin application, not very good cling and failed to wash of dirt. the dirt was still on their without being moistened.
A Premium brand, clings well, but failed to wash the dirt off completely. The dirt was moistened and was easier wipe off with a finger. So it did help.
This is well know brand to those in the detailing world. The foaming qualities not great and are to be desired. But when this runs of the paint it takes the dirt with it.
This is the result you want. The dirt and film is gone ready for a proper contact wash. It even cleaned some brake dust off!
Summary:
Don’t believe all the hype. The snow foam step is not a magical ‘foam the the car and it’s clean’ process. This foam step is to pre wash the car and should be treated as such. You need to manage your own snow foam expectations depending on the product. I have done a number of snow foam reviews on this website now.
I have been sceptical of the snow foam step even critical to a point. I saw it as the latest fad with no benefit to be honest. I have learned the hard way by working up the ladder. I tried the weaker brands which put a bit of foam on the car and emptied my wallet for no reason. I tried the big name brands which gave a great clinging foam but not much else. I tried premium brands which gave a good enough foam and decent moistening to the dirt. I tried the in the know ‘detailers’ brands. These later ‘detailer’ brands were by far the best performing of all the brands I have used so far.
Some brands are so much better than others to the point I haven’t even reviewed some of them, I used them up as a patio cleaner. After application of some brands, the dirt was not loosened and was still difficult to remove with a finger even after rinsing, like you shouldn’t do by the way. If the dirt is difficult to remove after the snow foam step then you are potentially going to washing a little harder to get the debris off the paint, in turn potentially introducing damage that you are trying to avoid in the first place.
If you are careful and use top quality shampoos with a two bucket method, then you can do away with this step as we have done for decades way before all this snow foam malarkey.
This snow foam step is trial and error which works for you. I have tried at least six products before I found something came close to something i could review or even partially liked. You may need to do the same, or look out for fellow detailer’s product reviews.
During the last quarter of last year, the UK had a few nice days of sunshine and as I had a few days off work owing to me, I decided to use my holiday up. That time was put to good use and completed a little project I wanted to try for myself. It’s often done on YouTube, but not to this degree, I think.
There are often a few car cleaning products compared on YouTube channels, but not ten side by side, with the same testing criteria by the looks of it. When I say “Top Branded”, I mean top manufacturers and their best selling products for normal weekend washing warriors on the street. Those of us who like the best products that work and at reasonable prices using traditional waxes, not the latest in thing of ‘Hybrid’ or ‘Ceramic’ waxes. Lets face it, there are some truly great products on the market at the moment, some of which are even essentials of my own cleaning routines, still. To put this into context there are waxes out there that are expensive for expensive sake, like Swizöl International’s Divine costing £2,150, Brough & Howarth’s Definitive Wax Marble costing £24,000, Zymol Vintage Glaze costing £2,400 or The Ultimate Shine costing an insane £65,000 which can be seen here: http://www.performancemotorcare.com/car-cleaning-product-news/worlds-most-expensive-car-wax/1808
However, there has been (a strong) rumour that the ‘Ultimate Shine’ wax itself is actually made by Mitchell & King in Scotland. I can’t verify this, but can only state what I have read so far. The original mix (allegedly) sold by M & K is called Gold Rush Rally at £75 a pot which is a mere 0.11% of the price! This brings me back to my point, although these ten waxes are (mostly) affordable and will last a good number of applications, they are not in that stupid silly money league. However there is an in-between level of Luxury car waxes such as Swissvax Crystal Rock at £300, BMD Prometheus £120, Auto Finesse Desire at £120 and Mitchell & King’s top of the range wax ‘Lily’ around £600 where only One pot is made a year, or anything in between from M&K for a comprehensive range of waxes between £45 to £600.
I will be reviewing Mitchell & King’s ‘Lily’ in a very special review coming soon. This was purchased with my wife’s very own money for a special Christmas gift. Before anybody asks – No, I’m not on commission or paid by them.
If you can afford those crazy sort of prices I suspect you will get somebody else to clean the car for you. I’m guessing most of those super high end waxes are being applied to Veyron’s, Ferraris or any other super or hyper car where money is no object. Then there is the other end where Poundland stores sell car shampoo for £1. Pure logic dictates that there has to be a difference right? But somewhere in the middle, there is a sweet spot and that’s these sort of products I have reviewed here.
Anyway, back to these standard off the shelf and top selling waxes, I have been very happy with most of these waxes and will continue to use them on my daily cars. Some do a great job and perform well after application. That’s why I really wanted to compare these particular mainstream products. Picking the best of the best that I like, then at a later date this summer step up to the ‘Real Luxury’ car wax to see the real differences, if any. But a couple of these waxes are getting close to treading on the toes of the ‘Luxury wax’ end of the market; Dat Wax and Illusion based on their cost to volume ratio. The scores I have given in the past to some of these products I stand by. At the time I didn’t know any better or had anything else better to compare them against until now that is.
Costs:
Multiple products which varied from a very reasonable £12 to a eye watering £75. All these products I purchased myself, no sponsorship to skew reviews. These are my own thoughts and findings for the products with my own hard earned cash I parted with for each of them.
Meguiar’s :
Gold Class paste £21 for 311g click here for individual review
Ultimate Wax Paste £40 for 311g click here for individual review
Mirror Bright Polish Wax £23 for 226g click here for individual review
Nxt Gen liquid Wax 2.0 £26 for 532ml
Auto Finesse :
Glisten £12 for 500ml
Illusion Show Wax £75 for 150g click here for individual review
Chemical Guys :
Butter Wet Wax £23 for 473ml
Cherry Dripping Wet wax £23 for 473ml click here for individual review
Instawax+ £16 for 473ml click here for individual review
The full video of this test can be found on my YouTube channel orherefor the shortcut or paste the link to YouTube. It’s easier to see what is going on rather than read about it. The video lasts for thirty two mins or so and has be trying to film, commentate, wax and buff all at the same time. I think I pulled it off after a bit of editing.
I have reviewed many products for detailing, especially waxes and quick detailers. Some have been rated 10 out of 10 by me when I tested them. Which at the time was correct as I used the product in isolation. However, there are always those nagging thoughts in my mind; what about side by side comparisons? Are the expensive waxes worth it? Can you tell the difference? I aim to answer these questions the best I can.
When you apply a wax on it’s own you can only gauge by what you are working with, application may be great and buffing at the time. But, you forget how others perform that you had previously used or reviewed.
So; I got my favourite waxes out and decided to compare them. That’s five hard paste waxes – old school and my preferred option. Then five soft or liquid waxes of similar products not made in a wax form.
The top three big boys are Meguiar’s, Chemical Guys, Auto finesse and a wild card of Dat Wax.
There are only really three actual ‘hard’ paste waxes which are the Meguair’s trio, Gold Class, Ultimate and Mirror Bright Polishing Paste Wax (made by Meguiar’s). The Auto Finesse Illusion and the Dat Wax are both very soft butter texture type waxes not quite liquid, but not a hard paste in comparison either.
The Sales Pitch(s):
These are found under each of the reviews I have done to date. See the links above. I still have a proper Glisten review to do and my latest purchase of the Butter Wet Wax.
Each of these products claims to have the best shine possible and protection, but they can’t all be right can they?
Instructions:
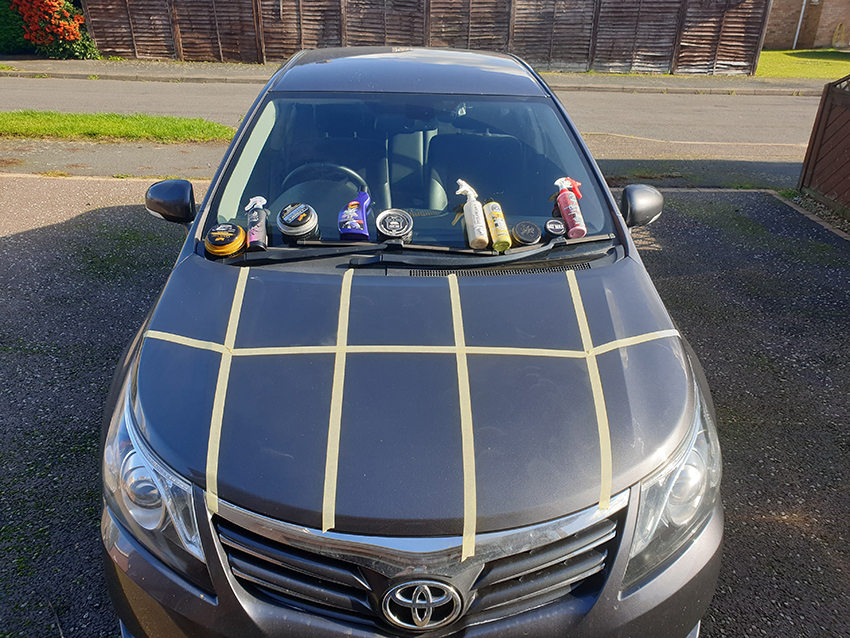
The instructions were followed on the tins and bottles of each product. The donor hood was my 2014 Toyota Avensis in a metallic grey. I divided the hood into roughly ten even sections via some masking tape. The day was overcast and sunny, but not enough to make the metalwork hot to the touch.
The top five sections were for the hard waxes, and the bottom five sections were for the soft waxes.
Top; left to right – Meguiar’s Gold Class, Meguiar’s Ultimate, Mirror Bright Polish wax, Auto Finesse Illusion, Dat Wax.
Bottom; left to right – Auto Finesse Glisten, Meguiar’s NXT Gen 2.0, Chemical Guys InstaWax+, Chemical Guys Butter Wet Wax, Chemical Guys Cherry Dripping Wet Wax.
Application:
The hood was first given a wipe down with quick detailer to get the light dirt off.
The hood was then clayed with Auto Finesse clay bar and a Megs Quick Detailer, not the greatest detailer it has to be said, it’s recommended by Meg’s as a clay lubrication product as well.
The hood was then given a good spraying with 99.9% Isopropyl Alcohol to remove anything left, which was quite a lot based on the clean white 100% cotton cloth.
My fingers dragged and squeaked across the paint, I knew then it was clean. The hood was the taped up ready to apply the products.
Each Product
Rather than going into pages and pages of what I did and how I did it, the video will show you each product as I went along.
Each product was applied with a clean applicator or cloth. The pastes and liquids were left to haze except for the Auto Finesse Glisten which could be buffed off straight away. It took around 15 minutes for all the waxes to cure / haze over.
Each buffing was done with a clean 280gsm microfiber cloth all from the same manufacturer for consistency, the only difference being the colours. I tried to apply each product in the same way, and buff off in the same way. The only difference being the Mirror Bright Paste as that required working into the paint as it was a polish as well. Failing to apply that correctly would have compromised the product. It’s interesting to note that the Auto Finesse Illusion and the Dat Wax never actually hazed over probably due to the oil content not evaporating.
I tried to apply the products to the paint for the same amount of time, and buff to a shine for the same amount of time for continuity.
Each product was only applied once to the cleanest of my paint work I could muster up. That way they all have a same starting point. It was obvious that some required additional coats to get to the desired levels of coverage. But, to be honest, you do need to actually build up the wax layers. It wouldn’t be fair to apply two coats of one and just a single coat of another.
The Video
This is a full half hour video I uploaded to my YouTube channel. The Video has me narrating (some say droning) on what I was doing and what I had found on the comparisons. Put thirty minutes aside and enjoy.
Results:
Don’t get me wrong, I like these products or I wouldn’t have bought them in the first place. I have previously given some of them 10 out of 10 for a review. They are all (mostly) great products from the top suppliers.
HOWEVER; when they are side by side there is a difference and I didn’t think for one second that the results I got were what I was going to predict below, that actually shocked me.
The results I decided to do in three categories. Touch, Shine, Water Sheeting/Beading.
The Touch Tests:
No matter where I go at a car show and my car is all shiny, somebody wants to feel the paintwork. Not sure why, but they do. So I decided to make that a test. No amount of photos will ever show you the feel of a wax.
Process: I had a single cloth soaked with Isopropyl Alcohol that I could wipe my fingers on between each touch test. That way I had no other waxes on my fingers to cross contaminate to the next touch test.
After a single application of the products and allowed to cure then buffed, touch test was ready. This was a simple feel for the surface, was it smooth, was it streaky or still there. My fingers really could feel a difference. The Meguiar’s Gold Class applied an adequate coating, but no doubt about it that it needed two or three applications to become a nice smooth barrier like the rest. It was really odd to feel the paint roughness still though.
I often refer on the video to a wet feel, of course it wasn’t wet, but just sort of feels silky or smooth buttery texture.
The touch test results are for the Pastes waxes:
1) Mirror Bright,
2) Dat Wax,
2) Auto Finesse – Illusion,
4) Megs – Ultimate,
5) Megs – Gold Class
Conclusion for Paste Waxes: The mirror Bright just felt like glass where as both the Dat Wax and the Illusion felt more oily which was to be expected by their constitution to be honest. Some may prefer that type of feel. Ultimate was in no way a let down and felt like the Mirror Bright but not quite as deep feeling as it were. The Gold class could be felt as a coating there but certainly not great on a single pass.
The touch test results for the Liquid waxes:
1) Chemical Guys – Butter wet,
2) Chemical Guys – Insta Wax+,
3) Megs – Tech wax 2.0,
4) Chemical Guys – Cherry Dripping Wet,
5) Auto Finesse – Glisten
Conclusion for liquid waxes: The CG Butter Wet Wax was the clear winner here with the Instawax+ with hardly any difference and a close run for top place. Megs Tech Wax 2.0 felt just like the Ultimate and a glassy feel to it. The CG Cherry Wet Wax was super smooth but just shaded a little by its siblings, a second coat and I would say it would be right up there with the winners. Glisten was on there but felt more watery based and you could feel there wasn’t much of a coating on the paint work, although a little better than then Gold class for a single application.
Overall: There is a difference between the feel of the waxes. The pastes are applying a thicker coating than the misting of Glisten for sure. Especially when you run a finger from bare paint to the waxed areas. It’s a very close thing between the Butter Wet Wax and the Mirror Bright. For a straight forward wax on the Butter Wet takes it, for a little cleanse and slightly harder work the Mirror Bright takes it. The Dat Wax and the Illusion over car show coatings feel like an oily coating to give that much desired consistent smooth look across all panels.
The Visual Inspection
Process: After the applications I was going to look at the colour and how the reflectivity, gloss, depth and warmth of colour of the waxes looked on a paint job. As my car has metallic flake this would be a real tell-tale of shine.
As I mentioned before this was a single application of waxes and inspected from their. The sun was in and out during the inspection. When the sun was out the metallic was made to pop by some waxes better than others.
The results are for the Pastes waxes:
You can clearly see from the top of this picture that the Meguiar’s has warmed the colour of the paint and clear to see.
The results for the Liquid waxes:
This picture shows the same warming glow to the paint from the Chemical Guys Butter Wet Wax.
Conclusion:
As each of these products are now applied they should be performing as a finished product as it were. That’s the look of the waxes once applied and the effectiveness of the waxes.
There IS a difference in the way that these waxes can effect the look of a paint, say on a white car using a yellowish based wax will give a warmer glow compared to a white wax for example. It not as immediately obvious on much darker colours. I picked my Toyota as an example to test for the metallic and the neutral grey. My hunch was correct as the colour differences can be clearly seen.
Consider the look of the paint you require if you are that into it, or not worry it’s up to you.
Overall:
The waxes either the paste or liquid made little difference in the end to the look of the paint. A personal preference obviously comes into play as it does all the reviews. But I found the liquid of the Butter Wet wax and the Ultimate wax paste was virtually undisguisable.
1) (Meguiar’s) Mirror Bright Polishing Wax
2) Chemical Guys – Butter Wet
3) Megs – Ultimate
One thing to remember here, the hard waxes will last way longer than the liquid versions just by the nature of how they are applied. This could be a major factor when considering a purchase – value for money.
Water Tester Sheeting and Beading
Process:
I filled a gallon pot with clean water and chucked it over the car. This would show the clearing capacity of the wax properties for sheeting and beading.
I did multiple tests of the water deluge on the video and it’s very easy to see the differences.
On a personal note: to see the beading looks great as there is a barrier between the paint and the water. But as the car moves it will run off anyway. I prefer to see the water run off the car completely, but ‘Bead Bragging’ rights is a huge thing in the detailing circles.
Why do I prefer to see it all run off? Well if dirt lands on the car or dust it will sit around the beads. Once the beads are gone it will leave a dusty layer looking like a moon surface. With sheeting it will at least be a uniform film of dirt.
For the hard wax beading I found the following;
Meg’s Ultimate Wax
Mirror Bright
Meg’s Gold Class
Auto Finesse Illusion
Dat Wax
For the liquid wax water beading I found the following;
Meg’s Nxt Gen
Chemcial Guys Insta Wax+
Auto Finesse Glisten
Chemical Guys Butter Wet Wax
Chemical Guys Cherry Dripping Wet Wax
For the Overall Sheeting ability I found the following;
Chemical Guys Butter Wet Wax
Meg’s Mirror Bright
Chemical Guys InstaWax+
Dat Wax
Conclusion:
Without a question some waxes bead better than others, Meguiar’s take that crown here with both the paste and liquids.
Large amounts of water should run of quickly, and small rain drops tend to form together until the beads are to big and run off.
A little misting and ALL these waxes will bead very nicely and there isn’t a lot in it at all. In fact I would go far as to say you wouldn’t be able to tell the difference.
Perhaps by full on pour of the water is a little unfair, but the sheeting tests is similar to those used on ceramic coating demos. I was just showing the same type of reaction from a well applied wax.
The difference between the hard and soft waxes is minimal if at all.
Overall:
Such a difficult thing to sum up.
It has to be preference for application. Traditional or old school – Hard wax on, cure and buff off. Great results and little goes a long way. New or time saver – Liquid waxes apply and buff off to a great result. This method tends to use more product, but is cheaper.
Beading / Sheeting, under heavy water its easier to see the ones that deal with it quicker, but allowing for beading they all performed well with the hard waxes being the more consistent beaders.
Scores:
Various out of 10 for these as I have reviewed most of the products before, but more to come soon.
Conclusions:
I’m not convinced that the fine mist spray waxes like Glisten are on a par with the liquids / hard waxes from the other suppliers. Personal preference is a huge factor for application, you either see it as an art form process – hard waxing, or an exercise to keep the car protected and looking good – soft waxes.
Costs between these waxes is insane – £75 for Auto Finesse Illusion that applies beautifully and smells nice looked no different from Chemical Guys InstaWax+ at £16 once both buffed off to a shine.
There is an amount of snobbery regarding brands between users out there. But the big boys vs the cheap end of the market there is a difference no doubt about it. However when you get to these high quality level of suppliers, all their great products in relation to each other there is virtually nothing in it.
Some prefer the wax of ‘So & So’ because it doesn’t streak, but on another car’s paint it may be difficult to buff to a shine. I found that I am using mixtures of brands to get what I want from a detail for a show. No one brand has everything covered better than the rest. You just have to try it for yourselves. If you buy it again then you have a product that works for you. I have a couple of friend’s Craig and David who are both as sad as me when it comes to detailing, we swap products between us to see what we like. I may like the look, but not the process, where as he may like the gloss that I don’t. We have different cars and they are very different colours, white, grey, black, dark blue, light blue etc so we can see the varying results.
I do need to mention that the waxes are dyed. Thats the Chemical Guys Butter Wet Wax after applying it to a car for two coats it looked like had been smoking 60 a day for the last twenty years. Same with the Cherry Dripping Wet Wax which left me with red fingers like I had been picking strawberries all day. Just saying!
So, when I go to a car show and a want a wax on the car not just a quick detailer, then it’s a liquid wax. At home with plenty of time it’s back to the hard waxes. I never thought I would hear my self saying that, but I use both types of waxes now. So I have moved on with the times, I think.
Would I buy them again?
To be fair most of them I would, but not the £75 Auto Finesse pot or the Auto Finesse Glisten, not my favourites to be fair, but both are at the opposite end of the price scales to each other. The hard waxes will last me a good few years yet and will probably still be some left to polish the handles on my coffin when I drop dead! Having to choose, the Butter Wet Wax I would buy again, as I would the Mirror Bright polish paste.
Would I recommend any of them?
Without a doubt some I would; such as the Meg’s Ultimate and Gold Class (when multiple layers applied), Butter Wet Wax and Mirror Bright. However, it’s hard to recommend a wax for £35 for few fluid ounces in a little jar or a £75 for a wax that don’t last long as it’s a “show wax”. Especially if there is no real difference that can be seen straight away after application.
Like I said earlier, I am looking forward to using a premium hand blended quality wax which I will review and apply before some car shows – weather permitting of course. To suppliment this post I have also created a Dual Action pad comparison & guide from the manufacturers. Once I have written that up I will also post that very soon before the car show starts again in earnest. This post may not all be exactly Mustang related, but it could be for any car and I hope useful. I have learnt a lot from speaking to the designers of the products and I will share a little of that information in the next forthcoming posts. I am really pleased to say that the blog is also attracting some car detailers to and not just Mustang fans.
Continuing on from my last post where I had visited Meguiar’s for their ‘Day In The Bay’ series. I have now been given access to all the pictures that Meguiar’s took on the day, but more importantly the video of the whole process is now also on YouTube, all eighteen minutes of it. Here are some great photo’s of the car from the day, and after avoiding being in any photos for seven years of my blogging, there is even a couple of pics of me in there, (I’m the one with the shaved head and a plain navy t-shirt). I have selected some of my favourites photos from the day, most of which are obviously the ones where I’m not in them. Rather than repeat myself with a write up again, this post is basically pictures, I hope that’s OK.
The link for the video of my car in the bay, is now on Meguiar’s YouTube channel hereor watch it below.
The Washing & Drying
Into the Bay
Then it was time watch and learn how to machine polish the paint properly. There was some tiny swirls that needed a little correction first with some compound, before we got to the waxing stage.
Then I got to have a go with the machines.
Waxing
Buffing
The Final Results
With the outside completed we moved to the inside cleaning and protecting the seats.
Outside for the finished photo shoot.
Perhaps my favourite photo of the day!
I hope you like the pictures and more to the point the video, as much as I enjoyed the day. It’s funny though, I still can’t believe that I am going to show them. So, if you are going to leave comments, be gentle with this fifty something, grey haired old bloke! 😉
Remember: This is not a sponsored post by Meguiar’s nor an advert for them. I did by some products while I was there and will be reviewing them soon. Check out my ‘Car Detailing Reviews’ menu for the latest updates.
The car show season is nearly underway for this year, and I’m looking forward to a few shows this year. But, as the calendar dates pan out, there are a few shows on the same day which is rather annoying to say the least. So I will have to be selective with which ones I attend instead of going to them all.
During some routine maintenance on my PC where I back up my files, then move them to relevant folders etc. I came across an old video that I thought I had lost. So I decided that I would share that video and a couple of others with you. The day was a Saturday 14th April 2012, I had a good mechanic mate of mine; Will from Park Garage Services came round to the house and help me with the start-up. This was a long time before I started to get involved with Mustang Maniac for my parts and the proper restoration process. After a long winter of re-wiring the car to get to the point I could turn the key properly, this was a very important day in the restoration process. I had no idea that this restoration project was ever going to be a blog that it is now, so there wasn’t that many pictures from the very beginning. I already had the old wiring out, well what was left of it that is. IThe old wiring sits in a big box and I’m still not sure what to do with it. It’s old, it’s brittle, it’s burnt and melted, it’s total rubbish, but I just can’t bring myself to dump it. Any ideas what to do with an old wiring loom? Please let me know.
The new wiring had been installed and nothing was neat at this point, or even in the right places come to that. The wiring was just connected up and roughly in place. That very early stage was just to prove the process to myself that it was going to work. Later on the new wiring would be taken back out for the full restoration and paint job, then reinstalled properly and neatly, just how I wanted it to be.
Fuse box location
The engine was not cleaned or prepped in any way prior to this video. It just had the new blue spark plug leads, Pertronix Ignitor II ignition upgrade, new replica battery, one wire alternator, new spark plugs and new cables for earth and battery etc. The starter solenoid was an unknown entity so we weren’t sure if we were gonna have issues at that point.
Being as I had rewired the car myself over a few months each weekend, the wiring was also an unknown piece of work too, I just hoped I had read the book of words (instructions) correctly. In fact the good lady wife had the instructions colour copied and laminated for me. That would mean my dirty hands wouldn’t ruin the paper or tear it. I could keep the originals in a safe place just in case I did lose one section or managed to damage them.
Back to the start-up day; I put two gallons of fuel in the petrol tank and made sure there was no leaks. I had previously turned the engine over by hand with no spark plugs in place, that would make it much easier not having to deal with the compression, the engine wasn’t seized up. I had previously filled up the engine with water and some temporary light oil as the engine wasn’t going to run under stress for any length of time either. Oil lubrication is a critical factor to consider when the engine hadn’t run for twelve years or so for any cold start and engine wear. The turning over of the engine on crank would pump the oil around the engine at those low cranking revs. The car was cranked over for a bout thirty seconds and then left the car to settle for a minute or so. We then primed the carburetor up with fuel via pumping the gas (via the carb linkages) to help fire up and this was video was the result. The headers were straight out as there was no exhaust connected at all, the volume and resonance distorted the microphone on the phone.
My good lady wife was in charge of the camera at the time, this is the first time this video has been on the internet on any of my media platforms.
With the car restored I was arriving home from a car show and the car was filmed being driven into the garage. This is a nostalgic look at the before and after comparisons.
This time the Flowmaster 40 Series mufflers were fitted to the 3″ headers which gives that unmistakable Mustang v8 rumble.
This is also a first time showing of this video on the internet.
This video of the car backing out of the garage was another mate who wanted a ride out in the car when he first saw it back completed from the restoration. The final first time video on the internet video.
Then of course there is the mandatory drive by;
Apologies if you have seen the “Driveby” on my YouTube channel, but I think it’s worth a proper posting on the blog and not just a link.
I have started to review a few more Car Detailing products now and hopefully you will find them useful as well. I have found a couple of real nice products all of which can be found under the “Car Detailing Reviews” heading, the latest being from the Chemical Guys.
I’m looking forward to this coming car show season I must say, seeing these videos has made me realise how much I miss driving her. 🙁