A Big Splash Of Paint

I expect you know what this post is all about – yep, Paint! The guys at Mustang Maniac have been brilliant this week with guidance on what I need to do on my engine and Adam has sent me photo’s of my car in the paint shop. There are a lot more pictures that I will post of the paint shop, but as yet I haven’t had a chance to edit and upload them yet. So without any more words here are the pictures I have dreamt of for so long now and it’s only in primer. A big picture post but you gotta see it all!

Bodywork:

Arrival at the paint shop

paintshop1

The car was taken apart and covered for each panel to receive the final filler skims.

The car was taken back to bare metal and all surface rust was removed.

paintshop9

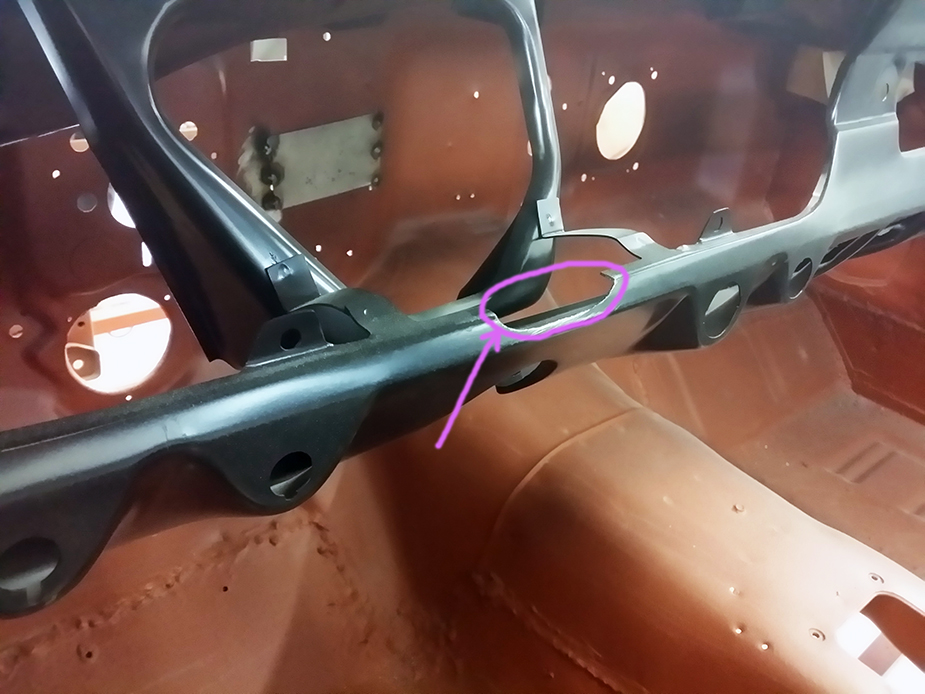
Any spots that needed treatment were either treated or a small plate was added, as was the case on this A post here.

paintshop8

The car was then masked up and all the panels were laid out ready for a skim of filler. The panels have a dye coat lightly sprayed over the primer to see the high and low spots for the filler.

The next stage was the etch primer to eat into the metal to hold the base coat or primer. This was done very quickly to stop the creep of rust back again onto the surface.

paintshop5

The next steps of the process are to spray with primer, add more filler and block down. This will be repeated three times with ever-increasing fine block papers so there is a mirror like smooth finish to the primer.

The car in the first phase of primer, the hood is to be completed at this point obviously.

paintshop7


paintshop6

I am so excited to see these pictures, you have no idea just how much!

Engine:

While all this was going on the next major item will be the engine. This will be mounted into the shell as soon as we can as the drive train and the suspension will need to be fitted. The engine was obviously caked in all sorts of road gunge and old oil from various leaks. The technic is to degrease it and then use the Mustang Maniac steam jet wash to take the debris off. I attacked the deposits with a good soak with Jizer and then I brushed in another coating into all the little gaps.

Steam cleaner taking the debris off.

The engine dried out pretty quickly and the nice weather helped. The intake manifold was unbolted to expose the inner workings of the push rods.

The engine was inverted again and dried out once again overnight. The remaining flakey paint was brushed off and a small air buff tool to make life a bit easier. All the facing surfaces that have a gasket need to be cleaned and a buffed to a shine ready to take the gaskets at a later date.

With the engine block dry the final part before the painting is to degrease the surface fully before any paint is applied. Before anybody says you have painted too much here is a fact;

The engines were block painted once they were assembled. so to see the engine all one colour is actually correct. There were various colours for various years. The colour painted could also depend on the factory that was assembling the engine or the car, in my case the home for Ford – Dearborn.

The engine was given two coats working around the engine. In order to make the paint dry a hot air gun was used to take the tack of the paint ready for a second coat.

First Coat:

The second coat incorporates the water pump and front of engine. once that was completed I was able to work around the engine block and headers for the final coat. By the time I had completed the block second coat the front was ready for its final coat. Spark plugs were lightly screwed in to keep the bores clean while in storage. Some small detailing will need to be completed but I will take pics soon.

The final step will be to rebuff the face plates again to get the over paint off so there is no high spots for the gaskets.

Another big post but it’s worth it.

Share my Content

1965 Mustang Gymkhana 7 Released

The moment we have been waiting for is here; Ken Block has released his Los Angeles Gymkhana 7 video – featuring a 1965 Ford Mustang causing mayhem. You just got to watch this video, a full 12 minutes of tyre smokin’ fun. Incredible stuff from Ken.

The car this time around is a world first as this is the only performance All Wheel Drive 1965 Ford Mustang Coupe or (Notchback) ever made. The coupe is powered by Roush Yates 410 cubic inch (that’s 6.7litres) Ford V8, producing a ferocious 845bhp & 720lb of torque. The transmission is a six-speed transmission and Dakar Rally-spec Sadev SC90-24 all-wheel-drive system. If that wasn’t enough there’s also a custom ASD Motorsports-designed suspension, a full tubular chassis, roll cage, door bars, three-piece 18 x 10.5 inch wheels and custom-made tyres by Pirelli made with Ken Block compound especially for this video. Bolt that lot together and you have the now fabled “Hoonigan Mustang RTR”.

There are now multiple links on YouTube already, but this is the best so far (without the adverts):

Click here  >>—> Ken Block Gymkhana 7 – Los Angeles 

Screen shots of the action:

About Ken Block:

Ken Blockʼs rally career began in 2005. His skill and car control became quickly apparent and Block aptly nabbed Rookie of the Year that season in the Rally America Championship. Since then, Block has continued to race in the series, racking up numerous overall wins as well as plenty of podium appearances. He’s also accumulated five X Games medals since the start of his career, including most recently taking silver at Global X Games Munich Rally Cross in 2013. In addition to his performance in the car, Block has been a driving force in shedding light on the sport of rally within the United States. His keen branding and marketing acumen, combined with his talents and skills behind the wheel, has also allowed Block to achieve global fame as a rally driver through his wildly successful viral Gymkhana series of videos. With all six of his Gymkhana videos (plus all associated edits) clocking in at over 250 million views on the franchise in total, they have helped put Block in front of eyeballs around the world. The franchise has also racked up several awards, including making the top 10 viral video charts by Ad Age, as well as the One Show Interactive Gold Pencil Award in the category of Online Films & Video/Long Form – Single, for excellence in an advertising campaign. In January 2010, Block formed the Monster World Rally Team and signed with Ford to pursue his dreams of racing in the World Rally Championship and in doing so, became one of only four Americans to ever score points in the WRC (more Americans have actually landed on the moon than scored points in the WRC). Additionally, his signing with Ford included campaigning domestically in racing (Global RallyCross Championship, X Games and Rally America), as well as continuing with his Gymkhana driving. In 2012, Block re-named his team Hoonigan Racing Division, with the goal to further push the boundaries of motorsports marketing. For 2014, Block will compete in the Global RallyCross Championship, World RallyCross Championship, Rally America, WRC, and the Monza Rally Sprints, as well as doing a handful of global Gymkhana demos.

Quick link:

Copy & Paste : http://www.youtube.com/watch?v=5qanlirrRWs

Or click the YouTube icon:

http://www.youtube.com/watch?v=5qanlirrRWs
Ken Block’s 1965 Mustang Gymkhana 7


Share my Content

A Very Big Week

I have been sent a batch of photo’s from Mustang Maniac which are of my car being loaded onto their transporter to be delivered to the paint shop where her new home will be for a number a while that could be around six weeks we are thinking at the moment. I am so excited that my car has got to this stage. The guys were on hand to make sure she was loaded onto the loader OK. As the yard was a little flooded due to the recent heavy rain fall, a plan to get her loaded during a dry spell was created. Cars had to be moved around in order for the shell to be moved from round the back. Like a parting of waves the synchronised moving and parking was all completed without a hitch. A celebratory cup of tea and a Jaffa Cake or three was in order after the well executed plan came together.

What next till she’s back?

Mechanics for engine, drive train, suspension and steering cleaning and polishing of all the bolt on bits and pieces, pretty much the same as before but on a smaller scale now. Well smaller scale compared to the chassis at least!

The first of those will be the engine of course which has already been started this week. The engine has not been run for around a year now, and the guys mounted it onto their test rig, lightly attached the three-inch headers without the gaskets for now. The bell housing was bolted on, starter motor bolted on, fuel was piped in from a large jerry can standing to the side, a portable jump-start unit was connected then she was hot wired to start. The timing was well and truly out and the distributer needed a good twist to pull it back to the 6deg that is should be for idle instead of the fluctuating 30deg we currently had. We tried again then she barked into life. The engine was allowed to warm up and the oil pressure was checked, water temperatures were checked from the top and bottom hoses in and out of the radiator, the carb balance was initially set up and allowed to run after the timing was set. The engine was now running a little lumpy, the spark plugs were changed to the proper Motorcraft spec instead of the NGK I had previously installed. Fired her up and then she run without any misses at all. The engine was warmed up, rechecked and then given a bit of a progressive high-speed run up. At this point I took a video which has been uploaded to YouTube here, or click on the quick link below for “Ford Mustang Flaming Exhausts”. There were flames from the exhaust which was quite good fun, and no this is not a Photoshopped photo.  Turn up the volume and enjoy the sights and sounds from a v8 289cid engine ran in anger!

Snapshot flaming exhausts

After the engine was run for a few minutes it was allowed to cool down and taken of the test rig to be mounted onto the engine stand. In my excitement I forgot to take pictures of the engine on the stand, but I will rectify that next week don’t worry. We took all the bits of the engine such as the headers, carb, HT leads, coil, the full distributer removed from the block, starter, water thermostat housing, fuel pump, power steering pump, vacuum lines, crank pullies etc. The engine was now just the heads and block, we drained the oil and as much water as we could. We turned the engine upside down and the damaged oil pan we knew about was unbolted. This is a very common damage to the oil pan which is due to the car being jacket up via the oil sump pan. If you look you can see the circular pattern of the trolley jack.

The next job was to remove the core plugs to see how the water has been flowing around the block and if the water ways are furred up or not. We suspected that they were fine as the engine was not running hot from the previous tests.

Terry used the video scope to check deep inside the block and all looks to be OK so far. I have taken some pics through the core plugs to show the gaps are still open between the cylinder jackets and in very good condition, I even managed to get a shot of a valve through a manifold bore.

The oil pick up gauze was clean and no bits of metal were wedged in there.

We checked the oil for any debris and again was fine apart from being very weak. We then checked the timing chain for play which was fine. the engine was cranked over by hand to watch the motion of the pistons were as they should be.

Terry then cleaned up the gasket from the oil pan and decided that now was a good time to put everything in containers that should be there. It was getting dark and we didn’t want to lose any bits. Terry put up with a barrage of questions from me and answered all of them and even showed me where I looked a little blank when we got seriously into the engineering!

gasket-rem

 Thank you Terry for the tutorials.

Quick Links:

“Ford Mustang Flaming Exhaust v8 289ci” from my YouTube channel: OnemanandhisMustang

Click the YouTube icon for the quick link:

click here for the link
Mustang Flaming Exhausts v8 289ci link
Share my Content

Ready To Rock

I’m back!  

I know I haven’t posted for a while, but there was and still are very good personal reasons why. So far it has taken me a few days to create this post on and off, that’s when I can even get round to doing it. Rest assured though, I am still here and I will continue updating my little ol’ blog as and when I can, hopefully things will slowly get back to normal then I should be posting more regularly and then back normal. Thanks to those of you that have kindly taken time to email me to ask how things are, I apologise for not posting sooner and disappearing without any warning, but the circumstances prevented me from do so, it was all rather sudden to say the least.

I could have named this post “New Shell” as the car is at a point now where she is ready to go to the paint shop within the next week or so. Compared to the original rusty or distorted metal work, this could almost be classed as a new shell. The Mustang Maniac guys have been keeping me fully updated while I haven’t been able to get down there to do my duties and help out. Thanks very much guys for the updates.

The last piece of work I had done was the hood which took an age to complete. The guys assembled the front of the car and the hood was re-fitted up. Now there was a problem, the leading edge of the hood had been bent down and was hitting the headlight buckets preventing the correct alignment and closure. The hood was adjusted but the fenders and cowling looked very strange regarding the gaps. The hood was taken off and the guys tried to straighten out the bend with partial success, and on the odd occasion it was quite brutally adjusted to align it all back up. But the hood was now sitting to high and it turned out to be quite obvious that the hood was distorted beyond an economical repair. When you are at this high level of restoration you want it to look right especially on such a large panel of metal that you will be looking at all the time you are driving. So a difficult decision was made – it was a new hood to be fitted, it’s a shame the original couldn’t be used. But I fully understand that these things happen during classic car restorations, the guys did try to rescue the hood before it was replaced.  Yes I could have kept the original that sort of fitted and I doubt that many would have noticed, but it would have played on my mind knowing that it didn’t fit 100% correctly with the gaps, I just knew I wouldn’t be happy with it. Like the driver door, it was an awful lot of hard work, but at least I am happy nothing more could have been done to make it fit perfectly. Come to think of it I have seen the odd restored car with worse looking alignments, I dare say some other restorers would have been happy with it. I now have a rather large bare metal piece of scrap.

However, on the plus side it means that my car is now ready to go to the paint shop with new metal that has already been protected from rust. Adam is now just waiting for the paint shop slot to become free in order for my car to go in and be transformed over the next month or six weeks before I see her back. Such an exciting time. I have potentially got the last set of pictures of the car in bare metal before she gets her new colour scheme.

As the car stands the filler work is pretty good, but has been left in a state where the body shop can see what has been done and what needs a final filler coat. Standard practice for the Mustang Maniac guys who seem to do just that little bit more to make sure all the gaps were correct. When the car is back from the paint shop I will then Red Oxide the inside parts that need doing over the black floor pans and the rear chassis legs before the work starts in earnest to put her back together again. I seriously just can’t wait to see her in the new colour.

Photo Menu:

I have tidied up the photo menus to group them together in order to make it more logical to find stuff.

I have added the following these large photo step by steps under the Photo Menu – Bodywork Section:

  • Rear Quarter Panel restoration work, click here for the quick link. (A very detailed step by step)
  • Hood Restoration Work, click here for the quick link
  • Trunk & Tail Light Restoration, click here for the quick link (A very detailed step by step)

I have also updated the Fender Work sections under a single heading to bring it all right back back up to date.

Reviews:

I have added a review of a Neilsen Slide hammer tool, or click here for the quick link.

Share my Content

Smooth Lines

The weekend took an age to arrive be fore I could get down to Mustang Maniac. I have been kept up to date with the progress of my car via teaser emails from John. The car is now in a very strong position to be taken from the supporting jig and mounted onto the transporting dolly or trolley, a big moment for my car. This also frees up the panel shop and the jig for the next little lady who needs it. Now maneuverable, the car can be moved around as required, especially important when she comes to be being painted of course.

On a personal note this was a huge milestone for me as it seems to be less of a permanent fixture in the workshop and shows that the work so far is at an acceptable standard to move onto the next stage.

The car had the fenders attached and aligned up to the doors and the hood. The story as you are well aware by now is to strip down the panel(s) to see what lies beneath the paint and then make a decision on what needs to be done.

dolley4

Last week I stripped down both fenders, things were looking pretty good. The left hand side fender was inspected for the filler prep the few dents were not to bad to look at, but the metal had stretched to a point that it would pop in and out just above the wheel arch with the filler removed, the same scenario as the left hand side door. So the the decision was to replace the wing unfortunately. The amount of filler and man hours to repair the fender was possible, but the man hours to make it paint ready was not going to be viable and the results could be questionable after paint. But, on the positive side this new fender will last the test of time. The new left fender fitting was good apart from the back sculpture of the fender to the door where the gap was a little out, so the MM boys being perfectionists that they are, made a little cutting and fabrication along a little metal work magic from Terry who gently refabricated the correct shape for the door – fender gap.

Terry made the repair to the bottom of the right side fender and welded the freshly fabricated new section as the bottom was a little peppered with rust holes. The repair was ground down and a light filler applied to protect the join. The headlight recess was repaired to make the rusted out odd shaped cable hole circular again via a new drilled out plate that was welded in its place.

The rear quarters were leaded up and rubbed down properly. The rusted parts of the windscreen were repaired with new lead work as the original lead had cracked. More of the same lead and ground out rust parts along the lower water channels to the windows frame at the rear. Once the lead had been rubbed down a final top coat of filler was applied.

With all the panels aligned and fitted the next job was the look and especially the feel of the panels, any minor imperfections were not going to be acceptable by the guys as it would show in the paint, so a little filler would be required which we knew would be the case. The leaded and brazed areas were now given a coating of filler and Terry worked to fill, rub down, add more filler and build it all up again in order to meet their high standards. A spray of dye coat or guide coat, was then applied to the first batch of filler. Later on this would be rubbed down to 500g ready for the fine paint prep work to begin.

Yogi started some filler on the top of the right fender where there were a few minor dents, I was given another master class on smooth filling and rubbing down with the aid of dye coat. It’s really annoying when these guys make it look so easy. The filler was applied so smoothly the amount of waste and rubbing down was minimal. Yogi did get a bit dusty, for which I received some grief I might add, all because it was a Saturday! Sorry Yogi, but it was funny! 🙂

Once I had seen enough to realise that the pecking order had been reasserted when it came to filler work I got on with my job, to remove the last persons efforts of filler work on the hood and see what lies waiting for me under the red oxide primer. The hood was placed on their panel work frame ready to start work as I put on my gloves. I wanted to start on the leading edge of the hood where all the primer was, if it was beyond repair it would be here was it filler or holes? I was about to find out.

As more paint came off and there was only a little filler that was found, the smile on my face got bigger. That was only half the story as the underside could be a big issue. The underside was unbelievably hard to get off, the heat of the engine maybe I don’t know but I was going through stripper like you wouldn’t believe. At 6pm Adam came to see how I was doing and helped me get the last bits of paint off. All was good, except for my back which was killing me.

We flipped the  hood over and the surface had started to get a little surface rust very quickly, so we went back at the surface again with wire wool and washed it all down with a good dose of thinners and a light coating of WD40, just for now. If you look closely at the front edge just to the right of the sculpt line there is a dent, this just happens to be the size of a palm print, common when the hood gets shut apparently over the course of time. But in general I am pleased to say the hood is in good shape. it will need some mastic to bond the frame and the skin together on the underside, but that wont take to long. Chris was back with me for a little while who kindly cleaned up the headlight doors which were in a good condition, so I was happy with that. Thanks to Adam, Yogi and Chris who all helped me out today.

The last couple of bits they had done was the dash and door. As the dash will fit the ’64 – ’66 Mustangs the gauge recess was generic. But, for the five gauge GT dash from ’65 (as an option) to ’66 it would not fit so the small cut out was made to accommodate the larger speedo. I have circled it so you can see it a bit clearer.

dash

The right hand door was lightly shot blasted back to bare metal in order for the light contours around the door cards to be painted properly.

shotblast

Sunday was a day of dusting things off, degreasing the metalwork that had been stored in the man cave and spraying them in them in red oxide, over the top of the anti-rust paint of course. These bumper irons will match the chassis when they are bolted into place.

Yes it’s another big post, but a lot happens in a few days when the MM guys get going. Once the car gets to paint then things may slow down a little and mechanical things will need to be done! quite what that will be I will wait and see.

Note:

McVitie’s Jaffa Cakes and Hob Nob biscuits are a popular choice with the guys, so I am looking for sponsorship from McVitie’s as they go through the stash of supplies I take down every weekend! How much are the McVitie’s shares???

Share my Content

Adding Metal

What a difference a week can make at Mustang Maniac, my car seems to have gone from a shell to a recognisable car in a mater of days, it even has bolts back in it. I have been sent little teaser photos by Adam and John over the last couple of weeks and it seriously wetted my appetite to get down there as soon as I can to start work on her. The car was packed Friday night, the alarm was set a little earlier on the phone and wishing the hours away to the morning. I arrived to find that Adam had been invited to Goodwood Revival so I was left in the very capable hands of John and Yogi. I was taken around to see my car and my jaw hit the floor as the car has a rear end and sides now. Terry has been adding the panels, welding up and doing a fantastic job and his attention to detail is second to none. The pictures here are of Terry working on the quarters with old school techniques rarely found in this Mustang restoration business. Firstly clamping up the panels and the wheel arches to each other for a dry fitting, the trunk lid rested in place for quarter gap positioning. Once everything is place then the top joints welded and brazed in place just like they were from the factory. Many people will just weld and leave it as it will be covered with filler and paint, not these guys though and that is quality of workmanship that they have become respected for. (Please on the pictures to see the full sized versions.)

Do I apologise for such a large picture post? No way!

The other workmanship revolves around the bottom of the roof to the quarters themselves. These are normally butt welded up by some people or even cut around the lead work. But here the lead has been removed, the spot welds removed and the rotten sections removed and re-plated with the original contours. This allows for the full quarter to be to be fitted to the roof section and welded where it’s supposed to be. Terry welds into the original places and then it will be ground down to allow for the full leading to be applied where it will all be covered over and the strength is retained in the car. Many other places will not do the lead work as it’s a fine art and some modern garages don’t use it for daft health and safety reasons.

quarters1

With the quarters in place and fully welded up the next big panel was the trunk lid. With the freshly painted hinges and inner wheel arches they were lightly bolted into place and the trunk lined up to the quarters, once in place its all tightened up. The trunk will lay down under its own weight to allow final positioning of the trunk. Once that is done the tricky and dangerous (if you get it wrong) twisting of the sprung bars into place to keep the trunk open once the key has released the catch.

The next section was the filler and light panel to be fitted. The new rear quarters have alignment holes that need to be located to the light panel to ensure the light housings fit into place as the two halves form both the openings. The panel is then welded to the chassis brackets to give the rear strength.

trunkarea24


Next is the rear quarter links that join the rear panel which are positioned and welded into place. With everything in place Terry then completes the trunk and quarter areas he has done so far with the traditional brazing.

Forward thinking at this point see the guys dummy fit a rear bumper to see where the quarter end caps will sit in relation to the trunk and the quarters. These original fittings are notorious to fit correctly to new panels, but these went on like a dream and only small adjustments needed. The bumper will be able to be moved into the final correct position at a later date. The final panel for the rear section is the back up rear valance. My original was well and truly mashed up on the right hand side as if it had been backed over a rock. It could have been repaired but for the sake of £60 it was decided to replace with a new panel and there is no rust worries either at this point now.

Remove the bumper and then screw the rear valance into place after aligning all the sections up together.

With the welding all completed the seams were sealed up like they were in the factory and it was really was quite brutal in those days and nothing fancy. Terry then added the boot catch to the inner panel and welded it all up. Rear section done.

What does she look like from the side? Pretty darn good I would say. The next stage was to add a little filler to the panels to smooth out any imperfections and apply flexible sealer under the quarter to the sill.

During all of this you may be thinking well what did I do Saturday? The answer was simple, I was prepping the other panels and removing the paint in order for Terry to be able to weld up properly. My tasks this week was to strip the fenders the “A” pillar posts once I had removed the doors, and then start on the roof. A large amount of work, but it all needs to be done so I left very late into the evening, I was physically hurting at the end of the day. The same old story, strip, scrape, strip again wire wool and strip any remaining last bits before a final wipe over with thinners.

The roof tuned out to be a big task. The car is on the jig I couldn’t reach into the middle, even at 6’4″ tall my long arms didn’t make. So I had to balance on the sills hold on and apply stripper and scrape. Now I’m no gymnast and it was quite tricky at times to be honest and I think this is where the fatigue kicked in. But the results were good and the roof came up pretty spotless.

Sunday I have spent most of the day editing these pictures ready for the blog plus the afternoon nap too. Next week – I know what I will be doing, stripping the hood back to bare metal.


Share my Content

Some You Win…

I try to post on a Sunday evening so I can give an update on the work completed by Mustang Maniac during the week and the work I do at the weekends. The reason I haven’t posted is quite simple. Trying to catch-up on the huge amount of  I have taken and the huge amount to work the MM (Mustang Maniac) guys have done. Most of the photo work has been completed now and hopefully the delay will be worth it. Where do I start?

The first thing I noticed when  I turned up was the back of the car was sitting in a white primer where Terry had cleaned and seam sealed it up.

The back of the trunk is to get blown over of the Acapulco Blue when the car goes for the full paint job. In the mean time a couple of light undercoats of colour will be applied to the areas that you can’t paint once the rear quarter panels are welded in place, such as the chassis drop off points and the top of the rear arches that can be seen when you open up the trunk. The hinges I prepared last week were cleaned up and given a spray and hung up to dry.

The next part to be spotted was the upper cowl that had been fitted in place and welded to the lower cowl. The Black resin coated parts in black are now all welded in place and brazed as they should be. Tape was placed over the vents and masking paper placed in the vents to avoid any and dust and rubbish getting into the fresh paint. The paper will be pulled out at the time of fitting up the rest of the car.

As I wanted an export brace on the front of the car going from the fire wall to the shock towers this one was going to be fitted correctly. What I mean here is that the export brace was fitted to a thick piece of plate also welded onto the top of the fire wall to add the required strength. Many export braces fitter later in life are just bolted into the original shock tower bolt holes and the fire wall. Under load the firewall will bend and give which defeats the whole point of the export brace being fitted. The welding you see here is exactly how it was when they were first fitted, no neat seam all round welding, just the little lines of weld you see in the close up. The brace is only resting in place as its not needed at this point of the restoration.

When I arrived on Saturday Terry was competing the repair plate to the roof and quarter panel lead area. Yes you read that correctly – lead, not filler and welds as modern restorations will do for you, but this lucky little lady was going to get the forgotten art of leading and brazing the quarters in place. The filler and welding are not ideal and could blow through with damp and rust at a later date. The Common place to have the rust appear is at the top of the B pillar as the water runs down and sits at the back of the strengthening sections and so it will eventually rot. Welding and filler will be especially susceptible to the damp. Red oxide paint was applied to prevent any more rust. The replacement plates in this area are common and the secret is make sure the plate are lower than the rest of the roof in order for the lead to run into any holes and fill the cavity up with strength. It’s this attention to detail that sets these guys apart from everybody else.

Anyway, I was given my task to strip the doors down to find any of Adam’s nasty little surprises as he likes to call them. The door, oh yes the lovely left side drivers door. The stripper was applied to door and the first layers of paint was removed no problem. Then I spotted it – filler. Ok, the filler was to mend any cosmetic issues for paint, so I kept telling myself. So the door got more stripper and more scrapping. The filler patch got bigger and bigger until it was across three quarters of the door. I asked Terry to take a look who said “You have to get it all out to see what is behind it”. So the door got more stripper applied to loosen the filler, then more and more. The scrapping knife was lifting the filler out like a spread of butter until the next layer of filler needed to be softened. Now I was going through the stripper like you wouldn’t believe as the filler was soaking it all up. The breakthrough to the metal was a good moment to behold and I thought I had cracked it, but no. The filler was about half an inch thick in some places, then I found out why. The car has had a knock in the door. There was regular holes in the door skin to pull the dents back out again with a slide hammer. At this point Adam was called down to survey the damage. Then he said “all the filler has to come out to see the full damage”, that’s consistency. Two hours later the filler was all out. The door panel was now fully exposed and any pressure on the door and the door popped inwards as the metal was stretched beyond repair, the filler was holding it tight. If I had of known this then we would have replaced the skin in the first place on the outside of the door.

The door had to come of to strip the skin. Adam went and got a skin and brought it over “it’s your lucky day – it’s the last one.” The door was mounted and the skin was knocked away from the door by breaking the spot welds. The inside of the door would show the damage if any done to the structural part of the door. The skin was popped off a little while later being careful as they were trying not wanting to damage the door frame. The skin was lifted off and with the inside exposed we could see the heavy rust at the bottom of the door and the thin metal about to break away. Not good. The side strengthening bar part of the frame had been bent on the initial impact and had not been straightened out at the time. Even worse. The arrows in the pictures show the areas of concern, the bent frame and rust holes.

In case you are wondering how much came out of the door? This much.

rubbish

The decision was made the door could not be salvaged with the amount of rust inside and the damaged bar. Yes, of course they could fabricate new parts and weld in place, but the man hours would out way the cost of the door. Terry went and got a new door. I had spots before my eyes or was it “£” signs, i’m not sure now??? Terry then offered up the door and fitted it along the B pillar and the sills. Adjustments had to be made with the door catch to make it shut correctly.

So to sum up:

1 x 5ltr od paint stripper = £30

8 hours stripping time

1 x door skin = £120

Terry’s time – a lot!

1 x new door = £400

1 x scrap cart full of my nice clean, paint free, bent door skin that has more bullet holes than Al Capone’s getaway car! One man was not impressed. BUT, some you win – some you loose, the original drivers door was a write off and that is the chance you take with old cars unless you know the history. I soon got over it once I had seen the new door in place. Oh, yeah it looked good. The other door Adam stripped down for me, that one was fine and OK to prep for paint. I think he was feeling sorry for me at this point, I did give him his door skin back though!! AND it only took him an hour or so to get this far.

door10

The door surround was cleaned up while Terry was prepping the door for fitting, this part of the bodywork came up pretty clean all round the inside and I was pleased with the results.

The door fitted with the clean pillar and inner door frame cleaned up looks amazing.

It was a silly long day and I would a special thanks to Terry, Adam & Frank for helping me out. I had a good laugh and it was great to see the new metal on the car and some colour.

I hope the wait for the post was worth it, it was for me. 🙂

Share my Content

New Paint Colour Revealed

The weekend still arrived slower than ever after a Bank Holiday at the beginning of the week. I was excited to get down to Mustang Maniac to see what had been done to my car. The lower cowl was going to be replaced as it had rotted through and that piece of work was known about. With the cowl off the guys could see the fire wall and the back of the dash clearly in daylight. On full inspection of the dash they could see it had gone a little thin underneath and rusted pretty badly all along the inside. A discussion was had to either replace the whole dash, or weld parts onto the old dash. This would mean shaping metal and replacing the radio slot that is always butchered on the classic cars. The decision was made to replace the complete dash, not a cheap option but it was going to be worth it in the long run. As ever Adam had a full dash in stock and was fitted, welded and brazed into place. It’s a little difficult to see black on the dark underside but you can make it out.

The top part of the firewall had to be fabricated as it was little thin in the top crease, so again it was decided by Terry to cut the top off the firewall and replace it with fresh metal and shape it to the new lower cowl. Metal work skills being displayed in all their glory and you can’t even tell it has been replaced.  With the lower cowl now firmly welded in place it was masked up and then given the first of a couple of layers of primer. It was at this point I was sent this teaser photo by Adam to show the primer had been applied to the cowl, this is the first piece of fresh metal to get proper paint.

lowercowlprime

I turned up very excited and itching to see the car expecting to see the cowl in primer. I wasn’t disappointed the lower cowl was painted in the colour that I wanted, Acapulco Blue. Obviously I am biased big time here, but it’s a bit different and a stock ’67 Mustang colour, I am absolutely delighted with it. This was the first time I had seen the colour on my car. A pretty special moment.

I got a bit carried away having a little bonding session with the fantastic paint job much to the amusement of the guys who followed me in to see my surprised look. Adam broke the news to me about the very busy day ahead of me. The trunk was to be removed and then strip it back to bare metal to see if there was any “little surprises” waiting for us as Adam puts it. What he means is, are there any pin holes or rust that have been covered up. I started on the top side and then worked my way to the underside. The underside took a lot longer due to all the corners and curves that made it hard work. I am pleased to say after a few hours hard work that the trunk is solid and no rust at all, except for a two very light surface areas where the paint had chipped off on the top side.

The next job was to red oxide the inside firewall as I had stripped it back to metal last week. The end results are pretty amazing I must say.

I was spoilt this week in my own little sanctuary, a nice guy Chris was given the dubious pleasure of working with me for the day. It’s normally quiet in the work shop, but last weekend it was a nice change to have somebody to share a conversation with all things cars. Chris made a great job of stripping the right side B pillar and the rear panel under the rear screen. Thanks for your hard work Chris. Throughout the day the normal visits from the guys was in full flow and towards the end of the day I was given some “homework” by Adam. That homework was to take home one of the fenders and strip it back to bare metal. Adam was right it was a busy weekend for me with a few more to come like it. Things have stepped up a notch, big time!

Sunday, I got up with a full day in front of me and the backs of my legs aching. My homework was to be completed along with the trunk hinges and sprung bars that connect them to hold the trunk open. The hinges were to be stripped and all paint removed as it has to be painted the same colour inside the trunk. I though I would try to be clever to strip and clean the parts with the sprung tension bars in place. Unfortunately this turned out to be a nightmare so I had to remove the bars.

I held one of the hinges in the vice and lever out the first bar. This was enough to start a cascade of events. The sprung bar unleashed itself like a coiled cobra and the end of the bar slapped me on the left hand at the base of the knuckle, the instant pain caused me to rub my hand as the other bar sprang away hit the man cave rubbish bin, this in turn was sent flying leaving a cloud of old sanding dust and rubbish all on the man cave floor in the doorway. After the initial clean up and the bruise on my thumb and wrist getting darker by the minute, I took the hinges back outside to complete the strip down. Both hinges came out pretty well and I was well pleased. To protect the inside of the hinges I gave a coating of Eastwood Rust Encapsulator to prevent additional rust on the inside of the hinges. The sprung bars were given an undercoat of red oxide and then a top layer of silver.

The homework was a dilemma, how to remove the paint from the fender. I decided on my Dewalt dual action sander with a 100grit discs. I intended to go down to the undercoat and then use a lighter and lighter grades to get to the bare metal. Some of it went to plan and some of the paint came straight of and I went to the metal. I will have to fine buff the tiny swirl off the metal work now this weekend. The purpose of the homework? to see if there were any little surprises waiting for me. I am pleased to say I didn’t find any on this original panel so far. I still have the top edge to complete but that could be later in the week or next weekend.

A big update again and a lot has happened, I intended to post on Sunday as normal. But, I had so many pictures to edit it was very late to start writing this little lot up. Forgiven?

Quick Links:

Right fender work to treat the inside click here

Share my Content

Rear End Moment

After a few weeks of not seeing my car I couldn’t wait to get down to see the guys at Mustang Maniac. Friday night arrived as soon as I got home from work I went out to the man cave and packed what I thought I would need. I had a rough idea and so I packed brushes gloves and the change of clothes. I was up and about, dressed, fed and ready to go by half eight in the morning. The trip was pleasant and I had the added bonus of seeing some classic cars going to where ever the show was. I spotted a couple of Mustangs, a GTO, couple of old Chevys, a few old trucks, a Charger, Stags and even an E-Type Jag etc. Seeing all those lovely old cars just made me squeeze the gas a little more to get there a bit quicker. Once I arrived I was greeted by a pack of dogs that must have forgotten who I was. Adam greeted me and we had a chat to catch up with all that has been going on with Mustang Maniac and my car. We walked in and it was one of those OMG moments and I was speechless, those that know me will realise that is a rarity. The back of the car has been rebuilt! The left quarter has been taken off and roughly aligned. The right has been prepped ready for removal and the replacement parts all lined up. The quarter will not be welded up just yet until the trunk has been finished and the outer wheel arch has been fitted correctly.

The trunk panel was a little thin on the main panel where the curves meet the fuel tank which I knew about, and thought I might get away with. The guys decided it was a little to far gone to save. The replacement panel they were going to use had angled fittings to it rather than the gentle curves it should be, so they were not happy with the part and rejected. As a result the guys unpicked another part to get the curved panel and weld that into place from the previously cut away section. Terry has done a brilliant job of reconstructing the trunk and has added the trunk flooring both sides on top of the chassis legs and the side drop off panels too. The welding has been ground down and doesn’t show at all, impressive stuff as always. The trunk is not fully finished yet, but it’s looking pretty damn good.

Once I had caught my breath back I asked what need to be done. Adam told me to remove the paint from the visible trunk area ready for primer and the car colour, that consisted of the inner wheel arches and the drop down main panel which goes over the shock fitting holes and into the back of the car behind the seat. I had guessed right with what I needed, gloves on and stripper poured ready for use. To do this bit of work I climbed under the car into the trunk and worked from there. The usual story, stripper, scrape, stripper, coarse wire wool and thinners to clean it all up. The end result was pretty good as there was no filler in place at all which was a major bonus. It did uncover a couple of little sections what will require a few spot welds and little plate inserted, nothing major or structural.

That leaves the overall view of the trunk which is amazing at this point. The front of the car is also being worked on quite heavily, but I will get the full pictures before and after next week. I have been spoilt and so has my car. Thanks guys.

rear end - Trunk13

I ached all over on Saturday evening bending in weird positions to remove the old paint. Sunday I visited an old friend which was just as well as I was still aching not that I got any sympathy mind you. Monday being a bank holiday in the UK gave me an extra day to finish up in the man cave. The task was to reassemble the steering section back together. I applied a very fine dusting of clear lacquer to the silver and allowed it to dry. Once the final layer of paint had dried I carefully removed the masking tape and the plastic carrier bags to get the overall effect of the paint work which I think works quite well. Of course nobody will see it but hey, I know it’s there.

The pipe work was refitted back to the relevant points, but none of the fittings have been done up tight yet.  The reason for that is just in case some of the pipes have to be moved around when its all refitted back up together again.

Just for comparison if you didn’t catch the original condition.

A bit of a large update, but I think it was worth it, me – I am ecstatic with the work.

Share my Content

Front End Fixes

The guys at Mustang Maniac have been busy welding up new plates to the inner wing and replacing the top cap plates to the fender from the cowl area. This little plate is quite a critical part of the car structure. To remove it without being on a jig will cause the car to bend at the firewall, in effect making the car sag in the middle. Although I had painted the areas and left the offending holes unpatched Yogi has taken a big chunk out and welded a completed new piece back in its place, just to be sure. The welding has been ground down and ready for more protective red oxide.

The steering linkages are the concentration this weekend as I am a little frustrated about having all the parts over my bench. Yes, I know I can move them, but it also prompts me to do something about it. So the plan was to remove the Gibbs Brand, not that you need to, but I Wanted to clean it up again to remove a few little pockets of grease I had missed around the valve mechanism. I applied the degreaser and with a clean white cloth to see where the dirt came from. Once I was happy with the parts being clean and dry I started the tedious masking up of the areas not to be painted. First of all was the rubber sections, and nothing else as everything was going to get a good coat of red oxide primer over it. I found that carrier bags on the larger parts inside the masking tape areas is a quick and easy way to protect the areas not to be painted. Only a small amount of tape is needed to hold it in place. I applied a blob of poster tack into the screw in sections to stop the paint getting in. Once it has been sprayed pull it out and throw it away.

The spraying of the red oxide primer was a little slow to dry due to the weather not being its best. But allowing coats to thoroughly dry before giving a second layer. I also sprayed the idler arm sections and the steel pipe from the valve as well at this point as they are quite small.

With the red oxide dried the next task was to mask up everything that was not going to be satin black painted. That was going to be the valve area and the main ram. To save the valve area complicated masking up I used a vinyl glove over the part and pulled it towards the accurate masking I had done earlier, to secure it in place was a simple wrap of tap around the wrist section. You only have to turn it inside out to re-use the glove with no wastage! The satin black paint dried a lot faster now as the sun was coming out and warmed the man up to an acceptable temperature.

The final part once the black had dried to was to reverse mask up ready for the silver spray. The smaller parts didn’t need to be masked again as they were going to be a single colour. Unfortunately the silver is taking hours and hours to try even though I used thin light sprays to build up the colour it is still a little tacky. I was hoping to add the pipe work to it today but the cool weather has put a stop to that. Rather than ruin the paint I decided to leave that till next week.

I would like to share a final photo of how I am supporting the ram and main steering bar while it all dries. Yep, I know it looks a bit naff, but it works.

steerpaint14

Review:

I have added a tool review for the Makita GA454530KD Angle Grinder here, or go to the Tools Review Menu and find it there. This was the replacement for my unbranded grinder that caught fire on me a few weeks ago. What do I think of it? Find out by reading the review. You can also click on the picture to go to the review!

makita2

Share my Content