The Key

Another good weekends work on the car with an added bonus of a trip to see the guys at Mustang Maniac on Saturday. After looking around the cars again I can see the KR replica is looking like a serious motor now, and I love the lights at the rear, in fact I want it! I believe they will be posting the updates for that soon. I have seen a sneak preview of the new website which is almost ready for launch and it looks pretty damn good I must say. It will be a huge leap forward for them as the parts ordering will become automated with online ordering with photo’s and stock availability etc. You won’t even have to call them to order the parts, just checkout, pay and wait for the order to turn up. It was great to see the guys again and have a laugh in the boys club. After speaking to Adam about my car and what to do next, I was advised to get the rear loom out and all the “shiny bits” from the dash. So I did.

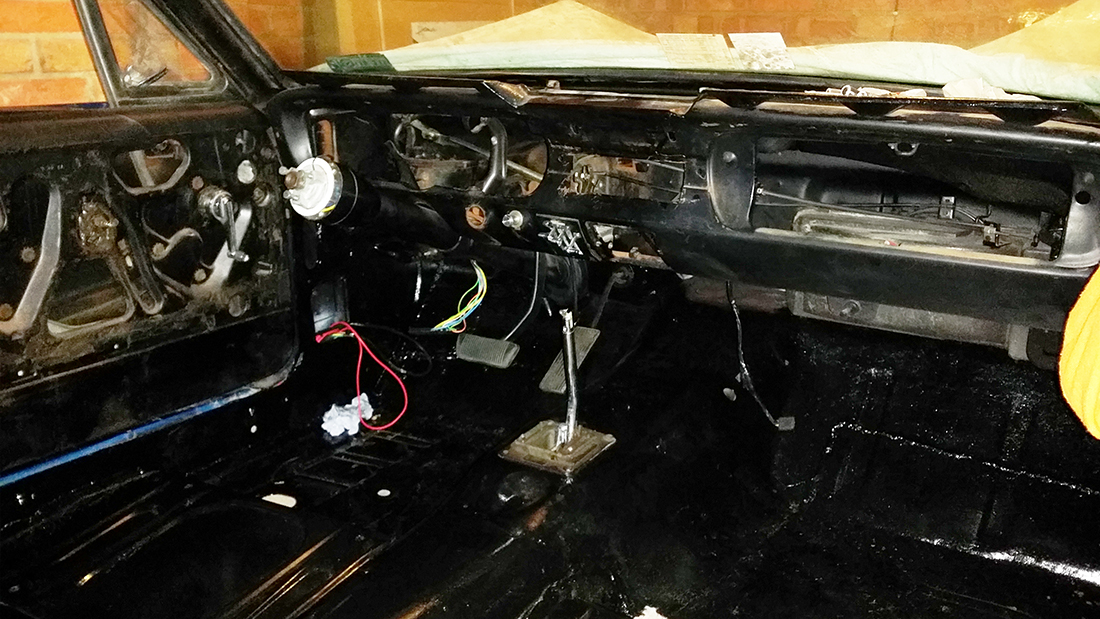
First job was to take out the heater controls and the non-original cigarette lighter that had been fitted. The fact I had to be double jointed to get to the two nuts holding the heater control face plate in place didn’t help. More thought was required and produced the solution by removing the ashtray mounting, then trying again made life so much easier. Next up was to get the heater matrix and motor and pulled out through the firewall. The only tricky part was going to be making sure the pipes didn’t leak any water onto the inside and make everything sticky as antifreeze tends to do. The whole process was simple enough and no spillage I’m glad to say. Once the motor and matrix was out-of-the-way the next job was the rust treatment which was going to be a pain, just because of the places I had to get to now that I could get to due to the clear space. Two brushes were used, sorry, destroyed during the process, one softer for all the curves and tight places, the other harder brush for the larger areas that were visited later after I got my head out of the way. A few missed patches from an earlier attempt were spotted and were linked up so all the surfaces are now treated. The ultimate position should be entered into the yoga handbook for men. In order to do it was on my back with my head jammed up against the cowl, with the centre tunnel under an arm pit, not ideal but my long arms helped. Note to self – next time I must tape a thick cloth to the top of the shifter as I managed to draw a little blood on the back of my leg as a result of a sharp plastic fitting that has the skin shredding capability of a golden eagle talons. In fact if I Pulled myself right up, I could look out of glove box. I tried to take a selfie but my arms just weren’t quite long enough, shame though. Removing the loose rust and all the dust produced a couple of nice surprises as I was brushing it all out clean. But more of that in a bit. The idea was to paint right up inside the dash into all the nooks and crevasses that I could get a paint brush into and work down towards me. For once I wore some safety goggles in order to stop any splash backs of the anti-rust liquid getting in my eyes. I looked like I had just borrowed Buddy Holly’s specs as they are a bit old, but do the job. However, I needn’t of worried as none splashed on me for a change. But of course, if I hadn’t of had the safety glasses on, the brush stroke would have flicked the lot in my eyes, with a handful of rust dust to make it worse – guarantee it! The pictures here are quite unique as they are inside the dash looking towards the truck, I personally haven’t found many of these on-line to be fair so I thought I would share them, just in case anybody is interested.

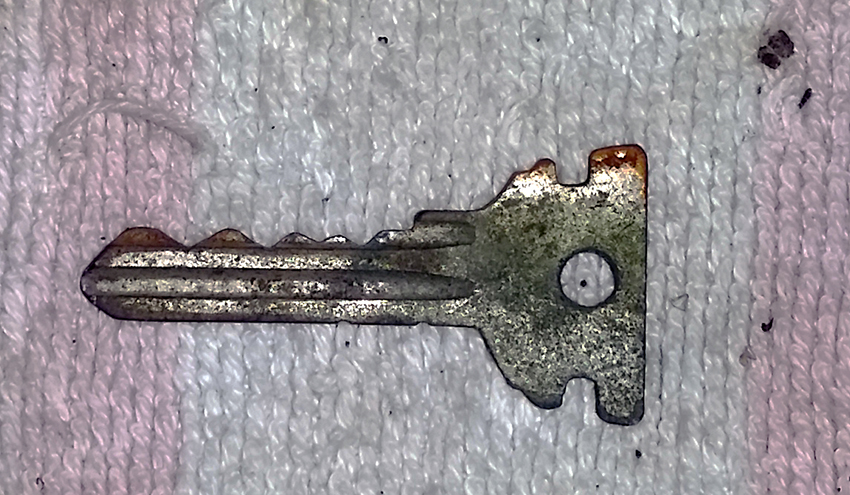
I mentioned earlier that I got a little surprise as I was brushing the dust and rust out. Well, this key fell out and landed on the floor pan. I have compared it to the other keys that I have and I looks like a single sided ignition key. As there was no ignition tumbler in the car when I got it I don’t have an original key to compare it too. The ignition key I have now is almost the same from the shoulder of the key to the tip of the key. The shape at the top is a little odd though and doesn’t look like the standard keys I have seen. Can anybody give me an idea of what it is or what it would have looked like? Strange place to find it on the back of the dash where the gauges would have been. Or is it not even a Mustang key, I don’t know. I also found a Dime as well  which I think the date says 1964 or 1984 I can’t quite tell.

key

Share my Content

Feeling Drained

All the things I enjoy doing, taking bits off, wiring, rubbing down, prep for the paintwork, painting and putting things back on, these have all been done this weekend, but not on the car. I have been promising the better half I would decorate the utility room for her after a few months that are getting on for a year or so, she has been patient. Since I have had the Mustang that part of the house has had little care, ok none really from me. But, I have put up shelves, fitted base units, fitted a sink and tiled around the sink. Other than that it has sort of stopped there as other more important things have taken over. This weekend that excuse didn’t wash, so I have kept my very late promise and decorated the utility room. To be fair it now looks pretty good again and she is happy with it. I have to score as many brownie points as possible at the moment as I will be spending a bit of time away working on the car when it gets to Mustang Maniac. Hey, I have even retrained myself from bidding on some Snap-On tools from Ebay this weekend. During the process of the decorating we have had some funny moments together doing it. But I should point out there are a few invaluable tips I have for you here when decorating with the wife or partner.

Tip 1: Once you have disconnected the washing machine from the sink and the wife asks “Can I pour this down here”, you should go and check what she means – I thought she ment pour water onto the floor to clean behind the washing machine. So I said yes without checking. The next thing is that bowl of water was now squirting out under pressure from the sink onto the floor, I had to jam my finger in the hole to allow the water the water down the outlet. That was my fault because I said yes she could pour it down there!

Tip 2: Once you have painted a wall and the part behind the washing machine needs to cleaned (again) let the wife know that the wall where she is kneeling is wet. The fact I had a smudged imprint of her a**e on the wall, and that the pair of trousers she was wearing now has paint on backside of them was all my fault because I didn’t tell her I had painted that bit!

Tip 3: When the wife holds a torch for you to do some wiring after all the electric has been turned off, make sure you tell her that the torch is for your benefit in order for you to see what you are doing – not for her to see what you are doing. That was my fault because I should of told her where to hold the light! I did have a few ideas at the time, but the torch is metal and she was holding it at the time, if you get me.

Tip 4: When you turn the electrics back on and you want to check the switches out for safety, tell the wife not to turn the lights on and off in the next room as you are still looking at said new switches you have just wired up. That was my fault again, as the electrics were back on it should of have been OK, and there was no need for me to jump like that.

Tip 5: Tell the wife to go out and treat herself shopping while you get on with it.

These tips will save time, grief and bewilderment at how it could have been your fault. On top of that, decorating can be done in half the time and multiple coats of touch up paint are then not required! Still it was good fun though even though I got the blame for all the little issues. How does she do it? The wife is a highly intelligent woman, but she has no common sense what so ever, she will admit that too. Still, Tip five is the winner and if possible skip Tips one to four, then when she comes back and all the work is done – brownie points in the bag! Unless I get paint on her clothes then I will have to make up for it and the huge hoard of brownie points diminished into a not so big hoard after all. Thanks to the wife for helping me in her own little way. However, if this post suddenly changes over the next couple of days then you know that the brownie points have been rescinded, and I am now sleeping in the man cave for mentioning the decorating tips for husbands. That also means she will have read this post too.

Back to the car:

I did manage to get out and do some work on the car, I drained the water/antifreeze from the engine and the radiator. This should make it little less messy when trying to get the engine out and disconnecting pipework etc. The Radiator shroud has been been removed and stored safely in the man cave now. There wasn’t much call for the photo opportunities of the process as pulling a pipe of the bottom of the rad is hardly exciting. Beside the way the weekend has been going I would have taken a photo and dropped the camera in the antifreeze. Perhaps I could try and blame the wife if I had of done that. There again perhaps not. I still have the rear section of wiring loom to remove which shouldn’t take to long. With any luck I will get round to it next weekend and put it with the main loom stored with the car in it’s own storage box.

drain
Looking down to the bottom pipe of the radiator.

I also received a a very late Christmas gift this weekend after it has been on order for two months. Its a GM550 Non-Contact IR-Infrared Digital Thermometer. I was after this to check for cold spots and hot spots of the car when it was running. But I have measured the toaster, kettle, radiators in the house drafts from doors – in fact everything I can point it at. It’s nothing to the with the fact it looks like a gun and fires a tiny red laser beam dot. I will get round to doing a review of it at a later date, I will probably need a new battery by then.

Share my Content

Two Steps Forward – One Step Back

It’s not as bad as it sounds though…

The weekend has been about me undoing work I have done up till now. OK, that sounds a little odd but I makes sense, my head says I needed to do it, but my heart said no. After speaking to Adam at Mustang Maniac I asked the questions “does my wire loom need to come out?” The reply was simple – “is the cowl OK?” I know there was a little issue of rust around it but it looked OK, in my eagerness to get the car wired I done the best patch up I could, deep down there could be issues. So the decision was made to take the whole loom out again so we don’t damage the loom and check the cowl out properly. If you have a dodgy cowl the rain could get in, run down some rust and ruin the carpets. Potentially every time I clean the car I would ruin a carpet, let alone being caught in the rain or use the window washers come to that. Also the dash has got to have a repair plate welded back in to look original instead of the wide gaping hole there at the moment where a modern radio was put in,  ideally the area behind it needs to be clear of wires. Once the car gets down to Mustang Maniac we are going to look at sorting out the cowl, rear quarters, any chassis welding work etc. then to paint the car properly. For that it will need it to be a shell in order to make it easier for the paint and prep work. You may ask yourself why did I do all the work I have so far? The answer is simple but the answer is threefold. The first is when I got the car there was nothing in it to work, so I wanted to know it was going to work, so I wired it up to prove that it does basically work mechanically. Secondly I didn’t know the Mustang Maniac guys at the time and I was (mis)led and “advised” by other people, – it turns out they obviously don’t know as much as they think they do, those people and companies shall remain anonymous from me as they don’t deserve any mention on my blog, at all. I could name and shame but then I will be bouncing their name possibly advertising them, but they know who they are! Thirdly, it’s a learning curve, I was going to do what I had to do to get the car on the road. Many conversations with Adam made me realise that it’s a bit of a false economy and I should do it properly. yes, it will take longer, but on the other hand, it will be more reliable and last longer, it will look so much better and be worth much more, in fact should outlive me!  The car was bought for me as a hobby to do up over time, which I am enjoying every minute of it, even when the car bites back and draws blood from me. In my infancy of car restoration things were done a little bit back to front in retrospect. BUT, the huge advantage is what I have done so far, I know fits and works. The last thing I wanted to do was have a nice paint job and go messing it up by doing stuff I wasn’t to sure about, scratching it, denting it and so on. One of those major things was wiring the car up from nothing, turn the key and it starts. That proved the point that the engine was basically OK and proved to myself that I can wire a car up. Other things like the brakes needed to be sorted out too. I know that I had of had the car sprayed and put the brakes on the car as I first did I would have ruined the under hood paint. The original brake booster looked fine, I checked it and cleaned it up, and when I filled it up with fluid it was fine, but when the pedal was pressed it squirted brake fluid out all over the place, like a kids water pistol in fact. Without a question of doubt it would have ruined the paint and I would have been gutted more than taking the loom out again. The brake booster and dual cylinder upgrade on there now works and should be a simple bolt back in job. So you see it’s not such a bad idea after all. Yes I took two steps forward, the one step back should only be a temporary loose of momentum though. In fact there are things I will do little differently when I put the wiring back in again. So it’s not so bad in the end after all.

remove loom

The inside is just as bad!

loomout inside

The American AutoWire loom was on its way out, and it all looks like a mess again. The advantage that I cling onto is that I can wrap all the wires back up again with insulation tape once in place. The engine will be coming out, so will the gear box, drive shaft etc etc. in order to spray the engine bay properly.

Inside the car with the main loom out, only the heater control loom and the rear link loom is still in place. The car is almost back to how it was when I got it! In a way I’m a little sad, but on the other hand it will be a better job than before. (I must keep telling myself this to keep the spirits up). Short-term I will not hear that bark of my v8 again for a little while anyway.

shell1

Review:

As it’s winter and it can be cold the good lady wife took pity on me and bought me a heater for the shed or garage while I am working out there on my beloved Mustang. The only thing is wanted something that was in keeping with what I had, retro in other words. There are these horrible plastic boxes out there that do the job, but I just don’t like them. I mentioned that I liked a particular style made by Honeywell and I was lucky enough to get it. Women have this knack to store things in their heads for ages, in this case it worked for me. Most of the time it’s evidence used against me when I am after something. Know what I mean guys? I have reviewed the Honeywell Heater HZ-510E1 under Accessories Reviews. Is it as good as it looks?

hh14

Quick Links:

Accessories Reviews – Honeywell Heater HZ-510E1 or click here for the hyper link

Share my Content

Raise a Glass Or Two

The good lady wife cleaned out the kitchen cupboards and moved a load of things around and found some bottles of drink we were given when we got engaged. We decided at the time to keep them for a special occasion as you do, and we put them right out-of-the-way for safe keeping and we promptly forgot about them, out of sight out of mind as it were. That special occasion day was today – they went down the drain as they had corked and smelt like vinegar when they were poured away. There is a message here, if you are given a nice drop of plonk – drink it while it’s still good. The others are OK but that’s not he point. I do however plan on opening a nice big bottle of champagne once I am holding that elusive MOT certificate for my car, then I can drive it legally, not after the drink of course, but you know what I mean. Oh, in case you are wondering – now things have been moved around, I can’t find anything!

The title suggests that I have been on the ol’ vino apart from what went down the drain, sadly that is not the case, but more about getting the rear quarter windows out of the car.  For the past two weeks I have taken a complete side of glass out, which includes the frame, brackets and bolts all of which were cleaned up, then the whole thing repeated for the other side. The task itself sounds pretty easy, but the main issue is getting the glass out through the top of the quarter panel opening. Once the glass has been separated it’s not to bad a job at all, the technique seems to be unbolt the frame, undo the glass and separate it apart inside the frame. The dexterity of hand and eye coordination is put to the test where you have to hold the glass, lift it out of the frame rack itself and then guide it out the top. The glass is not heavy but I am aware of the age of the glass and I didn’t want to knock it and crack it or worse still drop it. The fact that the winding gears had dried solid grease, Waxoyl all over them and general lack of maintenance sort of explains why nothing wanted to move very much. The cleaning was a nightmare getting the guide rails clear and removing the caked on Waxoyl. All this hard work nobody will ever see once it’s fitted back into the car.  As a result, my shoulders and neck ache for constantly looking down at it all, poor ol’ soul! But here is what I have been up too:

I have added a couple of before and after pictures as well. and I have added the full process under the Photos section or click here for the hyper link.

Right side glass

Left side glass

Left side glass track and frame

Both side winder mechanisms

The other thing I have tidied up today was a couple of boxes I had in from the USA a while ago which were some replacement dash gauges. These were in small boxes all over the place so I decided to make a little storage area for them. I had a sturdy box and created a cut out for each and placed them inside for safe keeping. A nice little idea, which I may turn into plastic instead of cardboard.

Quick links:

Photo Menu – Glass Work – Rear Quarter Window(s) Refurbishment or click here

Special Mention:

A special thanks goes out to Dana http://atlastracer.wordpress.com/ who has kept me laughing and motivated over the weekend. Pop over to check out her amazing blog.

Share my Content

Busy Start To The Year

Back to work in the new year was a shock to the system after having a couple of weeks of I must say. I had almost forgotten what the alarm sounded like, but I was soon reminded with a sledgehammer to the ear drums when it went off. The day I retire I will take the alarm clock outside and I will give it such a good hiding for all the mornings it has ruined my slumber. Why do you have the deepest sleeps just before you go back to work and the alarm wakes you up?

Anyway, back to the car; The new year has started in a busy fashion and I intend to continue the pace, it’s been busy getting it ready for some body work after a conversation with Adam at Mustang Maniac.  The time  of over he holidays was used to complete a project I started on the twenty-fourth on November and that was the rust treatment of the floor pan, the hyper link is here for the full story. I originally started at the front foot wells and worked my way to the back of the car. It was finished on just before the new year, what remains are the side panels by the rear seats and the side frames.

In order for the body work to be ready, the right rear quarter window was taken out and the driver’s side will come out next weekend. Once they are out I can get to the inside of the panels and treat them with rust prevention, before the outside work begins. The rear quarter window work is under the Photos Menu – Glass Work – Rear Quarter Windows of click here for the hyper link.

Quick Links:

Photo Menu – Inside the Car – Floor Pan Rust Treatment or click here

Photo Menu – Glass Work – Rear Quarter Window or click here

Share my Content

Happy New Year

They say a picture speaks a thousand words,

but mine only says eleven!

2014 happy new year

I hope my lack of words is acceptable in this case as I think I said it all.

Share my Content

Merry Christmas

I just wanted to say a warm wishes to all my fellow bloggers out there and Happy Christmas. I hope you all have a wonderful holidays. While I was thinking about creating this post I was searching for a few Mustang related Christmas items, I have loaded a few of my favourites here. I’m not so sure I would get away with hanging a Mustang ornaments from our Christmas tree, but I might sneak one two on there next year!

Share my Content

Lookin’ After The Pony

The weekend has gone and I have finally got a chance to catch up on the blog. The man cave has been my residence for the last week or so. I have run out of the consumables that I needed to finish the floor pans inside the car. A change of plan that switched my attention to the smaller things I can do in the mean time, the first was the air filter pan which is finished, apart from the final top coat colour what ever that may be. However, I did promise myself not to do any of the pretty things on the car before the basics have been done, such as paint, mechanics, rust etc. But every time I walk into the man cave there is a grill that hangs on the side with this dirty Mustang Corral on it. The grill is no good as the top part has finally broken (when I picked it up), so it won’t be able to be fixed onto the car now. So now I need a nice shiny new one, (never mind then), the original grill has had a poor spray job of black paint from the front which has also gone over the underside of the Corral, but saving the pony Corral was  the most important thing to me as it’s the cars identity after all.

I took the Corral apart and noticed a broken mounting leg or support which was repaired by body filler! The outside of the Corral was cleaned up and the leg was repaired with some JB Weld. The pony was fine, just very dull and no shine so I used a mixture of chrome cleaner and Gibbs Brand to bring it back to life. The results were really good and came out better than I had hoped for, so obviously I am well pleased with it. The full process of the cleaning and repairs I have added a page to the Photo Menu – Body Work – Mustang Corral, or click here for the hyper link, there are over forty photos in total. I did however take a few arty shots of the iconic horse while it was out as I may want to change the header at a later date with my own car and grill. What do you think?

The chrome cleaner was removing the dirt but seemed to be moving the dirt from one end to the other. A different approach was required, the Gibbs Brand cleaned up most of the dirt first and the chrome cleaner done the rest. As some of the metal work was pitted slightly I didn’t want to make it worse by catching the chrome with a cloth and leaving a chromeless spot and so it was treated carefully. The brushed effect wasn’t given any rough stuff either for the very same reason, the Gibbs Brand was the staple cleaner for those areas. I could see that brushed effect would scrape off if abused and ruin the look of the two-tone finish as a few tiny scratches revealed that point after the dirt was removed.

The finished result is a well-groomed pony looking forward to more open road adventures.

finished
finished

Quick Links:

Photo Menu – Bodywork – Mustang Corral click here

Share my Content

A Burning Question

Today I was in the man cave as I had a few ideas of what I wanted to do this week. One was to treat the back of the headlight doors and remove the stone chips from the front. The other job was to repair the old air filter pan that I had with the car. This particular does not fit my Holley 600cfm carburetor as I suspect it was for the original two barrel Autolite that came with the car. The air pan has been beaten up, dented, rusted up a bit and generally neglected. As I am not able to use it for myself I thought I could do it u, prepare it for sale to make a little extra money, well that’s the plan anyway. The trouble was there was so much old paint that I would need to remove it all and get down to basic bare metal and fill the dents etc. I used a product called POR-Strip, this is a product to remove old paintwork from the makers of POR15. As I rate their paint very highly and thought I would try this product out. It’s great stuff and I have done a review of the product under my consumable menu and also loaded a YouTube video of it as well. It’s not like watching paint dry but rather the opposite! Anyway, the point is that nowhere does it say wear gloves on the tin, it does say avoid contact with skin and eyes and now I know why, it burns like hell. Why didn’t they say wear gloves on the tin? It just amazes me that it’s not on there or wear goggles either. I have a few photo’s here but they are just of the stripper doing its job on the paint after I knocked the dents out. I will post more on the air filter pan work as I go along in the Photo Menu – Under the Hood – Air Filter Pan.

I did have a load of great titles I could have used for this post, but as this is a family rated blog I thought better of using them. Lets just say its a paint stripper, and I will let you think of the permutations possible for it. Not that any of them crossed my mind at all. After all, I do want Santa to call don’t I?

Quick Links:

The you tube video link for the review, click on the YouTube logo   

Photo Menu – Under The Hood – Air Filter Pan click here

Share my Content

Friday The 13th

No, this post is not about a horror film psycho running about generally being a pain in the ass, but more about the horror of a hangover I had this morning! The hangover was from the team night out that was a real good evening and to be with work colleagues that I also call my friends. I had a day’s holiday owning to me which was just as well because the older I get the more light weight I seem to be getting where this hangover lark comes into the scenario. Alas my self-inflicted pain started to ease at about ten o’clock(ish) this morning. I decided to make good use of my time off by making some small but subtle changes to my humble little blog, this obviously meant that the car had a break just for today. As for the new blog? Well everything is still there and no unexpected changes for the style, layout and functionality, but I wanted to freshen the pages up a little if that makes sense. The blog should now be a little easier to read while maintaining the darker theme and background. The side bar has been tidied up with a few little tweaks made as well. If you can’t tell the difference but it somehow looks a little difference, then I think I have achieved what I set out to achieve, plus it also gives me an excuse to use this picture I found on the net which I quite liked. The changes were not just for the sake of it but it’s something that has been personally bugging me and just looked cramped for some reason. I still haven’t managed to put my finger on it as for the reason why it looked cramped but the feel of the blog just felt like it. during my search for the right theme many were trawled through, some even reminded me that the residual effects of the hang were lurking in the background when faced with gaudy and garish designs! I think I have chosen well from the WordPress themes.

I hope the new (more subtle) design is better, but please let me know if I should revert back or keep the fresher looking style.

Share my Content