With the sun making an occasional appearance towards lunchtime the show was in full swing with many cars parking up expanding the car show area. I wandered towards the main hanger where some swing music was the background throughout the day and was rather nice.
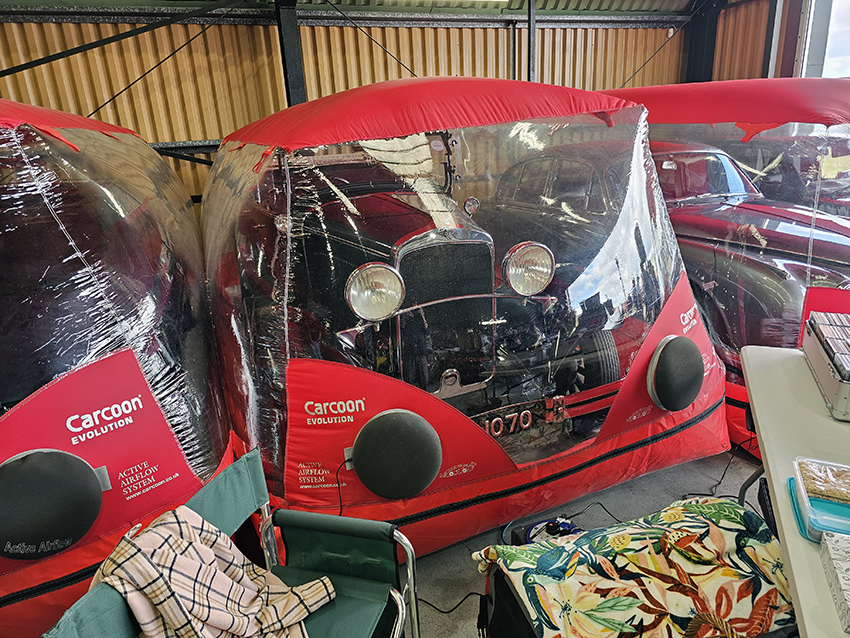
The main hanger has storage carcoons which are atmosphere controlled.
Within the hanger were some projects that could be purchased in various states of ‘project’.
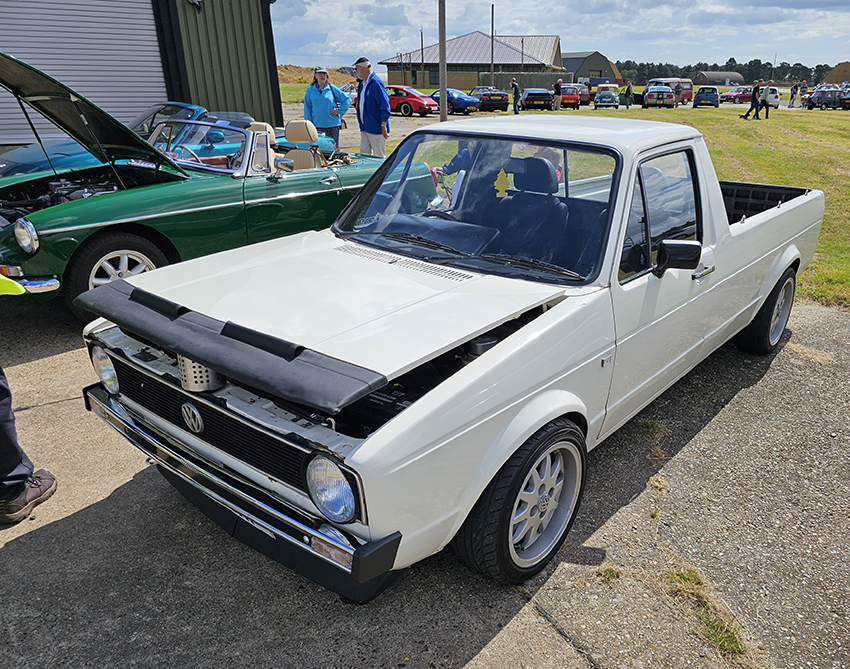
Back to the cars that were around this side of the show area.
Here I hound Marts car of the show, this really nice Lancia Fulvia.
The rest of the cars seemed to be parked up, with a couple of cars being pushed into place as they seemed to have broken down. 🙁
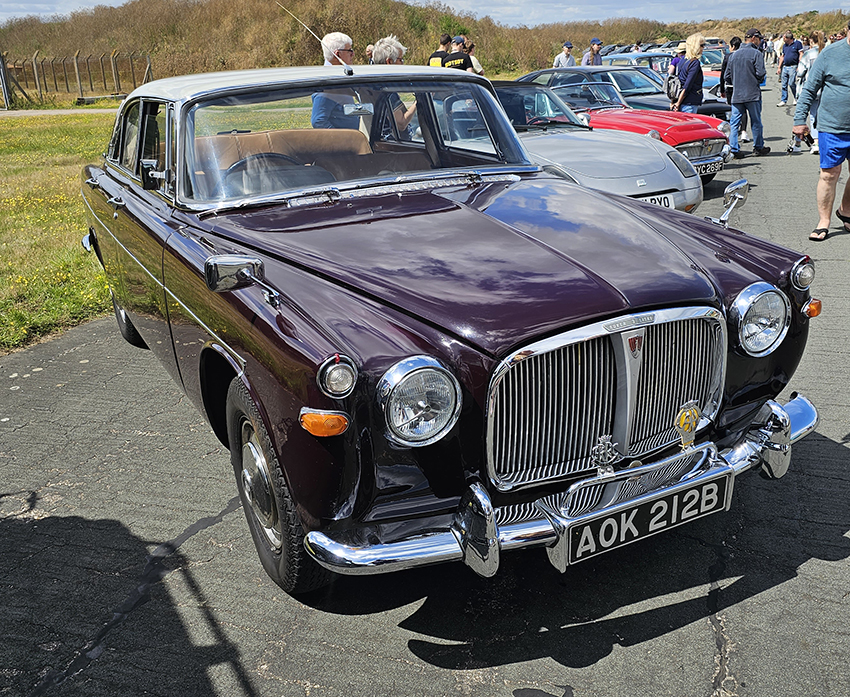
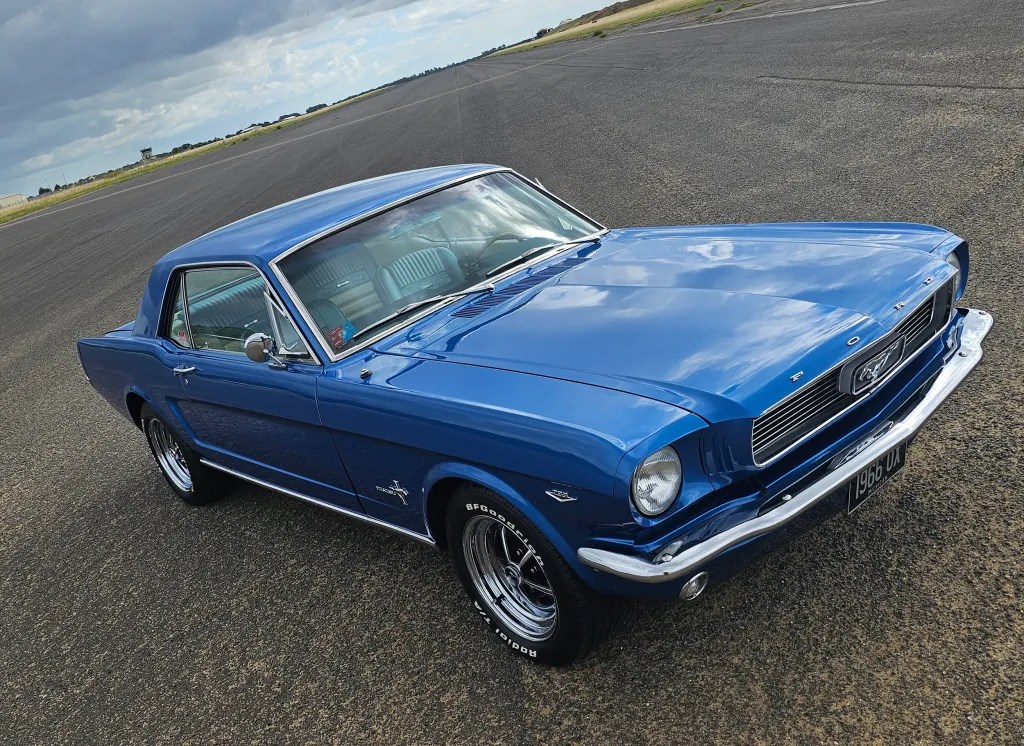
I left at around three as I spotted some dark clouds looming the car show’s way. This photo was taken by Bridge Classics. The car’s colour looks a bit teal coloured, I sort of like it!
About ten minutes after I left the dreaded spots of rain hit the windscreen, I decided to go the longer route home, but would be faster as it was all dual carriageway. The rain stopped as I headed in a Westerly direction, but when the road twisted and turned it was as if I drove back into the rain again. I started to speed up in order to outrun the rain, it was sort of working with the wind buffeting which was drying the car going along. The roads were still dry so there was no spray to deal with. It wasn’t until I was a couple of miles away from home that the rain finally caught up with me. I drove straight into the garage where I dried the car and made sure the dehumidifier was on full pelt to take the moisture out of the air. The warm engine would help keep the garage moisture levels down too. I turned it back to normal a few hours later in the evening. I had almost gotten away with it, if I had of left quarter of an hour earlier I would have maybe missed it. But, then I would have gone the scenic route home and then I would have got rained on regardless. Lets just say that my journey was rather enthusiastic on the way home and a trip to the petrol station is certainly required for the next car show, that’s all I’m saying.
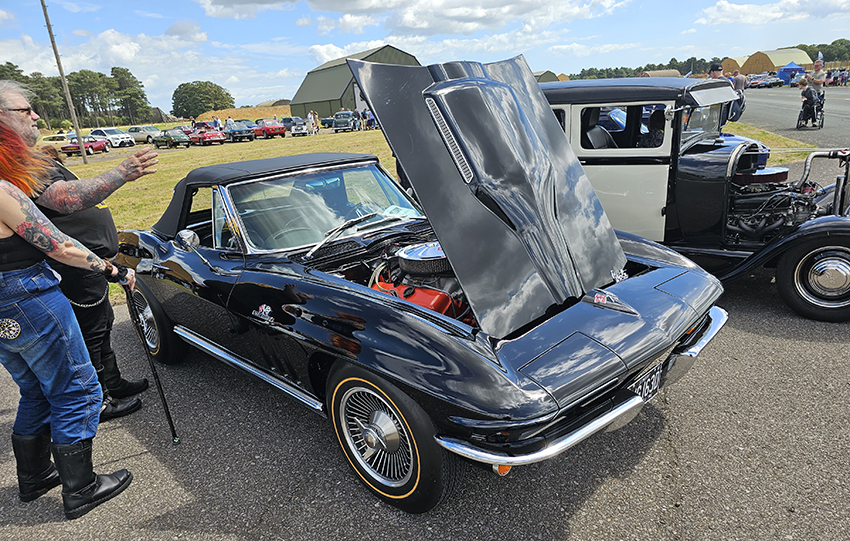
To finish up the rest of my ‘runway’ shoot!
A great show and I would go again for sure. Such a variety of cars without the pop and banging exhaust boys there. I spoke to some amazing people again and I even had an old friend from my old place of work come to say hello too.
My last post showed my ‘homework’ for a prototype part kit I was going to install on my car. I mentioned a while ago to Adam at Mustang Maniac that on longer journeys it would be nice to have a little more legroom. He said that had been asked about it some time ago as well, but there wasn’t really anything on the market. Until now that is, those discussions with Adam have been ongoing and he has had a prototype developed by his engineers. We then discussed how this was going to be done, the original plan was to do some filming of the fitting for their YouTube channel, we decided on a slightly different approach to the original plan for now. Two reasons, the first being the UK’s protest morons that have made getting fuel difficult in some parts of the UK. The second was ‘how difficult would the kit be to fit at home without professional workshop equipment?’ The challenge was accepted, fit the rails at home and share my results with Mustang Maniac while saving myself a fist full of dollars in fuel costs and time.
The seat extension runners came from Mustang Maniac. They are designed to allow an additional 2″ or 4″ movement backwards of the seat for additional legroom while still allowing the seat to adjust on the original runners. These runners are made from a heavy gauge steel with threads and cut-outs which allow for a straightforward installation. These extensions bars will fit all Mustang models from 1964 to 1968 by the way.
From my last post here the rails are dried and already painted with satin black ready for fitting.
There are four studs provided with the extension bar kit to allow the repositioned seat to be bolted back into the car without having to cut the floor pans or seat base.
Depending on your preference of course, you could respray these bars to match your interior as they will be a little more visible from outside as the seat will sit further back on the seat base, but not noticeably so. Satin black is always a good starting point and goes with pretty much everything.
Removing the seat.
Under the car there are four rubber grommets (or should be four) in place where the seat rail studs come through the seat base.
Remove the rubber grommets and inspet the inside. If all is good the studs won’t be correded up and will be easy to remove. If the rubber grommets are missing, or there is corrosion on the studs, then you may need to spray a some WD40 (or similar) to help loosen them up and remove. Make sure to use a good quality socket, if you round the fasterners off then you are in for a whole heap of hurt.
Tip:
Fold the back of the chair forward to the seat base as if you were getting out of the back seats. This helps to balance the weight of the seat and allows the fasteners to be removed without the chair tipping back making removal difficult or even bending a seat stud.
Use a deep reach socket to undo the fasteners.
With all four fasteners removed the seat should lift directly upwards out of the car. Notice in the left-hand pic that the seat falls naturally to the rear. Keep the fasteners safe as they will be used again to refit the seat back into place.
With the seat out, now would be a good time to inspect the seat runners and clean the runners up if needed. Apply a little grease to keep the free movement.
Fitting The Extenders
The bars have to be fitted to their correct left or right hand sides and the right way up. Looking at the seat from below the right hand side has the seat movement handle and a extending bracket. This side will need the cut out sectioned runner to be fitted, as the pics below. You can either attach the studs at this point or later the choice is yours. I prefer to do it later so nothing got in the way.
You will notice that there are holes, recessed holes and threaded holes. The standard holes are to allow flush fitting of the bars to the seat rails where the rivets are. The recessed holes allow for the original seat studs to be held flush to the bar. The threaded holes are for the studs position where you want the actual length of the extension to be.
Below shows the third hole down which is recessed and where the original seat stud(s) will go through.
The top hole is the 4″ extention the second one down is the 2″ extension shown in Red.
Yellow shows the location for the seat rail rivets.
Teal colour shows the seat stud holes.
From the position above turn the bar over to fit onto the seat rail flush. Fit the rail over the original seat studs and use some nuts of the correct thread on the seat studs and tighten the bars firmly into place.
You will now need to cut the original seat rail studs flush with the top of the nut. This has to be done in order to fit the seat back into the car and be bolted back into place. Before you do any cutting, make sure that the seat can still freely move with the seat adjustment handle with the extension bars bolted in place.
You can either mark the studs for cutting and remove the fasteners and bars away from the seat, or do it with the bars still bolted in place which is easier to be honest. I used a Dremel and a thin cut off wheel. Take your time and use goggles in case the cut-off wheel breaks or sparks fly. Going old school with a hacksaw will work just as well. You can see my Dremel in the right-hand picture bottom corner. I also got pretty OCD about it and ground the studs perfectly flush with the fastener.
Fitting The Studs
These new studs have a collar a quarter of the way down. The shorter thread screws are fitted into the extension bars, the longer thread will be going back through the seat base using the original holes.
I painted the top of my studs to match the bars so they were less visible from the outside, just because I could.
You will need a locking pair of grips to screw these replacement studs into place tightly, or a strong hand grip an pliers. I also used a little thread locker to keep them in place. The left-hand picture shows the correct stud fitting.
As I said earlier, if you want the full 4″ extension use the top threaded holes, for the smaller 2″ extension use the second hole down. Fit the second stud at the bottom of the rail extension use the threaded hole just above the larger hole (for the rivet) for the 4″ extension, and the 2″ threaded hole is below the larger hole. See the marked up image earlier on the page. If you are in any doubt measure the original seat stud gap and apply the same gap to the 4″ or the 2″ stud holes.
Refitting The Seat
Take the seat back to the car and drop the studs through the original holes in the seat base and carpet holes. From there screw on the fasteners from underneath the car to hold the seat in place. Refit the carpet spacers and then tighten up the seat properly.
Replace the rubber grommets and the job is done. I sat back in the car and was amazed at the difference that the extra few inches of leg room gives you. For a 6’4″ bloke like me I was always a little crunched up on leg room, that little bit extra makes it so much nicer to drive. Also as the seat base actually slopes down towards the back of the car, in effect I have also gained a little more headroom too. Win/win all round then. 🙂
The fitting was straight forward and I reported my work back to Adam with the photo’s. He has now decided to go into production with the current design. Their measurements were spot on so no need to make any modifications. I suspect they will be on the Mustang Maniac WebShop Soon, along with some of the photos and description of the fitting.
The second part of the my little upgrades I promised was the hood springs. There was nothing wrong with them at all, except that Adam showed me a set he has just fitted to the project car they have in a workshop. I see them, I wanted them it was a simeple as that. Not the cheapest replacement part just for looks, but why not? These springs are super strong and will have the Devil’s bite on you or the car if you get it wrong when replacing them. I packed an old duvet cover around the hood springs and levered of the springs carefully and under control with a large screwdriver come crowbar. They were replaced in a matter of seconds. I was so worried about the springs pinging off and damaging the paint or parts under the car, or flying up and removing part of my jaw that I forgot to take pictures. I do have the before and after pics for you. Most people wont even notice the change and think they are stock parts, but I think they just add a little bit of something extra to look at.
Right hand side:
Left hand side:
The last part of the day’s work was the annual oil and filter change. I tend to do around two thousand miles a year at most. But, I would rather pay £35 for fresh oil just to be on the safe side each year. The K&N gold oil filters I use are a bit bigger than the standard Ford oil filters, which means that I have to put in more oil in than the standard recommend five US quarts to get the levels right.
Now I’m all set for the car show season, apart from a quick wax and once over that is! Lets hope the weather stays fine for the shows. I will let you know as the season goes on.
Eight and a half years ago, way back on October 28th 2012 I wrote my first post on my little ol’ blog. I had nothing planned other than to share with a few friends what I was getting up to and how I was getting along with my Mustang restoration. Ultimately I could look back in a few years time and take a trip down memory lane with the photos I had taken a certain points of the restoration.
Delivery of my project car 17th September 2011, before it went to Mustang Maniac where I had professional help & guidance on my restoration over the years. Those guys have become some of my best mates of mine as a result.
When I attend car shows or via my blog and emails etc. I often get asked how I clean and detail my cars;
Some of the Car Shows and photo opportunities;
I get asked how I fitted things, how I upgraded this or that, I even get asked for advice on their own restoration projects.
That got me to thinking about adding extra sections like the tools (a selection of them here), that I used on project and since use, considering that I’m just a weekend warrior with a spanner.
Products that I used to keep our daily cars clean and the Mustang fully detailed.
My merchandise I bought over the years or have been given since I started my journey with the Mustang.
I even get requests to review items, all of which I buy if I think I could use them myself. As a result of all these things, my blog has evolved into an entity of it’s own.
Fast forward a number of years to 2021 where I my little ol’ blog has reached a massive milestone. This is not intended as some bragging rights by the way, but more like myself being proud of the result. Somebody within the USA this morning 15th May 2021 made my day:
My blog has just passed 1,000,000 hits!
I am absolutely amazed to think this could ever happen, I remember getting excited about getting ten hits in one day!
I value every single one of you that has followed me or just pops in for a quick read, like or even the odd comment. I would like to say a massive “Thank You” from the very bottom of my heart.
I don’t actually get anything from my blog/website on WordPress, other than some add money that goes straight to the hosting and my domain fees. It’s sort of self sufficient in a way. If anything I’m out of pocket, but reading the comments and seeing the views more than make up for it. Hopefully I can help somebody, somewhere with something.
My first follower was Debbie Nuessle (click here for her latest venture), from across the pond. We both started blogs within a few days of each other, both revolving around our love of American Muscle cars, especially Ford Mustangs of course. We keep in touch outside of the Blog circle and have become good friends.
I have a number of followers who ‘like’ the posts I put up after even after all these years, thank you all, it means a lot to me. I have such a range of followers; a very talented and well-known Soprano opera singer; Charlotte Hoather (click here for her blog), mechanics, engineers, oil rig mover, artists, photographers, builders, wildlife photographers, fellow classic car owners, writers, product manufacturers, shops, brands, a few younger bloggers, students, world travellers, petrol heads, gear heads, car clubs, writers, novelists, journalists, teachers, photojournalists, professional bloggers, social influencers, religious followers, the list just goes on. (There is even ‘ahem’ some adult orientated content following me!) The full list makes for some amazing reading.
Just in case anybody is interested in some of the more selective stats;
I have a total of 2,700 followers, of which 871 are on WordPress, 2,300 on social media, just over 2000 on Facebook, which is not my favourite of all the platforms I must admit.
I have been visited by 199 countries and the top ten countries in order are; USA, UK, Canada, Australia, Germany, China, France, Netherlands, Finland and New Zealand.
There are stunning islands that have visited me, Mauritius, Seychelles & Maldives. Some of those Islands are so small they wouldn’t be able to fit a Mustang on them! My bucket list is to spend a few days on these islands to chill and take in some sun.
The more obscure countries with a single visit are: Burkina Faso, Falkland Islands, Kosovo, Tonga, Northern Mariana Islands.
To date I have posted 340 blogs including this one over the eight and half years I have been posting on this blog.
These figures are quite low compared to some of you mega stars out, there with you super popular blogs I know that. But for me, like I said earlier, I’m honestly humbled and grateful to every single one of you who wants to look at a blog all about one man and his Mustang!
I started driving and passed my driving test at the tender age of 17. On that day when I returned home my dad gave me a car which was worth nothing to be honest at the time. The car was a 1977 Audi 100 LS a similar colour to this in red, faded red, orange and various shades of rust and sun bleaching.
His logic was that it had big bumpers and stop minor accidents. The car was also due an MOT and road tax, he wasn’t stupid. As an apprentice in my first year at the time it cost me a few weeks wages for some welding and a number of parts including an exhaust to get it through. It would have been cheaper to buy a newer car of my own in fact. The head gasket went six months later and it was then towed to a scrap yard! The ol’ man had his second car a Mercedes that he used from there on in. I then bought another Audi, a 100 5E Avant this time.
Anyway the same day he dumped sorry gave me the car he also gave me a Krooklok which was my mother’s father’s. My grandad gave it to my ol’ man when he stopped driving due to illness. He said I was to have it one day when I started driving as I was there when he gave it to him. Luckily he kept my Grandad’s wishes and he gave it to me.
My maternal grandparents had nothing. They rented all their lives, lived in a flat in Battersea, London. The flat was a stones throw from Battersea park. I spent many treasured school holidays living with them, I loved it there and them. I remember going out with them as a young kid with my Grandad driving his Ford Anglia and then his Ford Cortina, he would park it up and use the Krooklok as well. Grandad was a Ford man through and through.
I kept that Krooklok and treasured it in all my cars except the last two as I lost the key when I moved house and couldn’t use it, I was gutted. But, I kept it safe as it is pretty much the only thing I have of my grandparents. I hoped that I would find the key one day.
I was speaking to Adam at Mustang Maniac who told me to give it to him as he knew a locksmith who would make a key for it. Sure enough, a few weeks later I had the lock back and now it was working. The plan now was to put it back in the Mustang as it was from the same year, almost. So I thought I would post about my restoration of the lock and little history of the company, “Krooklok”.
I have tried to find as much information on the brand and the company as I could, some of which may be subjective based on the tiniest pieces of information from the internet. (I would be delighted if somebody could give me some more accurate details and I will acknowledge your corrections.)
“Krooklok” is the brand name and originally made by a company Johnson and Starley Ltd. who were based in Northampton, UK. There is virtually nothing online about the company or who owned it. I have tried to find out with little success, a company of the same name in the same area is now a heating supplies company.
In 1964 the company designed a lock that was in effect a telescopic bar with a hook at each end that was linked around the steering wheel and the other end hooked either round the brake or clutch pedal. In the centre of the bar was a locking barrel that locked a sprung loaded ball bearing into a recessed top part of the bar. With the key locked design the telescopic mechanism couldn’t be extended to release from the steering wheel. This was a visual deterant to stop thieves driving of with the car. The design would stop the pedals from being depressed or turning the steering wheel. The thief would have to remove the lock before attempting to drive off, potentially exposing themselves to what they were doing. Let’s face it, security in the 60’s wasn’t great and these Krookloks exploded onto the market. This was not a little company release but advertising at top sporting events mostly car oriented, Formula 1, rallies and amateur classes of motorsport.
Advertising was quite widespread and appeared in many magazines and a number of football programs. The earliest advert I could find was from 1965 from the Halfords catalogue.
The cost was fairly hefty 47 shillings and 6 pence. That worked out at roughly £2.37 at the time. In todays money that is around £37.50 in modern day money allowing for inflation over the fifty odd years. The price wasn’t exactly at the cheap end of the market but was a substantial lump of metal to have in the car.
A selection of more adverts from the early days in the mid 1960s to the early 1970s just after UK currency decimalisation in 1971 where the prices show the new money GBP.
In 1968 it looks like Krooklok ventured across the pond to the USA and applied for and was granted a Patent for the “Krooklok”.
For the UK I cant find an actual date that they were stamped on the locks, but it looks to have been granted around 1965 or 1966 at the latest. On the back of the barrel section is the trademark and the patent numbers. The registered design for Krooklok is 914608.
On the left is my own personal Krooklok which was made before the patents were issued, making this a very early and rare example. On the right is a slightly later dated Krooklok with the granted patents applied.
Over the years the design changed. The first itteration was a metal bar with a vinyl sleeve at the lock end in order to stop the metal hook marking the steering wheel. This sleeve was a nondescript grey colour and not really visible when fitted. Again a picture of my own restored lock with the original grey sleeve.
From outside the vehicle the “visible deterrent” wasn’t very visible especially at night. After the feedback was noted Krooklok introduced a new improved bright red sleeve that replaced the grey.
Moving on around a couple of years, the red vinyl sleeve was added at the opposite end of the lock for the pedals. This was to give more visibility and to protect the cosmetics of pedals. Early models came with plastic sleeve packaging, later models came with cardboard boxes.
Much later variations replaced the the nice chrome lock tower with a matching red middle section. The design also took a distinctive “twist” (literally) and the “hooks” changed from the facing each other on the same plane, now they were being set at right angles. This was intended to make fitting easier and stop the twisting of the original design to make it fit. This twist was down to the fact that as safety improved on vehicles the pedal design and steering wheels made some fitting to some vehicles a little more awkward.
My Krooklok on the top with the polished chrome lock tower, and the latest design at the bottom. The red locking section didn’t last long and was replaced with a contrasting yellow locking section, but this was just a cosmetic change. The steering wheel end has also seen a further modification to add plastic wings at the side hook to make it even more visible.
The pedal end was simply double indented or punched both parts together on one side and not the other. As the material construction is hardened steel this seems to be adequate but not ideal. This design hasn’t changed over the years and was hidden with the later pedal sleeve cover mentioned above.
The locking design was quite ingenious with a simple spring loaded ball bearing. The ball bearing is then locked into one of a number milled recesses that matched the diameter of the ball bearing. My lock before and after the cleaning to remove 50 years of grime.
Sliding the center section out to allow for a generous length of adjustment makes a very solid clatter as the bearing lifts and is sprung back into the next hole. The unit feels very strong and sturdy once fitted.
As the krooklok became more popular a couple of years later the advertising was added to the car window which stated that the vehicle was protected by “Krooklok”. The design saw a few variations of a the window sticker design, size and colours that warned potential thieves of the fitted Krooklok. The design started with a simple red warning design to more eye catching multi colour designs.
As time marched on Krooklok made other products, like locking wheel nuts, wheel clamps & tow bar clamps.
The Krooklock success still continues today with other companies making similar designs with similar sounding names to jump on the band wagon. Companies like, Stoplock, Disklok, Autolok, Xlock etc. The designs vary from pedal to steering wheel locks, to the more common bar through the steering wheel design.
After all the years the “Krooklok” still remains a strong brand name that started and set the standards of third party vehicle security.
Click here for a link to my own Krooklok that I restored for my own vehicle. The best part is that this particular model is period correct for my ’66 Mustang.
The Restoration
This Krooklok is 55 years old being made in 1965 from what I can work out. It had never been cleaned in all that time and needed some serious pampering to get back to its original condition. The state of the lock was rusted and the extension was very stiff and not free running. The rust was so bad on the back I couldn’t see any marking and wondered if it was an original Krooklok. The original coating was a dull steel colour but that had been replaced by rust and oxidisation.
The first thing I decided to do was to apply a little metal polish to see what happened.
Some serious rubbing and multiple applications removed some of the grime, enough to show me the marking on the back of the chrome locking tower. But, it wasn’t man enough to remove the pitting. I got out the Dremel and attached a nylon buffing pad to the base of the locking tower which removed plenty more before it eventually disappeared to nothing. When I saw the markings were there and the “Pats Pending” I realised this was a rare early model.
I started to buff the rest of the shaft and although it came up better it still wasn’t good enough.
I now started to move up the aggressive scale until I found something that was just enough to do the job back to bare metal. This is usually the wrong way round of course as you start aggressive and then work back to finer grades to remove the previous marks. I settled on a light buff of 180grit sand paper to take the worst of grime and rusting off, then followed with 240grit.
I could see that the steel would buff to a really nice shine. Although this wasn’t original I kept going. Starting with the Dremel 240grit sand paper discs which are very fine and took ages to go over the whole thing, using only the lightest pressure as the discs were much smaller and delicate. I then used 320grit to 400grit by hand to finish the look.
Once the sanding had finished it was back again to metal polish and the Dremel felt buffing pads which would flick the polish everywhere when I used too much.
The Metal bar both inside and outside started to polish up like the chrome and looked great. I had to keep working the notches with the Dremel and a small pointed buffing pad to clean them out.
A number of passes would bring the steel almost to a mirror finish. Which pleased me and saddened me at the same time. The cleaning also took the patina away from the lock and it’s age. Due to the rusting and pitting there wasn’t much choice. The item will never be worth a lot of money so it’s not as though I ruined it. As the inside of my Mustang has a lot of chrome brightwork inside it wouldn’t look out of place, but would even compliment it.
The steering wheel end sleeve was very dirty, I allowed a citrus cleaner to soak a rag in order to loosen a lot of the grime off. This was done by wrapping the damp citrus soaked cloth around the hook. Once that was wiped of after a few minutes the heavy duty cleaners were applied and the handle came back to its almost original colour. The chrome locking tower only needed a little metal polish to bring that back to its former glory.
The completed item gets more buffing and an application of wax to prevent the atmosphere tarnishing the metal again.
The only thing left to do was lubricate the mechanism, a thin application of light oil to the sides and drop into the first few holes. I worked the lock in and out a few times and some dirty oil ran out. I cleaned the lock up again and repeated until the oil was clean. Now the extension moves in and out smoothly. The lock remained free and little squirt of Gibbs in the lock for the tumbles allowed the key to slide in effortlessly, turn and remove just like a good lock should do.
In total it took me around 4 hours to clean and buff to a shine. I am well delighted with the lock.
The lock will now be with me in my Mustang at car shows. I can now think how proud my Grandad would have been to see my restored Mustang and his Krooklok sitting in it looking all sparkly and shiny.
After all, I’m now Classic Ford man through and through with my Grandad’s blessing.
Weekend just gone I attended the Stowmarket Carnival which was held over two days with a classic car section on Sunday. The general public was let in from eleven onwards, but the cars had to be in before nine thirty, although they were still being let in at ten thirty. So, I decided to take my photos sooner than later without too many people around, and before more cars arrived. A nice mix of cars and some top quality restorations on show. It was one of the first days this year I could get my show board out without the wind and rain because the sun was out all day, I even had to apply sun cream, twice! There were stalls, a dog shows, live singing, and a fun fair too.
I follow on Instagram a group of ladies called ‘_modifiedgirls’ and they also have a website called ‘https://modifiedgirls.co.uk/’ I mentioned this because I see a FTO being lovingly cleaned by a couple of ladies. Without trying to appear anything other than a genuine car fan I got talking to Tara Ashton who confirmed that she was a member of the Modified Girls scene. We had a chat about cars and I have to say that these ladies do know their stuff. I also think it’s fantastic to see members of the fairer sex enjoying the car show scene along with the guys. Here is her FTO she rocked up in to the show. I said I would give her a shout out on my blog, consider it done.
This Mk1 Ford Escort GT was a preproduction model and was used by the media to review the car. A nice example with some serious provenance.
There was mixture of a few hot rods, kit cars, more modern cars and some restorations to wonderful standards. Did you know the Fiat 500 number was the engine size in CCs? That’s 500 cc’s or half a litre, for our US friends that’s 30.5Ci Abarth gave the engine a stage 1 modification up to 595cc (36.3Ci) which made 31bhp.
Triumph models were varied, Stag, TR6, Dolomite, Spitfire. I almost bought a Stag when I was looking for a classic car, but when I saw the Mustang, my mind was made up. But I still like the look of those stags. 🙂
Some of the other cars that took my attention, I didn’t bother with the Nissan Skylines, as for the Golf GTI’s, Jags, Vauxhall Corsa etc, I could have gone down the road to the Asda car park and seen as many as I wanted. Is that a harsh thing to say?
From the heading I mentioned wings as well as the wheels. The Saturday they had a fly by of a Spitfire (the classic WW2 plane – not the car being propelled through the air). On Sunday we were treated to a WW2 Lancaster Bomber. If I had of known I would have taken a proper camera not just a cell phone. But I tried my best to capture this incredible plane that did three low(ish) fly overs.
I turned this into a black and white picture, I think it works better than the colour pics. I took a video of he final fly over, the trouble is you just get to hear the fabulous noise.
I took this video of the last fly over, the trouble is that the video didn’t pick up the incredible sound the plane made. 🙁
To finish the post I must be going soft in the head or getting sentimental in my old age. I had a guy Andrew who loved my car and was looking all over it. He made a good presentation to me on why he should sit in my car. I let him sit in it after emptying his pockets of keys etc. so as to not to damage the upholstery, I even took a picture of him in my car, just because I said I would. Consider that done as well.
It was a hot day, but I’m not complaining about the weather for a change. 😀 I spoke to lots of people and had a great day. More of the same next time I hope.
My last post was all about how my replica Autolite battery had dies a very sudden death without warning. I managed to recreate the battery with a top cover from Mustang Maniac and battery from Toyota of all people. That page can be found here. I promised that I would take the old one apart to see just what was inside. The project took me a lot longer than I thought it would and you will see why as I go along.
The old battery case I wanted to keep, and possibly place a similar battery inside it at a later date maybe? So the work was going to be slow and careful so I didn’t destroy the case. As I knew there was another battery in there I wasn’t sure what to expect either. So the battery was taken into the shed for a plan of action.
When you undo the cell caps on this replica it’s quite obvious that there is a smaller battery in there and a large cavity at one end. By deduction that would mean that the terminals for the inner battery would be connected to the to top posts via cables.
down the holes
other side holes
I could see that the top was fitted originally there was a gap at the back corner where it hadn’t seated correctly, from the left corner of the pic below. So that was going to be my starting point.
side (top left of the picture shows the slightly raised corner)
The Dremel was out and a cutting disk will be used to go around the seam.
The dust from the battery was incredible. The closest I can put this to is a laser printer black toner cartridge powder. Rub it and it stains what it touches. Just the back cut had created a black cloud and difficult to breathe.
So the face mask when on and ventilation made better. The battery was turned over in turn for each side that needed the cuts. Some parts needed to be cut a little deeper as the mould on the inside hadn’t been cut through completely.
Once I had freed the lid I could see one wire that was holding it in place. That wire would have to be cut, then I could get to the other side which was tucked into the corner.
This corner cable was difficult as the battery was holding the cable tight against the case. I think during assembly the gel battery was attached to the lid and then lowered into a resin that held the battery in place and set hard to hold it in place. There would be no other explanation from what I could see.
The resin at the bottom had set like hard plastic and couldn’t be pulled or peeled out-of-the-way. This was a problem as I couldn’t see any other option only to cut the bottom out as well. I managed to bend the cable to the lid out the way to make the cut to remove the top completely. Now I could turn the battery upside down and cut the bottom out. Now I had to be extra careful so that I didn’t cut through the inner battery causing untold problems I wasn’t prepared for. I had lots of old towels to hand and thick gloves at this point to mop up any spillage.
With the bottom of the case cut through the battery was still not coming out. Closer inspection down the side I could see the resin had gone up the side of the battery too, yet another issue. I had various steel pallet knives that I use for filling in holes on walls with plaster etc. The plan now would mean gentle taps to try to crack the resin away without cracking the case itself. I did manage to keep breaking the thin blade to a jagged edge. This actually helped to cut through the resin, like a saw tooth. Those gentle taps turned into more force as I realised I was not getting through the resin.
After what seemed like hours the battery started to loosen and cracks could be heard when the resin was starting to separate from the case and the bottom panel with the battery still attached. Eventually it all came free and I could see why I had such a problem.
Now I had an “L” shape to separate from the battery itself if I wanted to keep the bottom, which I did. The same process would need to be applied again, tap into the narrow space between the battery and the bottom of the case. This stage took a lot longer than taking the bottom out due to the significantly more resin in place. After a lot of hammering and two palate knives later it was all apart and looking a mess.
The final stage was to put it all back together again. The inside was cleaned up to remove any dust and debris to make a clean surface for the jointing glue. I used a sheet of plastic under the battery and placed the bonding glue in the gaps around the base and the inside of the case. The plastic would peel of no problem and leave a gap that was filled with a black mastic again.
The top was cleaned up and the cables cut flush. If I wanted to fit a cable back in there I would have to use a tap and die set to create the anchor points.
inside sealed
The top was held in place with a tiny bead of silicon so that I could remove it if I needed to, but wouldn’t fall of if handled. Now that the uneven top had been cut flush, the battery top was now sitting flat on the bottom case, just how it should have been.
So what was inside? I have no idea what the battery was after all that. apart from the fact it was a gel battery with the following sticker details. Google hasn’t given me any more.
Can anybody else help me out with it? I think it was a golf cart type battery, but I could be wrong!
Related pages are the original battery review clickhereor cut and paste this link:
So the question is now, was it worth it? The answer for me is yes. My inquisitive mind wanted to know what was in there.
I now have a very lightweight antique car battery that is nicely cleaned up and sitting on a wooden shelf in the garage. It just looks so wrong that it shouldn’t be there! The amount of effort to get it all part is not really worth it, perhaps a battery in the middle and not stuck to the side of the case would be much easier. But, thinking of the safety aspect with the battery sliding about, that wouldn’t have been good at all.
A while ago I was traveling back from a car show in the dark and needed my lights. Although it was a quick trip home I realised just how awful the dash lights are in these early Mustangs. I have seen at SEMA last year all sorts of digital dashs and they looked amazing, but they came away from the classic look that I was trying to retain. So I had a word with Adam at Mustang Maniac who showed me the various options and what to expect. I settled for an illumination pack of four LED’s that will make a huge difference so I was told. The difficult part was deciding on what colour to go for. They even make a set of bulbs that matched the original colour scheme that would have come from the factory, with the fresh bulbs and the fresh filters! So I picked my blue bulbs (of course) and couldn’t wait to get started. Saturday was a lovely day and I decided that would be an ideal time to do the job, unfortunately I promised the wife I would help her with a couple of jobs, but that had to be postponed until Sunday now. She didn’t look to impressed when I said I had to do it when the sun was out, or the car would get wet! More making up I have to do now.
I have created a full walk through guide herebut I will outline what I done, or you can cut & Paste this to your browser:
Before we get going, it was an idea to get the before picture.
Here is a comparison of the bulbs side by side which both have the standard 1895 fittings. The LED bulb has five lenses, a large one on top and four around the sides to spread the light evenly, a clever piece of engineering for a bulb.
If you wanted to buy a set click here for the link.
I decided that I was going to do it properly by removing the dash and the internal bulb filters. The process to swap the bulbs is fairly simple, but fiddly at the best of times. You will need to remove the gauges and take the unit apart to do it properly. After disconnecting the battery I covered the steering column with a fleece cloth to avoid the damage to the paint and also to protect the possibility of the brittle gauge cover being cracked if you drop it.
The whole cluster is held in place by six screws, four at the top and two at the bottom either side of the steering column that I have arrowed some of them here.
With all the screws out you can pull forward the cluster to expose the back. Behind the cluster there is the speedo cable screwed to the back of the speedo gauge itself, and a mass of wires. As I have big hands this is not the easiest of tasks to be dexterous and unscrew the speedo cable. But as my car is a recent restoration mine could be undone with fingers. There isn’t much room to work behind here, so when I was putting the car back together again with the new wire loom from American Autowire, I created an additional quick disconnect plug, just in case I needed to remove the dash for some reason in the future, this is a good example why. Here you can see the disconnect plug and the speedo fitting.
I took my cluster from the car to the work area and laid it on a towel to protect the finish of the face.
With the two sections apart this will expose the gauges and the coloured filters for the bulbs. The replacement bulb filters were held in place by a stud and a screw as I had replaced these at the time of assembly.
With the filters out of the way you can see all of the bulbs. You can at this point twist the old bulbs out and replace with the LED’s, or remove the sprung loaded bulb holders out of their holes from the rear.
It’s worth a few pictures of the bulbs up close, and you buy a full pack of seven bulbs which included the indicator bulbs and the high beam. For me these are fine with the tungsten fittings to be fair.
The new LED’s are the same fitting as the old bulbs and are a simple press in and twist replacement, like for like.
After I refitted the cluster together again I took it back to the car and reconnected the wires. Now is the most difficult part to refit the speedo cable, not only did I have blue bulbs now, but the air inside of the car was turning very blue too. This is a tricky part of the job and has to be aligned dead straight to start the thread of with.,To make matters worse you can’t see behind it unless you have a mirror so it’s all done by feel. With everything now connect up I could screw the dash back into position. Reconnect the battery and voila! Job Done.
In total it took me about an hour and a half to complete and I am so happy with the results. Here is the side by side comparison.
Now I can’t wait to drive her in the dark. This is such a worthwhile simple upgrade job that makes a huge difference, not just for safety but also for keeping an eye on the gauges for any potential problems. I honestly recommend this upgrade. Next weekend is my local car show and I am looking forward to that, so there will be an update from me on that, providing it don’t rain and I can get in this time without having to wait for two hours!
Oh, it’s also Fathers Day in the UK on the 18th June, I hope my two little guys (the dogs) treat me to something nice, hint hint!
I have had some emails saying why don’t I do a before and after photo set of the restoration? Then I got to thinking as to why I hadn’t up till now. There was no reason, so this post may be cheating a little as there is nothing new here. But what is new is the fact they have never been compared side by side before. As I didn’t start my blog until a year after I bought the car, some of the earliest pictures don’t exist as such, during that time I had re-wired the car for the first time, managed to fire the car up, got the locks working (sort of), painted the trunk section and interior floor pans. Obviously if I had of known I would be doing a blog at that time, I would have documented it all much better than I have done. However my early work was re-done once the car had got to Mustang Maniac. Under their supervision and help it would be done “Properly” as Adam told me. So in effect you are indeed seeing the restoration from scratch, all be it not as bad as it was. I suspect that I would be playing catch up to keep on top of the car all the time to keep it looking good, especially with the original route I was going to take, ie; the amateur way.
Body Work:
Rebuilt Back End:
left quarter
no lights and fuel tank out.
Underside:
This was the old underseal, dirt and what ever else was squirted on there. Welded, ground down, filled, sanded down, painted with red oxide and painted with proper underseal and satin black paint.
from inside the trunk
Doors, Roof and Sides:
new door
right quarter
rear glass removed
daunting start
Rebuilt Front End:
battery tray plate
new door
Interior:
Inside was originally treated with POR15 for rust protection. This was later removed and proper sealant applied at paint and then primer and top coats. The last step was the Dynamat sound proofing, before the carpet that is.
left different angle
Rear back
left side with prep sprayed
Engine:
The story here was that I wanted to go sort of modern with the silicone look. As I knew I wanted a blue look to the car I went for the blue silicone and the blue spark plug leads. I went of the idea and eventually swapped them for the revised black and chrome look. The spark plug leads were changed at the last month as was the valve covers. The cable routing went through a number of variations until I was happy with it at that point. Rewire of the car was the first job as I had to see if the engine started, which it did on the second turn of the key after twelve years of standing years. Pretty impressive.
Brake booster in location at the very back right hand corner
prep for intake removal
Transmission:
unable to even see the grease nipples.
box end
Steering and Suspension:
finger tight fittings
steering box end of column
old shock right side
right
Brakes:
Even the brakes look as good as the outside of the car. The front drum brakes were replaced with disc brake conversion for stopping power and safety. The brake servo was original from the factory but was upgraded to dual system, again for safety.
Drum before treatment
Black caliper
drive shaft removed with back plate in place
brake set and inner gasket on (awaiting additional sprng for the seperator bar under the cylinder
Booster surface rust
Electrical:
All electrics have been replaced and the bulbs converted to LED where I can.
Original burnt out wire loom
lens and bulb out
LEDs located on the housing
Glass and Bright Work Trim:
rubber seal cut away and left on mastic
frame in place
frame Insides cleaned
right inside before clean
right inside cleaned
Original state
Paint Process:
There are hundreds of photos I could add here but I have kept it to the more key stages of the process.
Transportation:
These were some interesting shots of the car coming and going to different places.
ramp up
Driving Her:
Special Thanks:
I have mentioned this before, but none of this would have been possible without the help and moral support from Mustang Maniac and their associates; Adam, Al (Yogi), Paul (Lob Monster), Chris (Careful), John, Paul (the paint), Lance (OCD from Marketing). I have learned so much from them all, above all I have gained some great friends who have all helped me realise a life’s ambition and dream come true.
This weekend was the last weekend at Mustang Maniac before the Birmingham NEC Classic Car Show. There was lots of tiny little jobs to do and tweak but priorities have to be played. Yogi was getting parts ordered up for me that I would need to fit the cards so I could get them from the stores. On my return I was given my instructions on how to fit them. The door cards cover the inner workings of the door and finish the interior, they are a notorious pain in the butt to fit and look good. Although my interior is a Pony spec I didn’t like the Pony door cards. So Adam ordered mine up as a special order for what I wanted. Hopefully just something very subtle different to the standard ones you see out there. The cards a dry fitted to the door to see where the mechanisms need to come through. This was fairly simple as I just got a little dirty dust and put it on the tops of the mechanism. This left a mark on the white underside so I knew exactly where to punch the holes out. John came up trumps with a set of punches to cut the holes, that way the holes are clean and shouldn’t run. The little clips on the back of these door cards slot into cut outs in the card itself, and the metal legs press into the metal of the door frame. Simple so it sounds, but the reality is every clip (around thirty in total) has to be aligned to the holes and pressed in until it snaps into place. Press in the wrong place and may damage the cards. There is a wax sheet that is held in place same principle as the rear quarters were. On top of that was two springs, these keep the door car pressed against the door handles to avoid any bow or sag in the card. The handles for the door opening and the window winders are a single screw secure. The arm rest comes in two parts; the chrome base and the coloured arm pad on top of that which in turn is held in place with two screws underneath.
The cards in place.
At his point Paul who originally sprayed my car came back to “Mop” the paint work, “Glaze” it and then a final “Wax”. This was a professional detail going on here now and was being made to look her best for the show. The rubber parts were masked over as was the vent to avoid any debris going down there.
The process was the roof, trunk, hood, then the sides. The was repeated for the glaze and the waxing.
After each process had been done I just stood there in disbelief looking at how good it was. Paul took great delight in telling me “Don’t worry, it will get better”. OMG was he right. the depth of gloss on this car staggering. Paul said he doesn’t often get to shine them up after he has painted them as the customer takes them away and that’s it. So after one year Paul is back finishing his beautiful work of art he has created for me.
Glaze going on.
Then the last step was the wax to be hand applied and ;eft for twenty minutes and hand buffed off.
I can’t begin to tell you just how delighted I am with the paint and finish. The reflection in the poor light and rain in a workshop is still nothing short of incredible. Now I know how much time and effort these Concours cars are prepped. Paul spent four hours doing my car, and that’s a professional detailing.
Paul (a different Paul this time) was down during the week and said he would kindly fit the badges up for me. These take a little time to get right and in the correct places. Why? Because these were going to be stuck in place and no holes drilled in the fenders to take the clips on the back of the badges. The process involved in a lot of measuring and patience. Due to the timescales involved I wouldn’t have had time to do it all on Saturday. So a big Thank You to Paul & Yogi on their help.
The messy part got saved until later which was the wheels. The “Raised White Lettering” is coated in a blue protective film which needs to be cleaned off. Yogi gave me a pot of his road film cleaner (the last he had) and told be to just rub it till the protective film starts to come of. Plenty of elbow grease later the results are awesome. The before during and after pics. Before you say the wheels don’t look shiny – I know, they have a coating of Gibbs Brand Lubricant on them to protect from any moisture. They will be buffed up at the show.
The tyres were then treated to some tyre dressing to give them back that nice new look, what am I on about? They are new!
1966 Ford Mustang Restoration is FINISHED!
How long has it taken (time wise so far) from purchase to restoration completion?
4 years 1 months 21 days or 49 months 21 days or 216 weeks 0 days or 1512 days
I could work it out as man hours (I hate to think just how many, but at least a couple of thousand hours), perhaps I will work it out one day. I have spent at least one full day a weekend on the car and sometimes the other day too, cleaning, prepping, painting, making the bits for the car etc. I even spent hours in the shed after work in the summer months, working into the darkness preparing bits that would be needed for fitting to the car.
That was the all main jobs done, so technically that that’s the restoration finished. But there are some small things I need to do still, technically it’s ready for MOT all important road worthy test, then the full road testing for final set ups. I expect there will be the odd problem running in and settling down after sixteen years of nothing, such as carb, timing, first few quick oil changes, antifreeze etc. Then it will be onto the full Registration and her UK plates to be fitted.
Speaking of number plates – I pretty much think this says it all, they say a picture speaks a thousand words. These plates have been made specially for the Car Show as Mustang Maniac and LAR will be transporting my car to the show for me. Thanks to Lance for the great looking plates.
I owe a huge debt of thanks to all the guys at Mustang Maniac and the associated people who helped me with my project.
Adam – Inspiration, mentor, Owner, restorer, mechanic, body work, fitter, parts, advice, storage, help, banter, forum and everything else in between. Without whom none of this would have been possible.
Yogi– Inspiration, mechanic, panel beater, body work, fitter, paint sprayer, advice, help, banter, forum and giving me the nick name “Sat Nav” . Thanks Mate!!
John – Mechanic, bodywork, advice, help, banter, cooking great stews in the depth of winter.
Terry – Mechanic, panel beater, body work, fitter, paint sprayer, advice, help, banter.
Paul the Paint – Paint sprayer, body work, fitter, advice, help, banter.
Chris – Advice, fitter, banter, help, forum, Jaffa cakes and goodies.
Lance (OCD) – Advice, printing requirements, help, banter, keep an eye out for my OCD, forum, cakes and goodies.
Sam – Helping hand and banter.
As you can see there are a couple of common themes going on here, the first is “help”; whenever I have a question I am not just answered, but shown as well. The guys time and patience spent with me as well as my sometimes (what must seem like) daft questions goes way above their call of duty.
The second is “banter”; the non stop ribbing for who ever is the chosen poor soul at the time makes it just a fun place to be and work in. The guys are all just brilliant and such a pleasure to work with and long may it continue. 🙂 On my next car????
Then of course there is my Wife who bought the car for me in the first place. For four years she has put up with me working on the car away from home, working on the car at home. Writing about my car on the blog. Buying things for the car using my new best friend, Mr Credit Card. She has supported me, shouted at me for cleaning parts on the kitchen table, had frothy fit when I was spraying parts in the utility room (it was in the winter and needed to be warm). Put up with me storing parts in the house ready to go down the workshops next morning. Through it all she has supported me regardless, and I couldn’t have asked for anything more. Well, maybe a 1969 fastback for my next milestone birthday perhaps? 🙂 My “hobby” you started me on has turned into a way of life now.
Thank you Darling I honestly appreciate it.
I would like to point out that is not the end of the blog though– oh no!
There will be many more posts to come and there will be pictures of the other little jobs that need doing. So you see, it’s still going to be business as usual for me, maybe just not as often being posted each week.
I will of course take some photos of the car at the NEC Show this coming weekend with the car in its completed state, that way you can see the full effect, as indeed will I for the first time. I really hope to see you there, if you are there at the show, please come and say hello.
A day a Mustang Maniac is one of life’s pleasures, car talk, lots of cars and above all great company. Saturday the guys were sorting out the yard and moving stuff around again, the yard looks so much bigger now. The inevitable tea break allowed a relaxing few moments in the sun to listen what the plan was going to be for the day. The task was to finish up the electrics Once the neutral safety switch had been fitted. The fitting was two bolts slid over transmission selector lever. The twin pairs of wires were to be connected to the loom to stop the car turning over in anything other than Park or Neutral or the gear box. As the wire colours and fittings don’t match to the loom it was a case of using a Power Probe to manually switch on the back up lamps, and then make sure the car wouldn’t start in any gear. The initial educated guesstimate was correct and allowed the wires to be spliced in with proper tight fitting connections. The wire loom could now be sealed up to make it look stock. Adam was around to help out with Neutral Safety and as the battery was connected up a decision was made to check the headlights. Nothing, the neat cable work under the dash was pulled open and the relays were checked, nothing. The relays were removed and more Power Probe work was used to search out the live feeds. When manually triggered the headlights worked, that was a good sign at least. Adam asked if the fuses were OK, and of course took the statement “Yep, they are fine” as it was intended as a statement. Adam had a customer turn up to collect a large batch of body work and got “Lord” Yogi to come in and offer a look. Many shouts of “they on yet?” Resulted in a forlorn “Nope” response. This went on numerous times, and with lots bleeps later, still nothing. Then a consultation with the “book of words” reveled the problem. When the loom was fitted the “Live feed restricting connection and disabling function device”, ( I just made that bit up) or better know as a “Fuse”, was not in the fuse holder board. Yogi plugged in the correct rated fuse, the switch was turned and the lights came on, no problem. This explained the lack of a live feed. Needless to say “Lord” Yogi dished out some friendly abuse yours truly, all totally justified of course. When Adam asked what the problem was, no matter how much you try to disguise the fact that the “fuse” was missing by making up fancy words for it, a certain amount of banter often followed. Adam nailed the problem straight away earlier on, but choose to take the word of somebody who hadn’t checked their own work, it was a school boy error, OK. Everybody is allowed one now and again. Lol.
The latest delivery of Adam’s also included the custom fitting Monte Carlo stainless steel bolts that matched the export brace. The correct positioned holes were fitted and the bolts tightened up. The effect is pretty darn cool.
Right side of bar
Left side
Export brace bolts
The next job was the wiper functionality and washer jets. The two-speed wiper motor was restored and looked pretty good. The down side was the two wires didn’t say what was the poss or the new side of the motor. So the plan is to put a pipe on the bottom of the pump and rest it in a jug of water and manually Power Probe it into operation. Yep, it made the correct noise, but made a complete meal out of and did nothing. The connections were swapped around and still nothing. Adam filed in his new storage area – the scrap bin. A sparkly new pump was sourced from the ever-expanding stores and the experiment was repeated. This time a gush of water duly sprouted forth as it should do. Two more holes had to be drilled into the inner fender panel to make it fit correctly.
The water bag was hung on the hooks and the rubber tubing fitted.
The pipe work was run around the loom location and run to the cowl. Washer jets were proudly displayed to Adam who looked at them and filed them under his new system “B” for Bin. Although they had cleaned up Ok the ends were flattened and wouldn’t have made a correct jet. So new ones were fitted. Two simple screws held the brutally simple pipe just under the cowl bars.
To finish up the day the loom was recovered with tape and neatened back up. Figuring all the issues out took up a fair bit of time. To complete the day the windows were cleaned up and the car has taken on a whole new look. Again not too much to look at this week as it was tidying up and correcting issues with the “Electrical restriction unit” or fuse.
Adam came around at the end of the day and decided to authenticate the restoration. He bought down one of the coveted Mustang Maniac labels. It simply has a number on it. Mine is 35, this is a badge of honour to say the work is worthy of the assigned number.