Nobody Will Ever Know

The weekend couldn’t come quick enough for me and seemed such a long week until it finally arrived. Saturday I woke with a feeling of knowing exactly what I wanted to do, but I didn’t really want to do it. It was going to be messy, it was going to hurt and it would never be seen. But that is the nature of restoration that I have learned so very quickly. The job in question was removing Waxoyl from inside the car roof. As you may or may not know, I had fun and games removing it from the floor pans before I treated them with POR15 paint. This time it was above me and I wasn’t too sure how I was going to attack it. Red Bull drinks were lined up and snacks were lined up like little toy soldiers on my Blue Point work cart, I knew what was coming. Plan A; was to rub the wax off with a bunch of rags and degreasant, I tried but I only seemed to spread it about and not remove it fully. Plan B; drink Red Bull and find a scraper while eating a snack. This gave the poor ol’ bloke arm muscles time to recover from half an hour of what seemed like somebody setting fire to them, they were burning that much. The man cave has lots of things that I have stored, (not hoarded – Stored) to choose from. I found all sorts of flexible implements that I could try and felt rather pleased with myself walking back to the garage. Trials were undertaken for the best tool. First was a plastic separator for a tool compartment – that was too soft, but would make an excellent filler spreader tool. (Note made to self at this point, for a small spreader use this bit of plastic). Secondly I had a silicon sealer remover, this was OK but too small and hurt the hands due to the funny angles on it. Thirdly I had a pallet knife that was good but again to small and too stiff and dug into the metal on more pronounced curves as it was sharp. The winner was an old filling knife I used for decorating, it was flexible and formed to the very slight curves of the roof, it didn’t dig into the metal and scraped of a good amount each time.

roof4

I started from the back to the front and the flex of the blade followed the roof well. The whole process was messy as the skin grafts of wax were raining down on me and went everywhere. At the start of the work you can see the roof under the wax which wasn’t pretty but it worried me a bit as it looked rust coloured, so I wanted to protect it best the best way possible. I took a photo of half the roof done for a comparison with and without the Waxoyl to show what it was hiding.

The mess was unbelievable and the old towels I had put down were not enough to cope with the mess. The side pillars at the rear were also cleaned up but were going to get a slightly different process. Snacks were consumed and a fair amount of water taken into the system. Arms are now aching beyond belief.

Once the roof was stripped of the wax I had to degrease it with the strongest mixture of POR Marine Clean  I could mix up on 1:1 basis. This cut through the grease and left a very clean surface after a couple of treatments. this was left to dry thoroughly.

I used a full tin of Rust Prevention paint (picture on the process page, or click here) as this time as there was no real rust to be fair. The paint required two thin coats within ten minutes of each other. They looked a little patchy when drying but the end results was amazingly smooth and consistent to a whitish grey in colour.

The side pillars were a different story as the bottoms by the shelf was rusted a little more and need some treatment of the Granville Rust Cure. Once that had dried off too I used some Eastwoods Rust Encapsulator to spray behind the pillars into all the little gaps then sprayed the outside all the way down to the window winder area. The satin black cuts the light down in the car again. Around the roof where the inner rail is there was not enough prevention spray for all of it. So I decided to Eastwood those areas too, while trying to prevent a little over spray not that it would ever matter of course. Another note to self; start on the rear shelf soon.

The end result looks quite good due to a contrast of the black and white, the down side is once the head liner goes in – Nobody will ever see it and nobody will ever know!

Quick Links:

For the full process so far of the work; Photo Menu – Inside The Car – Roof & Sides Rust Treatment, or click here.

Share my Content

The Key

Another good weekends work on the car with an added bonus of a trip to see the guys at Mustang Maniac on Saturday. After looking around the cars again I can see the KR replica is looking like a serious motor now, and I love the lights at the rear, in fact I want it! I believe they will be posting the updates for that soon. I have seen a sneak preview of the new website which is almost ready for launch and it looks pretty damn good I must say. It will be a huge leap forward for them as the parts ordering will become automated with online ordering with photo’s and stock availability etc. You won’t even have to call them to order the parts, just checkout, pay and wait for the order to turn up. It was great to see the guys again and have a laugh in the boys club. After speaking to Adam about my car and what to do next, I was advised to get the rear loom out and all the “shiny bits” from the dash. So I did.

First job was to take out the heater controls and the non-original cigarette lighter that had been fitted. The fact I had to be double jointed to get to the two nuts holding the heater control face plate in place didn’t help. More thought was required and produced the solution by removing the ashtray mounting, then trying again made life so much easier. Next up was to get the heater matrix and motor and pulled out through the firewall. The only tricky part was going to be making sure the pipes didn’t leak any water onto the inside and make everything sticky as antifreeze tends to do. The whole process was simple enough and no spillage I’m glad to say. Once the motor and matrix was out-of-the-way the next job was the rust treatment which was going to be a pain, just because of the places I had to get to now that I could get to due to the clear space. Two brushes were used, sorry, destroyed during the process, one softer for all the curves and tight places, the other harder brush for the larger areas that were visited later after I got my head out of the way. A few missed patches from an earlier attempt were spotted and were linked up so all the surfaces are now treated. The ultimate position should be entered into the yoga handbook for men. In order to do it was on my back with my head jammed up against the cowl, with the centre tunnel under an arm pit, not ideal but my long arms helped. Note to self – next time I must tape a thick cloth to the top of the shifter as I managed to draw a little blood on the back of my leg as a result of a sharp plastic fitting that has the skin shredding capability of a golden eagle talons. In fact if I Pulled myself right up, I could look out of glove box. I tried to take a selfie but my arms just weren’t quite long enough, shame though. Removing the loose rust and all the dust produced a couple of nice surprises as I was brushing it all out clean. But more of that in a bit. The idea was to paint right up inside the dash into all the nooks and crevasses that I could get a paint brush into and work down towards me. For once I wore some safety goggles in order to stop any splash backs of the anti-rust liquid getting in my eyes. I looked like I had just borrowed Buddy Holly’s specs as they are a bit old, but do the job. However, I needn’t of worried as none splashed on me for a change. But of course, if I hadn’t of had the safety glasses on, the brush stroke would have flicked the lot in my eyes, with a handful of rust dust to make it worse – guarantee it! The pictures here are quite unique as they are inside the dash looking towards the truck, I personally haven’t found many of these on-line to be fair so I thought I would share them, just in case anybody is interested.

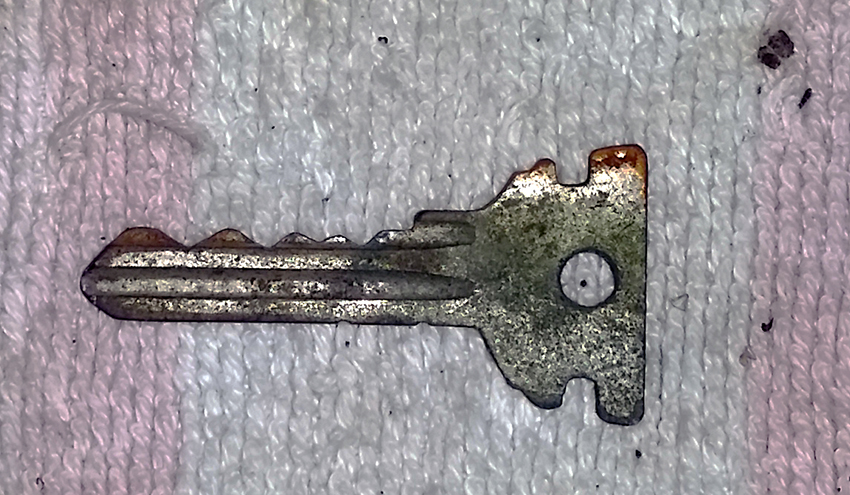
I mentioned earlier that I got a little surprise as I was brushing the dust and rust out. Well, this key fell out and landed on the floor pan. I have compared it to the other keys that I have and I looks like a single sided ignition key. As there was no ignition tumbler in the car when I got it I don’t have an original key to compare it too. The ignition key I have now is almost the same from the shoulder of the key to the tip of the key. The shape at the top is a little odd though and doesn’t look like the standard keys I have seen. Can anybody give me an idea of what it is or what it would have looked like? Strange place to find it on the back of the dash where the gauges would have been. Or is it not even a Mustang key, I don’t know. I also found a Dime as well  which I think the date says 1964 or 1984 I can’t quite tell.

key

Share my Content

Lookin’ After The Pony

The weekend has gone and I have finally got a chance to catch up on the blog. The man cave has been my residence for the last week or so. I have run out of the consumables that I needed to finish the floor pans inside the car. A change of plan that switched my attention to the smaller things I can do in the mean time, the first was the air filter pan which is finished, apart from the final top coat colour what ever that may be. However, I did promise myself not to do any of the pretty things on the car before the basics have been done, such as paint, mechanics, rust etc. But every time I walk into the man cave there is a grill that hangs on the side with this dirty Mustang Corral on it. The grill is no good as the top part has finally broken (when I picked it up), so it won’t be able to be fixed onto the car now. So now I need a nice shiny new one, (never mind then), the original grill has had a poor spray job of black paint from the front which has also gone over the underside of the Corral, but saving the pony Corral was  the most important thing to me as it’s the cars identity after all.

I took the Corral apart and noticed a broken mounting leg or support which was repaired by body filler! The outside of the Corral was cleaned up and the leg was repaired with some JB Weld. The pony was fine, just very dull and no shine so I used a mixture of chrome cleaner and Gibbs Brand to bring it back to life. The results were really good and came out better than I had hoped for, so obviously I am well pleased with it. The full process of the cleaning and repairs I have added a page to the Photo Menu – Body Work – Mustang Corral, or click here for the hyper link, there are over forty photos in total. I did however take a few arty shots of the iconic horse while it was out as I may want to change the header at a later date with my own car and grill. What do you think?

The chrome cleaner was removing the dirt but seemed to be moving the dirt from one end to the other. A different approach was required, the Gibbs Brand cleaned up most of the dirt first and the chrome cleaner done the rest. As some of the metal work was pitted slightly I didn’t want to make it worse by catching the chrome with a cloth and leaving a chromeless spot and so it was treated carefully. The brushed effect wasn’t given any rough stuff either for the very same reason, the Gibbs Brand was the staple cleaner for those areas. I could see that brushed effect would scrape off if abused and ruin the look of the two-tone finish as a few tiny scratches revealed that point after the dirt was removed.

The finished result is a well-groomed pony looking forward to more open road adventures.

finished
finished

Quick Links:

Photo Menu – Bodywork – Mustang Corral click here

Share my Content

A Little Spring Cleaning

Spring cleaning during the winter, in the man cave.

Another weekend left to my own devices and I was able to get on with the seats that I had no intention of starting this weekend. Not sure why I started the seats but it’s probably something to do with the fact that the passenger seat was in the way on the work bench. The original drivers seat had collapsed and a good mechanic friend of mine (Will, from Park Garage) done me a big favour and welded the bits, literally six or so bits back together again for me. A quick lick of coloured paint was applied but I wanted to do it once more fully as I don’t intend to take the seats out again if I can help it that is.

I took this picture at the beginning of the paint process but I thought I would share it as little modern photography. I quite like it, even though it is of a driver’s seat frame!

frame springs
seat frame springs

Anyway, the tracks that were holding the seat in place and allow the frame to move were seized up big time. A little treatment with the Gibbs Brand sorted that out, but the old dried grease needed to be cleaned out as it was contaminated with dirt and other undesirable additives. Once that was done the frame was cleaned down of dust and the very light surface rust removed. I sprayed zinc anti rust self etch primer to the frame and the tracks ready for a black satin finish. The parts that I had taken of from the driver’s seat I also cleaned up and coated with Gibbs Brand ready for fitting back. Two of those bits ,the springs had stuck together and had to be bent slightly in order to free them up and make them flexible again. (Note the tenuous link to the spring cleaning here?) While cleaning the tracks out for the seat I used my home-made “Filler Removing” tool that I had made last week.

Note to Snap On (again): I appreciate you are busy this time of year and that you probably haven’t got round to drawing up the contracts just yet, but I am prepared to wait until the end of the year for a fat wad of cash – or just enough to cover my paint job, otherwise I may have to take my designs elsewhere, then you will be sorry. Obviously I don’t want to offer it elsewhere, but you might be forcing my hand here!

As this latest home-made tool is now obviously a multi-purpose tool, I was thinking of renaming it something more appropriate like: “Specific Corrosion Rust Extractor Workers Device, Removal, Insertion, Varying  Equipment Rod” or “SCREWDRIVER” for short! What do we think? (Ahhh C’mon, it took me ages to come up with that! lol) Any other ideas on what to call this special tool I have made?

The pictures here show the primer and the cleaning in progress before the top coats of satin black.

The second coat was applied in satin black and now looks like new. The rails were greased and now they move smoothly with a single finger.

I have a couple of weeks holiday owing to me over Christmas so I intend to tinker around on the car so I am not sure what I will be doing, but I reckon it will be nothing I have planned! I think I may topcoat the inside of the floor pan, not sure yet though. I may do under the rear seats but I am running out of the POR15 paint unfortunately. I hope Santa has at least a 473ml can for me. I have been a good boy.

Quick Link:

I have added the full set of pictures to the Photos Menu – Inside the Car – Seats, or click here for the hyper link.

Share my Content

Black Friday

There is a lot of hype about the Black Friday & Cyber Monday with Pre-Christmas sales advertised all over the internet. I must admit I had a look and was a little surprised that the so-called “sales” were not as good as they made them out to be, at least here in the UK anyway or did I miss some bargains? I would love to know if it’s the same situation in the USA too, maybe the hype has worn off a little in the current economic climate? Black Friday now seems to be Black Weekend and a Cyber Monday thrown into the mix as well, almost a long weekend of sales according to most of the larger retailers to kick start the Christmas rush. So with this in mind I decided to have my own little Black Friday, the trouble is I am not selling anything or even buying anything, I am just using POR15 black paint. See what I did there? OK, it was bit (very) tenuous but I kinda liked it, it was also Saturday when I started it, but I did plan it on a Friday night so that still counts right?. Last weekend I started the front of the floor pan and this weekend I done the middle part up to the rear seat. The weather was cold, there was a snow alert from the car, but I still went out in a fleece and t-shirt to finish the rear section, ’cause that’s what real petrol heads do, I think, well that’s just before the stupid ones get a cold! Then they (me) put a jumper on when nobody is looking. I took the front seat out from the passenger side and pulled the carpet up. Yes, I knew there was filler there from when I purchased the car and looked her over, the filler was around the welding work and I thought no more of it at the time, now I decided to probe a bit further just to make sure. My home-made filler removal tool which may look like an old school screw driver that I had broken the blade on it, but don’t let this simple tool fool you. This precision engineered tool took me all of about three minutes to make and that included the thinking time. Firstly I ground the end down to a slight angle across the blade snow plough style. After making sure that the harsh jagged edges were removed, I rounded it of a little, but maintaining a little edge to dig in with. This new tool allowed easy digging out of the flexible filler and also scrape close to the metal without gouging lumps out of it.

Note to Snap – On Tools; please feel free to contact me for the full specifications of this tool, you can make these under licence from me at very reasonable rates, or any of my other home made tools come to that.

The floor pan was replaced before I purchased the car, that part restoration of the floor was a job that I didn’t fancy doing to be fair. But, knowing what I know now and the help I could have had from friends and professionals, maybe I would have had a go at it. The underside of the car has been under-seal sprayed, while the inside has been wax sprayed. The roof headliner area has also been sprayed, but to better standard than the floor pan had been done. In some places the wax spray was thick and in others areas it was almost not there. The welding of the pan is not the best or neatest I have seen, and this raised a little suspicion on my behalf. I removed a fair bit of the filler around the welds and the filler was there to patch up the uneven welding and the grinding, so it was not much of an issue apart from the cosmetics, which will be under a carpet anyway. There was however a patch of larger filler right in the corners that I wanted to investigate. Digging away (with my new tool, from the new line of, “One Man’s Tools Collection”), revealed a little patch of horrors and cover up of some rust sections. I removed all the filler from the area to expose the full extent of welding and find the bare solid rust that I could work with, Lucky enough it was all pretty solid enough but had just been covered over and not treated, done in a hurry I expect. Sloppy work. Now that the bare rust was exposed the POR15 I used on the front section was also going to be continued through to the middle section. Once I was happy with everything in the rust area and the surrounding metal area, I started the long three step process again; clean, prep, paint, sand & paint again. The POR15 was again done over the course of the two days this weekend, and todaythe weather held out enough for me to be able to push the car half out the garage to help me see better where I had been and missed between the coats. I have attached the process in photos under the menu heading Photos – Inside the Car – Floor Pan Rust Treatment, or click here for the quick link.

I hope you all had a good Thanksgiving on the other side of the pond.

Quick Links:

POR15 Rust Treatment Review

Floor Pan Rust Treatment

Share my Content

My Six Pack

At last this weekend things have gone a little better for me. The wife went out for the weekly shopping on Saturday and I was left on my own to get on with the car. I promised myself that I would start on the roof headliner areas, but the sun was out, all be it little cold. The car was pushed out of the garage enough for me to open the doors fully. Then a change of mind hit me and the headliner plans went up in the air. I decided to treat the floor pans. The carpet was pulled up, and the foot wells were cleaned out. The POR rust treatment was applied in its various stages and hopefully will be a first part of the whole floor pan to be treated. Now the foot wells should be rust treated and preventative at the same time. Sunday was again a nice but cool day so the second coat of POR15 was applied to the floor pans. As the drying was taking longer than I expected I didn’t get the chance to apply some POR Patch seal for the rougher edges of the welding. Next weekend I will and then start on the headliner unless I decided I will do the next floor section that is!

The six pack? No, it’s not a beer pack, case of wine or an abdomen wash board, it’s the pack of six POR15 118ml small tins that I used to treat the floor pans with.

I have created my review of the POR15 product and given a step by step guide of what I done this weekend with photo’s.

Quick link:

Consumable Reviews – Rust Treatment Menu – POR15 Rust Treatment click here

It has dawned on me that this time next week we will be in December and the Christmas holidays will be upon us sooner than we think. What made me think about Christmas this early? My wife, you can blame her for being organised as each year I get asked what I would like for Christmas, I supply a selection of items for online baskets at various places and she chooses a selection for me, from what ever she likes. That way I know I will be getting something I would like and the right version or style of it as well. A good example would be that there are so many cans of primer or similar out there, its a mine field to choose from let alone the wife trying to understand it all. The fact is pretty much everything I have made a list out for is Mustang related, funny that! Does anybody else have a similar arrangement or is it just me being a lucky boy?

I have added another little link on the sidebar of the blog, it’s a Dollar to Pound exchange rate link, you just put in the amount and it gives a current live exchange rate. Not just for the Dollars either, in fact most currencies. I use this site to give me an idea when ordering from abroad or the USA. It will need to be online for the rates but it loads up pretty quick and hardly any adverts on it either. Let me know what you think, is it worth being on there?

Just to be even more sad, I have added a countdown to Christmas. If I get enough grief for it I might take it down due to popular demand 🙂

Share my Content

Shattered & Tinkering

I have now come to realise that I just can’t live without my cell phone! This week I was waiting for my train home and dropped my phone from the little bench I was sitting on. It couldn’t land on the side or the bit where the cover was on could it? No, it had to land on the very corner that the cover came off and hit the concrete with a delicate “dink”, because it only feel about eighteen inches it didn’t even bounce. But that little impact shattered the screen from the top left corner to half way down the screen on the other side. I even surprised myself with the torrent of new swear words that flowed instinctively from deep within my subconscious thoughts, the flood of words formed into incomprehensible sentence without breathing, one  word per crack it would seem. With that in mind it still worked so I should be thankful for that, sadly the screen was difficult to read obviously. I ordered a replacement glass screen that evening from eBay, every time I looked at that screen I was reminded of the fact that I really should pay more attention to what I am doing, along with the fact that I should apologise to a few fellow passengers who were near by. Those poor now scared for life souls must have thought that I was some sort of nutter trying to recruit people into my fledgling cult using a strange chant, using a strange language mixed in with copious amounts of Cockney Rhyming Slang! Friday night I replaced the glass which took me almost four hours in total. The reason it took so long? I was tired and just didn’t want to damage it, I wasn’t sleeping because I was worried about my phone. Now my phone is back to its former glory and works again, and my life is a once again organised into some sort or order, but I can’t help feeling the phone has been tainted in some way. When you have a minor fender bender in the car, you never feel the same towards the car again, or is that just me? Off the back of this traumatic event of mine, I need to ask a question though; Can you live without your cell phone? I came to realise that my functioning life was on that phone and I definitely can’t live without it; My contacts, my personal emails as well as the emails for this blog, my diary, things to do, passwords & website logins (all encrypted via an app of course), birthdays, anniversaries, text messages, photographs and in fact just about everything is on there. It felt like my hand had a finger removed because I didn’t use the phone as much, let alone being the extension of my arm that it usually is. I have now backed up my phone and the important things I need just in case I damage it beyond repair or it doesn’t turn on one day.

On a Friday afternoon at work we tend to ask each other what we have planned for the weekend, things like going to see parents, BBQ’s, chilling out, going to the movies etc, when they get to me I get “What are you doing on the car this weekend Mart?” Now either I am predictable, or I have just conditioned their thoughts to expect me to be working on my project or obsession depending who you talk to that know me. This week I was asked if I was going to be out “Tinkering” with my car? That was an expression I haven’t heard for a long time and I don’t normally associate the term with “working on the car” as I tend to call it. Does anybody else have a little phrase they use for their car work? I would love to know.

On my Twitter account I saw a reference to a great story from 1966. That year Ford provided their latest model Convertible Mustang for a promotional exercise in conjunction with the Empire State Building. The car was perched on the 86th Floor and taken up to the top floor by means of only the passenger lifts, no helicopter or winches were used. It’s an incredible read and amazing what they managed to do with a team of Ford engineers, six hours overnight and a few small lifts! It stayed up there on the building for the next five months.

I have posted the rest of the photos and the full story of it in my “Articles” menu or you can click here for the quick link.

3

6

This weekend I have been doing a little bit of tidy up work where the door pillar on the right hand side. There were a few little rust holes that needed treating and the seams strengthening. I got the Dremel out and slowly sanded down the seam filler for a good base for the filler to cover up the imperfections. Next weekend I hope to get the car out and rub it down smooth ready for some anti-rust treatment primer.

Quick Link: Empire State Building and Ford Mustang, click here

Share my Content

A little R & R

The weekend is almost over and that is the last Bank Holiday before Christmas I am sad to say, an extra day for a weekend now and again makes all the difference.

Rest. A little bit of relaxing was the order of the weekend. There was a little shopping Saturday and me pottering around in the man cave rearranging my tool chest and just trying to make it a working space again instead of my cave becoming a storage area for garden tools and rubber boots. Sunday was a day out with the wife at a big hall near us, each year they wear period costumes with role play for the Tudor era. All the characters were brilliant, sewing, weaving, making felt, cooking, archery, hand making wooden beams for a roof etc. I tried my hardest to break their characters into the modern-day English, they weren’t having none of it, instead I was greeted with things like “Master, I know not this word”, Did they really speak like that? My wife reliably informs me they did.

The car, today was all about the other “R”, Rust. I pushed the car out the garage on such a nice day and pulled the carpets up, pulled the old sound proofing out and cleaned the floor pan. The was a little light surface rust on the bulk head so I decided to treat that little bit, then another little bit, before I knew it I had gone back to the seat mounts with the anti-rust agent. It was not bad at all, just a few little surface patches here and there. The replacement floor pan still looked like new. I also replaced my original plenum today and put new pipes in too for the demister. The old plenum had an issue with the flap not working properly inside to divert the air around, but I was going to put up with it. That was until I moved the lever and the flap inside made a cracking noise and nothing moved, the air direction plate had broke off completely. I got a replacement from Mustang Maniac of course and it’s now a much stronger version. A bit of a pain job to get in and out, but worth the hassle. Nothing looks any different in the car apart from being dark patches where the rust used to be. With that in mind the photo’s I took you couldn’t see the difference, so I didn’t post any today.

But, to make up for it I was sent this little funny via Twitter, it did make made me laugh and I shared it with the wife. My better half just gave me “That” look again. But I have just got to share it!

decision made

I have had a request for the blog layout, I was asked to do a little something with the menus of mine. I thought they looked OK, but I will move them about and make them a little more user-friendly. Let me know if they are any better or go back to how it was.

(Thanks for the feedback Sam.)

Share my Content

Rust Comparison Results

After a wait to see how the products performed, I have some results.

Well the weekend is almost over and I have been busy rubbing down and doing little bits in the car. One of those little jobs is the wrapping of the the under dash wires with black insulating tape to make it look stock. I find that job therapeutic, just like some people find gardening or painting as a therapeutic activity. Am I weird? Any other strange therapeutic stuff people do? Anyway, my other cars have been feeling neglected and so I just had to wash, wax and valet them. As a result I feel as though I have been arm wrestling with Arnie  – The Terminator. I ache, and before you say it – I know quit moaning.

The main point of this post is to say that I have some preliminary results for my rust comparison tests, they are a little controversial I think. I had taken the two big guns and put them in a head to head just like Practical Classics magazine did. But this was my own money that was funding this and I wanted them both to be exactly the same. But, my results are the exact opposite so far of Practical Classics results. The two main contenders are Rustbuster – fe-123 and Granville – Heavy Duty Rust Cure. They cost pretty much the same, look the same and even smell similar. But do they perform the same? Simple answer is No. Practical Classic magazine stated that the Rustbuster fe-123 was the winner. However, they were incorrect with their details on how they applied one of the products for their tests. I have explained this fully in the comparison test, the quick link is below for the Practical Classic test and my tests. I had previously purchased from Frost Auto Restoration Techniques the Granville Rust Cure and wanted to see what this new “winner” was all about. So I found an old inner fender splash guard from my Mustang that was really rusty. I applied the products at the same time on the same material. The video was then uploaded to my YouTube channel, One man and his Mustang. This weekend I have taken another video, part 2 and posted that on YouTube as well. The results are very clear that the Granville wins hands down. The Rustbuster was flaking up, peeling and shows signs of the rust reappearing after only a few months. I am very disappointed with the “winner” and its surrounding hype. I have various videos of the Granville in action too on the YouTube Channel.

I bet there will be people out there moaning and complaining about my results. But I have photo evidence and videos of the tests and results. As yet I have not seen any results from similar tests or company. I was going to review the Rustbuster as a separate product on my blog, but I don’t think I will bother now as the results are here. Anybody else like the Granville Heavy Duty Rust Cure? Or is there something even better. I know about POR15 but that is not recommended for the outer bodywork that is ready for spraying, and that came from the POR themselves.

close up 2
Rustbuster fe-123 close up

On another note does anybody have a good primer they would recommend preferably available in the UK?

Quicklinks:

Rust Comparison test article: http://onemanandhismustang.com/rust-comparison-test-granville-vs-rustbuster/

YouTube: Rust Comparison test Part 1: http://www.youtube.com/watch?v=L8J9MvVlZLc

YouTube: Rust Comparison test Part 2: http://www.youtube.com/watch?v=dY2muLWmzwI

Frost – Granville Rust Cure link: http://www.frost.co.uk/catalogsearch/result/?q=granville&x=0&y=0&order=relevance&dir=desc

Frost Main Page: http://www.frost.co.uk/

Practical Classics Magazine Rust Test: Click here for the PDF

Share my Content

Secret rules

The weather this weekend for a change has been gorgeous, hot and not a cloud in the sky. Is our summer finally here? A bit late but I will take all the sun I can get at the moment. This Friday evening we got the garden swing seat out from the cover and I was able to evict the cushions that have been squatting in the corner of my shed since last summer. They take up so much room, I could put my Karcher jet washer there, and few power tools in that space. The wife sneaks things into the man cave and puts things on them in her little corner and they fall off. So when I open the door I am greeted by an avalanche of cushions Wellington boots, trowels, hand forks, plastic pots and cardboard boxes from god knows where. The corner of the man cave right near the door. She has the house and garden, I have the garage and the shed – that’s the rules. But women play by a secret dirty secret set of rules that only they know about, they are allowed to put things in my area when they see fit. Yet when I bring in a set of brake springs in the house and sit at the kitchen table ready to treat them, you would have thought somebody had just pushed the nuke button! Trying to explain it’s only a temporary measure seems to add fuel to the fire. Does anybody have a copy of these rules I could look at please, or at least explain them to me. Anyway, while sitting in the swing seat watching the birds and the bees in the garden while sipping on an ice-cold bottle of Bud, I heard the comment, “I think a flower bed would look nice there.” Epic, not. So I chipped in with only if we have butterfly and bee loving plants. With that the Saturday was sealed but I didn’t know it.

Saturday morning and I was straight out into the man cave, I got the front valance out again and rubbed down the filler that has been built up, rubbed down and built up again. The work was almost done when they, being the wife and mother-in-law got back about five hours later. The front valance and grill valance were now ready for their spraying and I was feeling pretty pleased with my little ol’ self.

There were repeated trips from the car to the back garden with plants which were laid out around the area that they wanted the plants to be, yeah I got my bee and butterfly plants “Hot Lips” apparently! They looked quite nice to be fair. Then the shovel came out, from my man cave and the marking of the grass began. As they decided the ground was too hard to dig it was passed to me to dig. Great, the day has been baking in the high twenties and the earth was like rock. I questioned why now and got told the plants would die if I didn’t. I was reminded that I had done my own thing on the car all day so I could now help her do the flour bed. Bearing in mind I looked like I had just been rolled in a giant pack of flour due to the ultra fine dust off the valance while I was rubbing it down. Within minutes the sweat was pouring off me and the dust was now turning into a paste again. Eventually after the new ground was dug up I was released to go and do what I wanted. At that time laying on the grass waiting to pass out seemed like a good idea. But the compost went in the new flower bed, then they got the hand trowel and fork – from MY man cave, and they started to dig the holes only to find out that they could only get down to the rock hard clay that I had got too. So yes, yours truly had to dig the deeper holes for the larger plants.

Sunday was a day of more tiny rub down as I missed a bit to make a final surface prep. The shower curtain went down on the grass and I sprayed the valance and the grill valance, firstly with the Rust Encapsulator I got from Frost, then some grey primer and left them to dry in a shady part of the garden. Then I decided to clean the sauna my man cave out and tidy the Snap-On tool box up a bit. About a month ago when I was bleeding the brakes I needed some very small AF spanners. I bought a set of spanners that were ring one end and open-ended the other. They weren’t very expensive as there is no real leverage required. What I did notice was that they were always falling about and looked a mess in my OCD laid out tool box. I had an idea and looked on eBay where I purchased some carabiner clips like the climbers use for their ropes. Mine was small and not meant for climbing but they sure make a brilliant spanner clip. The spanners come off and go on with no problems and now they are all together! What do you think?

So this weekend was all about compromise, I do the work on the car and then I do work in the garden when the ground is like concrete. The garden it has to be said does look really nice. I sit here thinking; if I didn’t have that beer would I have still had to dig the flower bed? I reckon.

Quick links:

Front valance work updated, click here for link or go to the Photos – Bodywork – Front valance project part 2.

Share my Content