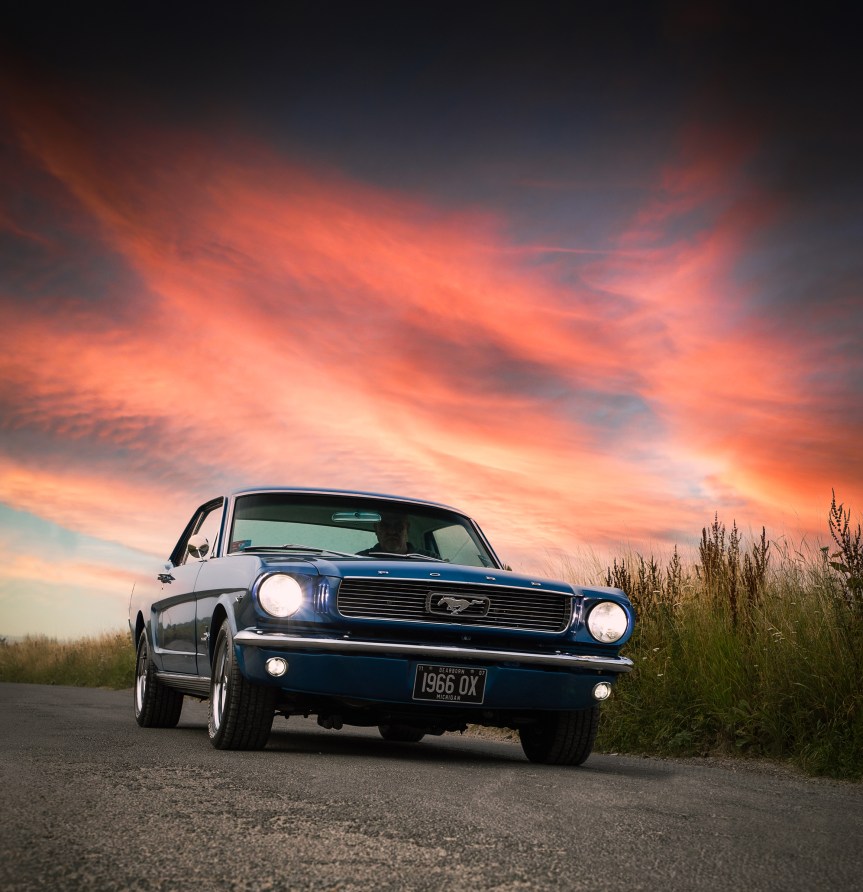
I mentioned a couple of post ago while I was at the Culford car show I got talking to a photographer who wanted to use my car as part of his port folio. I agreed as he would also send me the photos to use too. I got them a few days ago and I’ve just got round to posting them up.
We agreed to meet up early in the morning when the sky would be moody and even more important, it wasn’t due to rain. I was to arrive at Cambridge before six in the morning or earlier if possible. That meant I had to get up at four in the morning as I had to get some fuel on the way. The best part was our two little dogs decided that they wanted to get me up at half twelve and then again at two in the morning. So when the alarm went off I was literally running on a couple of hours sleep. So it wasn’t just the sky that was moody! I was Mr bear with a sore head who had also sat on a cactus. As the sun started to creep up and I arrived at Steve’s house well before six, all was good again. I gave him a quick call and he came out straight away and we drove of to the little lane to catch the sky and ambient light just about a mile away.
The road was a single track road which gets busier than you would expect. On a couple of occasions I had to move the car out the way. People were very patient with us and we got a thumbs up or ‘OK’ hand signals now and again.
I’m so happy to share these pictures with you which were taken last week in Cambridge by a self employed pro photographer called Steve Armon. He has a great Instagram account called “trigpointpictures” where you can see a lot of his work, and not forgetting his website where you can book his services www.trigpointpictures.com. His accounts have some amazing and very varied pictures which are well worth checking out, and they include my car. Before you ask – no I’m not being paid by Steve to say these things or on any commission. I wanted to give him a shout out in these difficult times as he has done my car proud and me very happy. don’t forget to mention me when you discuss your photo requirements, so he knows where his traffic is coming from.
these are most of his pictures and they are amazing, I haven’t even managed to pick a favourite yet as I love them all. I think this first one has to be up there though.
We did a few drive-by to get some movement in the pictures.
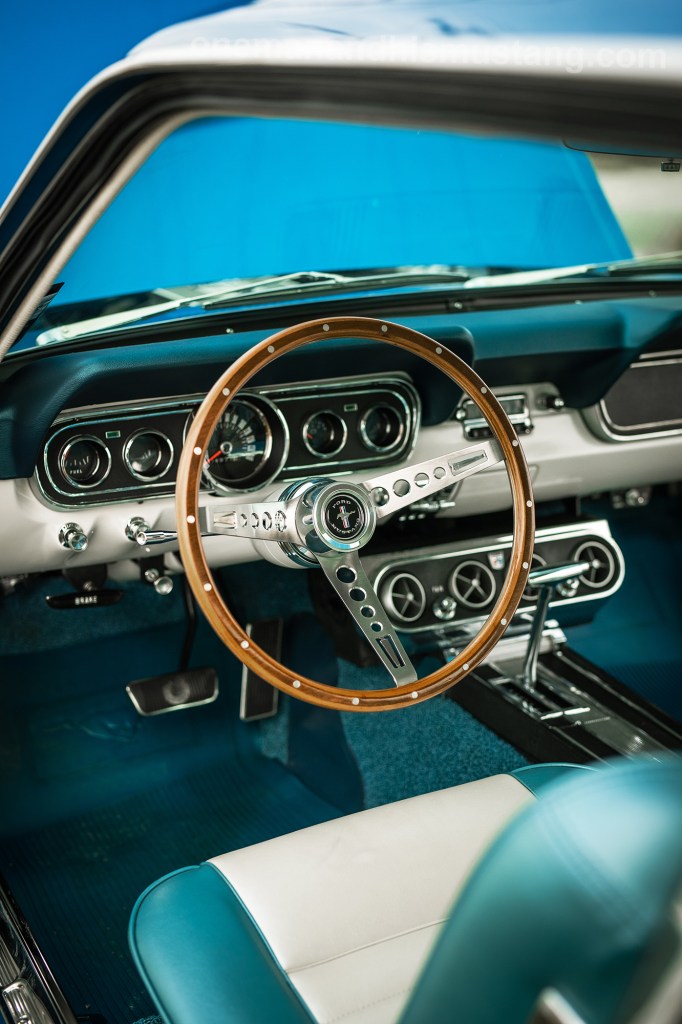
I parked up and we took a few interior shots.
I opened up the whole car for a unusual set of photo’s that you don’t see very often.
We decided to do a few under hood shots.
To finish up I love this picture of me in the car looking back at Steve in the rear view mirror.
An hour or so later we had finished and I dropped Steve back home and took a leisurely drive home. Parked the car in the garage, took myself into the house and plonked myself on the sofa for some much needed shut eye. I need to mention that the dogs were fast asleep until I got back in, the tables had turned in my favour now. But, not for long as my little guy jumped up on me for a cuddle there we stayed for the next couple of hours. What a great way to start a day.
The photo’s are a bit out of sequence from the day itself where I thought that I would try to group them up. I have also taken some of my own pictures at the same time as Steve trying to learn from him. Obviously they aren’t as good as his pics, but I will post some of mine up soon. There again I sort of expected that his would be so much better than mine as I only have a smart phone, Steve had a big camera with all sorts of bolt on bits and pieces which were all way beyond me! My idea of an ‘F-Stop’ is to shout out ‘F-ing stop’ to somebody I think might crash into me. Apparently it’s not the same thing. 😉
Thanks again to Steve from ‘trigpointpictures’ we had a greatmorning.
This year I have taken my car out for a couple of shows and I have developed a rather annoying squeak from the drivers side front wheel. I have taken the wheel of and greased everything that had a nipple on it. I squirted, white grease, silicon spray, Würth Water Dispersant, WD40 everywhere I could. Nothing. It was still there.
I spoke to Adam a couple of times about it and he advised me to bring it down and he would have a look at it. So I did just that.
The photo’s in this post I’m using have been given to me by Mustang Maniac and saved me taking the pictures; big thanks to Mustang Maniac for that. They told me they were probably going to use them this weekend. It looks like they beat me to it by posting first. So we have a little overlap although they have a couple of different pictures on their post.
Adam was walking to the yard and heard the squeak as I was turning into the yard’s driveway. I explained that I think the steering doesn’t feel right either. He listened intently and promptly jumped in my car and took it for a test drive up the road.
We swapped places for the driving seat as Adam need to swap a few cars around in order to get a clear run for my car onto the ramps in his workshop and I drove it in. Reinforcements arrived in the form of Yogi who had emerged from his workshop to help out with the diagnostics which is a two man job.
First thing they noticed was that the idler arm had some play. It looked like that over time standing in my garage the rubber had perished and broken down when the car came out for some shows this year.
You can see them when compared just how much the old one had broken down. The new one is on the left of each picture.
The guys checked everything else over on the suspension and I received my bollocking for a couple of other nuts that were loose. 🤦🏻♂️ Probably down to the play in the idler arm making things worse. Adam and Yogi both worked up and down under the car to check everything was tightened up as it should be. A couple of rear axle nuts were not as tight as they should be and Adam again tightened them up. I would like to say that in my self defence Adam does have a two foot long Snap On 1/2″ fitting breaker bar, to make sure things were properly tight.
They fitted the new idler arm and checked that the the locating bracket had no play with the arm fitted in place. Once they were happy I was sent out on another road test. Both Adam and Yogi told me that the steering would feel very different. The picture below is the new idler arm being fitted before full greasing.
I got out the main gate and and immediately the car felt different. I couldn’t believe just how bad it had gotten over a course of couple of years. You just get used to it and think no more of it.
I turned back into the yard happy, the squeak was still there, although not as bad now. Straight back onto the ramps and up in the air again. The guys decided that the wheel was to come off and have a look. They did all sorts of play checks and listened to the rotor spinning.
A decision was made fairly quickly. Yogi dropped the outer bearing out to check the look and feel of it. He wasn’t happy with it. Yogi then cleaned it up and Adam had a second look under the big lighted magnifying lens on his bench, nothing visibly wrong with it to look at. He stuck the bearing on his fingers and felt it, spinning it fast, slow and twisting it etc. Adam said “although it looks fine, I just don’t like how it feels, nope, I’m not happy with it”. With that he went of to the shop to go and get a new one.
In the mean time Yogi cleaned up the track of the bearing and made sure it wasn’t damaged by scoring or pitting. Luckily for me it was OK. The inner bearing was still fully packed. While we waited Yogi then proceeded to grease everything he could see, upper arms, lower arms, steering, bushes the lot.
Adam returned with the new bearing repeating his feel tests as he walked back to the ramps. “That’s better” he announced handing it over to Yogi. He repacked the new bearing with grease, rechecked it and fitted it back into the hub and adjusted it up correctly. He then replaced the retaining washer, split pin and the bearing cap. The wheel was put back on and retested for play and feel before letting the car back down.
I was then sent back out on the second test run to see how it was. I arrived back with a smile as big as my front grill. The noise had gone. Sorted 👍
Before I set off for my run I was told that if all was OK, to park out the front of the offices. Which I duly did as i was now well chuffed. They asked me if it was OK to use on the their blog posts. Of course I had not objections at all, they then took a number of pics of my car for their ‘Park & Pic’ section on their forth coming blog. Www.mustangmaniac.org
I love this picture as there is an early Falcon convertible, which of course was the Mustang’s immediate predecessor that shares the same chassis as First Gen Mustangs, and also a later Mustang all in one shot.
I sat in the offices with Adam and we had cup of tea, well he did and I had a cold can of pop. We put the world to rights, sorted out the bill before I left for home. The journey home was a pleasure until it started to rain. I was not impressed that my car had now gotten wet of course. But, considering the car was now in a another league, I wouldn’t mind.
I arrived home some hour and half later after filling with fuel (again). I just had to clean my car before I put her away and cover her up. I then plugged in the battery maintenance unit to keep the battery in tip top performance.
Again a huge thanks to Mustang Maniac (Adam & Yogi) for fitting me in and sending me home all on the same day. That is what I call “proper customer service.”
Before I sign off I just need to wish my friends on the other side of the pond;
Eight and a half years ago, way back on October 28th 2012 I wrote my first post on my little ol’ blog. I had nothing planned other than to share with a few friends what I was getting up to and how I was getting along with my Mustang restoration. Ultimately I could look back in a few years time and take a trip down memory lane with the photos I had taken a certain points of the restoration.
Delivery of my project car 17th September 2011, before it went to Mustang Maniac where I had professional help & guidance on my restoration over the years. Those guys have become some of my best mates of mine as a result.
When I attend car shows or via my blog and emails etc. I often get asked how I clean and detail my cars;
Some of the Car Shows and photo opportunities;
I get asked how I fitted things, how I upgraded this or that, I even get asked for advice on their own restoration projects.
That got me to thinking about adding extra sections like the tools (a selection of them here), that I used on project and since use, considering that I’m just a weekend warrior with a spanner.
Products that I used to keep our daily cars clean and the Mustang fully detailed.
My merchandise I bought over the years or have been given since I started my journey with the Mustang.
I even get requests to review items, all of which I buy if I think I could use them myself. As a result of all these things, my blog has evolved into an entity of it’s own.
Fast forward a number of years to 2021 where I my little ol’ blog has reached a massive milestone. This is not intended as some bragging rights by the way, but more like myself being proud of the result. Somebody within the USA this morning 15th May 2021 made my day:
My blog has just passed 1,000,000 hits!
I am absolutely amazed to think this could ever happen, I remember getting excited about getting ten hits in one day!
I value every single one of you that has followed me or just pops in for a quick read, like or even the odd comment. I would like to say a massive “Thank You” from the very bottom of my heart.
I don’t actually get anything from my blog/website on WordPress, other than some add money that goes straight to the hosting and my domain fees. It’s sort of self sufficient in a way. If anything I’m out of pocket, but reading the comments and seeing the views more than make up for it. Hopefully I can help somebody, somewhere with something.
My first follower was Debbie Nuessle (click here for her latest venture), from across the pond. We both started blogs within a few days of each other, both revolving around our love of American Muscle cars, especially Ford Mustangs of course. We keep in touch outside of the Blog circle and have become good friends.
I have a number of followers who ‘like’ the posts I put up after even after all these years, thank you all, it means a lot to me. I have such a range of followers; a very talented and well-known Soprano opera singer; Charlotte Hoather (click here for her blog), mechanics, engineers, oil rig mover, artists, photographers, builders, wildlife photographers, fellow classic car owners, writers, product manufacturers, shops, brands, a few younger bloggers, students, world travellers, petrol heads, gear heads, car clubs, writers, novelists, journalists, teachers, photojournalists, professional bloggers, social influencers, religious followers, the list just goes on. (There is even ‘ahem’ some adult orientated content following me!) The full list makes for some amazing reading.
Just in case anybody is interested in some of the more selective stats;
I have a total of 2,700 followers, of which 871 are on WordPress, 2,300 on social media, just over 2000 on Facebook, which is not my favourite of all the platforms I must admit.
I have been visited by 199 countries and the top ten countries in order are; USA, UK, Canada, Australia, Germany, China, France, Netherlands, Finland and New Zealand.
There are stunning islands that have visited me, Mauritius, Seychelles & Maldives. Some of those Islands are so small they wouldn’t be able to fit a Mustang on them! My bucket list is to spend a few days on these islands to chill and take in some sun.
The more obscure countries with a single visit are: Burkina Faso, Falkland Islands, Kosovo, Tonga, Northern Mariana Islands.
To date I have posted 340 blogs including this one over the eight and half years I have been posting on this blog.
These figures are quite low compared to some of you mega stars out, there with you super popular blogs I know that. But for me, like I said earlier, I’m honestly humbled and grateful to every single one of you who wants to look at a blog all about one man and his Mustang!
Over the course of the Holidays and various forms of tiered forms of lock down that nobody really adhered to, I took my Mustang out. Now to be within to rules I took the car out to place where I could exercise after parking the car up. It just so happens that the car was parked in a pretty good place to take some photos while I was out exercising. There was nobody about, the odd car now and again going past, that was about it.
The garage was opened and the dust cover removed and placed on top of my tool chests. Excited to see the car after a number of weeks I got in and started the car, well tried to start it. The car was turning over fine but it didn’t fire up. I opened the hood and had a general look round under there. Fuel filter, yep fuel in there. I took the air filter off and checked the carb was squirting fuel, yep it was. After putting the bits back on I jumped in the car thinking it was just standing time issues. Turning the key the car started to turn over again, still but no fire up. Now I could smell fuel quite strongly, so I decided to leave it for a few minutes with the hood up to evaporate the fuel a bit. As it was getting late in the afternoon it was worth one more try before I give up and look at it properly another day. Third time lucky? She again spun over the crank slowed down and “BANG”. The backfire sounded like a grenade going off in my garage which made my ears ring, timing was obviously out to ignite at the wrong time. The car was running now a few seconds of really rough idle then it settled down to a smoother choke running. I backed the car out OK and drove of fine. However, there is a lot more to this story a little later…
The pictures:
I parked up and took some pictures before my little walk somewhere different. It just so happened where I was parked up would make a good backdrop. I took over 200 pics that afternoon, but this little selection are my favourites so far. I even done a black and white variation on a few of them. The pictures are variations on angles and lighting etc.
The next couple of photos I tried to start of with colour on the right and gradually fade it to black and white on the left. I played with the contrast to make the bottom one more antique and faded too. It sort of works I think, let me know if I hashed it or smashed it! I may even do some sepia variables as well.
The Journey Home.
I got back into the care and started the car, eventually after a few seconds it did start, but it was unusual to take that long. The drive back was about ten minutes and were not right. I got a few hiccups under mild acceleration from a standstill and the odd flat spot on a 40mph straight. I can’t deny that I was a bit worried. The car was parked up in the garage and covered her up with a nagging feeling in the back of my mind.
Next day I went out to the garage to just start her up. Turn of the key and the car spun over, then over and over. I tried to start her a number of times and smell of fuel was quite strong. I had a problem that was evident.
I sent Adam a text at Mustang Maniac to ask for a little advice when he had a moment. Adam being the kind soul that he is told me to get to my tools and he would call me back in a few minutes when I was ready. To his word he called me and talked me through some tests to look at with him over the phone. We swapped out the new coil with an older one that I had with the same result of spinning over with no fire up. We swapped over the coil HT lead to the distributor after testing with my multi-meter Ohm settings. Nothing. We then earthed out the coil HT to the engine to see if a spark jumped over to the engine. How did I manage that? Simple I talked sweetly to my wife who came out for a couple of minutes to turn the car over for me.
The diagnosis was narrowed down to the Pertronix ignition sensor which has gone to the great scrap yard in the sky! I needed a new one, it was a simple as that. Adam said he would get one out to me via mail ASAP as their location was in a high tier restriction for Covid reasons.
The next day my courier turned up with the part. I took a drink along with the part into the garage, unlocked the tool chests and settled down for a few hours. The distributor cap was removed and the single screw was removed the Pertronix sensor. The downside was the wiring loom had to be cut open to expose the wires for the sensor. The fitting of the Pertronix sensor can be found here.
I done a rough fit without the neatness of wiring loom and connected up ready for the start up. I got in the car and turned the key. The car fired almost instantly and run smoothly all the way to the choke coming off. I let the car cool down and got back to routing the wires back into the loom and neaten it all back up again. A couple of hours later the work was finished and up to my own self imposed high standards. The aftermarket part is now looking like part of the stock loom again and I’m happy. I need to take the car out for trip to make sure everything is still as it was. But, as we are in a current national lockdown that is out of the question right now.
All that remains is for me to thank Adam at Mustang Maniac for his time, even though he was officially “Closed” over the holiday season. I needed the part and I paid for the next day courier service from his WebShop. I was offered the multiple choices of delivery and the costs options. Normally I would drive and pick it up, and it’s also a good excuse to catch up for a chat with some friends. There is a an advantage of being a loyal customer and personal friend with a Mustang parts supplier, who will help go out of their way for you when you need the help.
Since I refitted the new part, I have been on a number of forums about the Pertronix Ignitor series. It seems that I was a lucky boy after all in the fact I got home at all. Most of the time these units are absolutely fine and last forever and a day. But, if you get a bad unit they just stop dead. You could go down the road, pull out of a junction and it stops dead in the middle of the road as one person reported and that’s it. The same symptoms I had – no restart. I had issues where I had a cut out which progressively got worse to the point it didn’t start again. Now I intend to get an old school set of points and condenser to carry with me as an emergency get me home kit. If the points burn out after a few miles due to the hot coil 45,000 volts with 0.6ohms I won’t mind. As long as I get home they are cheap enough to replace again.
My 2021 didn’t start very well, in more ways than one. It could have been much worse of course, I’m just lucky it was a simple problem to replace. Onwards and upwards I guess.
This week has been a very stressful week for me as my pride and joy has had to go and get some serious repairs. During this Covid lockdown like many of us we are finding things to do and pamper our cars. I have been no exception to that of course, with a LED upgrades going on, carb spacer swap out all of which I have to post about and will be coming soon. But this update jumps the queue. I said when I was restoring my car I would post about the good, bad and everything else. This is one of those gone wrong posts. Mustang Maniac may cover my story this weekend as well, to help each other out we have swapped some photos between us. 👍
Background is that I had a mini project to replace a carburetor spacer from the old metal 1″ style to the new phenolic spacer. This meant that I ‘had’ to test drive the car t make sure all was OK, while on my way to take some exercise of course. During the shortish journey of ten miles round trip or so the car started to make a whine noise, almost like a super charger. This annoying noise was coming from the gearbox area. The car started to make a significant thud when selecting reverse or drive gears from park or neutral. I called Adam at Mustang Maniac to explain what was going on. He listened to my explanation and said that he would open a slot for me at their yard.
I drove down on the Monday morning very gently I might add and the whine was getting worse. I knew something was wrong and hoped it was an adjustment somewhere. When I arrived and was greeted by Adam and Yogi, both said to put it straight onto ramps when they heard it. Within a couple of minutes Yogi had listened, diagnosed the problem and said gearbox was trashing itself, and probably the torque converter too. This was bad, real bad. The decision was made to drop the gearbox out to investigate after the dipstick for the gearbox was checked and was covered in foam.
The oil was drained out and the proper dark red colour was a foaming mess of pink slop.
While the “liquid gold” as Adam calls it, was draining out the prop was removed, the speedo cable, handbrake cables, and the exhaust split from the headers.
A conversation was had with Adam and I was given the option of what gearbox I would like and he went of to get it from his secret stock. The sound of expensive parts arriving in the trolley was sad sound to hear. Adam returning with the parts.
Yogi and Stuart jacked up the gearbox lift up to the gearbox to support the weight while it was lowered out.
These C4 gearboxes were clever for their time in the fact that they had cooling pipes that ran from the gearbox, up to the front of the car, which were then in turn connected to the bottom of the radiator. The pipes in the bottom section of the radiator shares the cooling with the engine block’s coolant. The cooled oil returns back to the gearbox ready to reapeat the process. The cooling pipes have their own entry and exit fittings to the radiator. It was here that the problem was caused; the internal loop of pipe within the radiator had failed somewhere. The water pressure from the radiator had forced water into the oil cooler channels because the gearbox oil is under less pressure than the engine’s coolant.
With the gearbox down on the floor the investigation could begin. Yogi had an airline on the cooling pipes which were still on the car, with a jet of air the water was expelled at a high pressure, confirmed water (and anti-freeze) was in the gearbox.
The bottom of the C4 gearbox has a removable pan that allows access to a serviceable filter to protect the delicate interior. The filter had done its job and stopped all sorts of debris and was getting near to clogged. The gearbox tension bands, seals metal on metal parts had indeed started to disintegrate. By feeling the gunge on the filter there was some swarf or tiny metal particles. Yogi was right, the gearbox was starting to eat itself, and it was very hungry.
The torque converter was removed and checked, draining the contents more swarf was found inside. With the oil pan emptied more traces of fine swarf were found at the bottom. The expense was starting to ramp up.
The water had in effect contaminated the oil and strated to break the oil’s properties down and failed to lubricate the gearbox along with the torque converter, thus unable to keep it all cool. The end result was the bands were slipping in the gearbox and the engine coolant had caused the gearbox to overheat. I was told I was a lucky boy as it could of just let go, dumping the contents of the gearbox on the side of the road leaving me stranded. The radiator was low and topping it up gave us an idea of how much water had got unto the gearbox. The top up was almost one liter.
The new gearbox was a genuine 1966 date coded C4 green dot fully rebuilt gearbox. This was a rare part, let alone to have a choice of them straight out of stock.
The new torque converter was screwed into the bell housing and the careful alignment to refit back into place. The gearbox was lifted up into place and little magic the gearbox was roughly in place.
With the gearbox now bolted into place, the finely tuned machine that is Mustang Maniac had a gearbox out and back in place within a day. Yogi was pleased with the day’s work, it was time for me to go home and leave my very poorly car on ramps for the night.
The next day I was back at the yard in the afternoon. Yogi had completed the rest of the refit and and all was back in place.
The next problem was the radiator the proximate cause of the problem. Again Adam asked me what style, cooling performance and look that I wanted. I went for the upgraded three row (which I already had) from the standard factory two row, with the OEM stock look. The expenses were ramping up even more.
Yogi pressure tested the old radiator and it had indeed failed in the oil cooler loop. A rare failure by all accounts that had catastrophic consequences on the gearbox. Why it failed we can’t be sure, perhaps a failed weld, or rusted out or crack? Without cutting the radiator open we won’t know.
The engine block had to be drained and flushed before the new radiator could be fitted and more fluids replaced.
The rest of the plumbing was reconnected and filled up. The car fired up and the gearbox whine was gone. Selecting a gear; there was no thud and the engine didn’t stall out.
The engine idle on the carb had to be reset and a road test. The was a little more dark art of carburettor fettling going on after the road test, the tuned ear of Yogi jumping from one screw adjustment to another and back again.
My drive home was a different car altogether, it was again effortless and a joy to drive. The joy of owning a classic car can be bitter sweet. I have had some wonderful sweet treats, and then this week the very bitter pill of a transmission failure. There you have it, a very big downer for me with things not going to plan. I was lucky that I got to Mustang Maniac how and when I did. Keeping it quiet is not what it’s about for me, this blog shows the good with the bad.
A huge “Thank You” to all at Mustang Maniac.
I have some mini projects coming up and detailing product reviews too, I will be posting them soon. But, first I have an excuse to clean the car engine bay again as it got a bit grubby after all the work being done on it. Many wouldn’t notice anything to be honest, as it was cleaned up pretty well. But I’m just pleased my little lady is back home and I again can pamper her and give her a nice clean up. I’m lucky to own a classic Mustang so I can’t complain. I don’t thrash my car so perhaps that helped me in getting down to the yard without a breakdown. If you own a classic car these things can happen, but not to often I hope!
During this lockdown we can’t go out in our much loved and pampered cars to any car shows. We can start them up and clean them. Something which I have been doing a lot of recently as well. As time has gone on my love for my Mustang has never waned or faltered ever! Since the car has been on the road technology has moved along in respect of the lighting on cars. DRL or Daytime Running Lights have become the norm as has LED headlights. LED technology has taken over where the HID bulbs left off. The HID had to have a massive current draw have their own relays etc. LEDs don’t have that problem. So I had a word with Adam at Mustang Maniac and he has been researching for me and came up with a little prototype pack. This is the story of the pack which consisted of two lenses and two sets of LED bulbs. Both sets were similar in specifications, but different fitting styles.
My brief to Adam was that I wanted the replacement bulbs to be like the original standard ‘sealed beam’ style which I had refitted back on my car with correct Ford logo lenses.
These are the proposed replacements with optional side lights.
The side by side comparison of both bulbs, Ford on the left and the proposed replacements on the right. Not to bad at all and I certainly didn’t want the clear type lenses.
The replacement halogens looked great and provided a nice upgrade compared to the fillament ‘candle’ power of the originals.
All the lightbulbs on my car are LED, and I just wanted that super white look on the headlights and of course the increased night vision and visibility to other road users.
Adam always comes up with a solution and asked me if I wanted to trial them for him. Of course I jumped at the chance. So here is the walkthrough of that process.
Process:
Removing the headlight.
The headlight doors are held in place by four screws, one in each corner.
The headlight door is not attached to anything and can be lifted off cleanly.
With the door off the headlight retaining ring becomes visible which in turn is held in place by three screws. Removing the threee ring screws will release the glass and could fall out if you are not careful.
With the ring off it was an ideal time to give the brightwork another polish and clean up before being refitted. Metal polish applied and buffed to a shine. I was surprised just how dirty they had become.
Lift the bulb towards you to expose the wire loom fitting behind the bulbs. Disconnect the plug fitting and the sealed bulb unit will come free.
The main problem is that there is a clearance issue behind the bulb. With the sealed beam and fitting plug in place there is just a few millimetres at most.
The LED Bulb Sets:
There are many options of LED bulbs. Most of the high power LED bulbs will need to have some sort of cooling. That may be provided by the use of built in mini fans or heatsinks. The passive heatsinks are predominantly bigger and will definitely not fit behind the bulbs.
Active bulbs have a fan which will extract the heat produced from the LEDs over the cooling fins thus enabling the LEDs to operate properly and last as they are intended to do so, 30,000 hours or just under three and half years in this bulb set case.
Here you can see the comparison of bulbs. The standard length of the H4 bulbs on the left and the LED option on the right without any excessive heatsink. The blue LED much larger base contains a small fan built within it and is considerably shorter than some other LED fan options available. Even so, the additional 10mm longer, plus the loom fitting causes the problem of clearance at the back of the bulb when test fitted. It was worth the try and would have been a very neat option. This was the “it could fit” option, but these will not fit as they are. Yes you can cut the connector of and make individual blade fitting but that is a real pain and will still be very close the fender fronts and not recommended.
The other option of bulbs to try was the fan and heatsink. In order to make this fit a wire pigtail will plug into the loom fitting and not plugged in directly behind the bulb itself. Not as common, but a very nice alternative. Also with LEDs there is an option to customise the colour of light from the LEDs. These are the 6000k option which gives a very clean crisp white light, very much like the HID bulbs. Of course the 3000k or the 4000k options will give the more standard filament bulb warmer look. These are the “they should fit” option.
With the additional pigtail connection this means that the bulb body can be longer itself without being a problem. Below is the longer fitting bulbs compared to the other already too long option in blue. Although the bulb is even longer the net length is shorter as the fitting is held away from the bulb itself via the pigtail. The pigtail and loom connection will tuck neatly behind the bowl at the back. Comparison of the bulbs getting longer left to right., Halogen, all in one, and the pigtail variation.
Bulb Power:
The power of a bulb is rated on its output power known as Lumens or ‘lm’ suffix.
– Halogen standard bulbs are rated at 1000 – 1500lm. Although some bulbs can be tweaked to give more, but are much more expensive than their standard counterparts.
– The blue LED bulb has a rating of 12000lm total which is 6000lm each side.
– The pigtailed version is rated at 10800lm total which is 5400lm each side.
Thus the LED giving off considerably more light than the halogen, more on that at the end with comparison shots. Supposedly these LEDs are 300% brighter. I don’t think it’s near that, but they are certainly much, much brighter.
The pigtailed bulb has a clever fitting for the sprung loaded fitting or the normal H4 recess cut out. The LED bulb twists out via bayonets and allows the plate to be swapped over for both style of fittings as required. A nice touch by the makers.
Lenses.
The option I have here is the pattered type (as I wanted) lenses with the side light option. The lenses come with a dust cap, pre fitted H4 halogen bulb and sidelight.
Standard clip to remove the halogen bulb.
The sidelight option is removed by pulling from the snug fit grommet and is also a standard BS9s filament bulb.
As I have LED/indicator side lights at the front this additional sidelight isn’t required at the moment, so I removed the bulb and will be blanked. I may refit the bulb later if I get the urge, as long as it’s an LED alternative of course.
Measuring the height of these replacement lenses the standard 6″ depth with the longer bodied LED (blue) bulb is past the limit with the loom fitting plug in place. Verified by a test fitting.
Sidelight Options.
You can leave the sidelight in place and use it, leave it in place not used, or blank it off. I did the later using the original grommet and slightly smaller blank off grommet inside the other hole to fill.
In order to avoid the black plug which can be seen through the glass I decided to spray them with a little left over chrome car spray I had left over.
The results were good enough and can just bout see them. The pic on the left is the hole exposed and the right is blanked off.
Fitting The LED Bulbs:
Test fitting of the pigtailed LED bulbs showed that the dust cap will not allow the bulb to be fitted with the dust cap in place as the bayonet fittings are covered up.
The answer is to turn the dust cap inside out and cut back the additional internal collar with a sharp knife, I used a scalpel and a new blade. When the dust cap is reverted back to the correct orientation it clears the bayonets fine.
Note: Before cutting the dust cap I did confirm a test fit that the lens and the bulb fitted together back into the bulb bowl, there was enough clearance to allow the air flow at the back for adequate cooling.
Another reason the bulb plate is removable because the spring loaded clips will not bend around the motor and heatsink. Clip the plate in place first without the main body of the bulb. (Test fitting of the bulb without the dust cap in place is shown in the larger picture).
Now the clever bit; place the dust cap over the bulb and insert the LED main body into the base plate and twist the bulb until it clicks in place. You can see from the Picture here below that there is space around the bulb for the heat exhaust.
Important:
To align the beam pattern which is so much more visible now, the LEDs are to be facing 9 – 3 orientation, or the centre of the flat bulb vertical. You may need to adjust this angle once the bulb is fitted back in place and to then checking the aim of the lights as well.
Refitting the Headlight
Clip the loom connector to the pigtail.
Move the headlight back into the mounting bowl and thread the wiring to the back of the headlight bowl.
The headlight has three ridges which sit within the headlight bowl to stop it twisting and moving the headlight pattern. Seat the headlight in place and fit the retaining ring onto the lens and tighten up properly when all is held in place.
Check the headlight aim and all is working correctly.
With everything working and in its correct place refit the headlight door.
Time Taken:
In theory it should take around half an hour to replace a headlight bulb each side.
However as I was trialling different bulbs and to see what fitted it took me longer. Of course I won’t add that to the overall time as I have done the working out for you. The only non standard part is the trimming of the dust caps to allow the LEDs to locate in the holding plate. That only took a couple of minutes to do it neatly with a sharp knife. Alignment of the bulb within the lens is the only bit to remember before final screwing up.
Full time took around forty minutes all in for each side.
Results:
I pushed the car out of the garage a bit and shut the door to keep out much of the light as I could. I changed the driver’s side first in order to give the comparison. Left pic the original halogen, the right pic the LED bulb. I tried to keep the exposure the same to show the difference.
The results on the wall test looked very noticeable as well. The left side of the pic is the LED shows very white. The right side shows the warm light of the halogen and not much light pattern definition.
With both LED bulbs fitted.
I am well pleased as this is a great upgrade and will certainly help with the nigh time running and visibility to other road users, or in poor weather. A very modern upgrade that doesn’t look out of place. Less strain on the alternator regarding power draw is a major advantage as well.
With the engine of and the headlights on there is a very faint hum of a motor which comes from the back of the LED bulbs. With the engine on you will never hear it. In the open you can hardly hear it, but if you listen for it you can hear it – just. The motors are ball bearing based and designed for long. I would say that it’s kinda cool that I have cooling fans for my LED headlights on an old classic car if anybody asks!
I have to thank Adam and Mustang Maniac for his time into researching the possibilities and getting them sent out to me so I can have a play over the bank holiday. Will Mustang Maniac stock these along with his other LED kits I can’t say. But, to get LED headlight’s on a budget these are a great conversion you should really consider. The visual results speak for themselves. In fact anybody who uses the standard 7″ round headlights may be able to use this combination.
I will be posting some more car detailing reviews very soon so watch this space under the “Car Detailing Reviews”. I have found a new source of products from a great company and they are honestly amazing. No I’m not on commission and i buy all the stuff myself before you ask!
A little while ago at a car show I was told that my brake lights didn’t work. I was concerned for obvious reasons. The cars behind me can’t see me slowing or stopping, and the fact I’m running LED’s was a concern. It’s not as if I had a blown bulb or something which would be an easy fix. The guy told me that while we were in a long queue to get into the show he “didn’t see my lights come on at all”.
After he left explaining it to me my fellow Mustang mate David heard what he said and suggested I pressed the pedal so he could take a look. I pressed the pedal as I normally do when braking and the thumbs up and a “yep fine”, no problems there then. We swapped places and he pressed the pedal, no problems again as the lights came on as expected. This is now turning into a puzzling scenario. Perhaps an intermittent switch fault, or is it the fact I am very light on my brakes? I don’t pull away with a boot full of revs and I don’t jump on the brakes to stop me either. In traffic I pull away gently by just letting the idle move me forward, when I brake it’s just a light pressure enough to stop. Less wear and tear on the engine, less fuel used, it will help avoid a boil over and the big positive is there will be less brake dust on my chrome wheels to clean as well.
I made a trip to Mustang Maniac to be in the company of fellow petrol heads and I explained what had happened to Adam. He suggested a swap over of the switch for the power assisted disc version. When I asked what the difference was he told me the spring for the switch was not as strong and the wires were on the other side of the switch bracket. This translated means that the normal drum brakes need more pressure to apply the brakes with a longer pedal travel. That switch is stronger as the brakes don’t actually apply until a reasonable force is used. The power assisted disc brakes need less pressure before the brakes apply, so the switch needs to be activated a little earlier. Simple when you think about it. So with advice from Adam of course I was going to replace it.
Here the two are side by side. Old drum brakes on the left (still working when tested with multi meter) and the new one for powered discs on the right. It’s also the same switch for a 67-68 as well.
I got to work where the switch is attached to the pedal via, which is in turn mounted around the master cylinder lever, which is also attached to the pedal via the same pin. The switch and the lever are held in place by a fairly strong retaining pin which needs to be removed.
Depending on the state of the pin it could be rusted and a little penetrating oil may help with the removal. I used a long pair of angled pliers to pull it out, be careful you don’t slip and take a chunk out of your steering column.
With the pin removed the connecting bar to the brake master will be able to be pulled off the pedal to the side.
Move the brake lever halfway off the pin. This will release the closed part of the switch casing, a hole which the pin fits through in order to stop the switch from coming off the pedal itself. The switch itself can now be pulled down as the opposite side of the switch is open at the top of the casing to allow the switch to be removed. This saves having to completely remove the brake lever bar if you didn’t want to. While I was at it I decided to regrease the pin and plastic bushings. When removing the pin take care to retain the plastic bushing inside the lever bar. There are also a nylon washers on either side of the pin which don’t need to be removed, but you can if you want to. Below is the pedal push rod to the master cylinder being removed.
I sprayed the pedal pin with some white grease ready for reassembly later and also the inside of the push rod and bushings. If they haven’t been replaced for a while, replace them just for the sake of it as they are very cheap replacement parts. That would also eliminate and play in the pedal, if you have any that is.
Side by side with the closed side of the switches compared. The powered disc brake version on the right with the terminals on the closed side of the switch. The left has the terminals on the open side.
The other side of the switch where you can see the open side as it were. Notice the terminals on the left manual switch are now facing up.
Once the removal has been completed now it’s a simple the reverse to fit it. Apply grease to the pedal pin that locates the push rod bar and the bushings. I used plenty and can always wipe it up after. If you go mad with the grease you could drop or run grease onto your footwell carpet, be careful or lay some old rags around, just in case.
Place the switch up to the push rod bar which will sit between the open and closed sides of the switch. Align the holes and slip it back over the brake pedal pin. You may need to slightly rotate the switch so that the open end is located all the way up to the pin. The switch itself should sit square at the end of the brake push rod, in line at the end of the lever bar as shown here. If the switch is not located square, the lights could be on all the time or not come on at all.
The push rod lever bar has straight edges deliberately, this means when the pedal is depressed the lever bar moves on the pin’s axis and the edges press the top of the switch down to make the contact.
Check the motion of the pedal and you should here a very faint click as the switch engages. The retaining sprung pin can be located into the hole in the pedal pin. This retaining spring is quite a tough to open around the pedal pin in order to be properly located. Here just the retaining pin tip is located in the brake pedal retaining hole.
You may need the pliers on the spring a little to get it passed the pedal pin and snap it into place.
A little more spray on white grease and pump the pedal to make sure full and correct operation.
Lastly you just need to swap the connecting block to the other side of the switch. It’s possible that you may need to free up a little more cable but you should have enough slack in the loom to allow you to do this. Here the switch is fully assembled with the connector in place with the red and white wires showing, before I re-wrapped them again. The connecting block can only fit on in one direction as the male terminals are set at angles.
From a slightly different angle.
Again, check the FULL motion of the pedal and make sure everything is clear from snagging. You should now be able to check that your brake lights are now working correctly. Lastly you can either clean up the grease on the visible parts or leave it as is. I left mine for a couple of trips in order to let it all work around, then I cleaned it up, but not to much as you need the lubrication there.
The noticeable difference being that the pedal moves less now before the brake lights come on which suits my style of driving. Also even if I just cover the brakes it should give the car behind earlier warning that I am actually slowing down and avoid being rear ended.
In total it took around just over half an hour plus taking the pictures to complete. It took a further few hours for my back to recover after laying upside down in a Mustang footwell and twisting into positions that any circus contortionist would be proud off. The cost of the project was £16.80 from Mustang Maniac, click here for the link for the switch I used. A small price to pay to be safe.
Quite what the issue was with the brakes not working or just the switch playing up i don’t know. Replacing the switch is simple and like I just said, it’s better to be safe than sorry. Quite what my next project will be I’m not sure, but I will find something no doubt, hopefully without having to book an appointment with a chiropractor! 🙂
Last weekend I went to a car show at the Enfield Pageant of Motoring, and guess what? It rained; OK it wasn’t a bad downpour, but it was still wet stuff from the sky which landed on my car. That’s the first three shows this year that I have attended and rain has appeared, although to be fair it wasn’t until later in the afternoon. This won’t put me off car shows, it just makes me check my useless weather apps more to see what lies they are going to tell me. It seems as though my luck this year with car shows is not going very well at all. I drove to the end of a field and parked up on the Mustang Maniac stand where I meet Adam, Yogi and Paul who were busy getting their priorities right, making the cups of tea. My priority was to start cleaning my car. Simple reason being that the previous day Saturday was a hot day for a change at the show and the entrance car park had dried to a dust bowl. The show cars that were driving into the event were going slowly so as not to kick up much dust and gravel. In other words, showing respect for other people. However some selfish a-hole in a van decided to do mini burnouts every time he moved. Needless to say the dust cloud that enveloped the car park was like cloud of nuclear fallout and just as toxic. Not a great a great start to the show, I wasn’t best pleased.
I have continued to review lots of car cleaning and detailing products as I get a few questions now and again about what products I use on my Mustang as well as the daily driver cars too.
Contrary to popular belief I am not a one brand product devotee, far from it in fact. A big pet hate of mine is where somebody will buy a single product and be brand loyal refusing to admit that some of that brands products are in fact a useless waste of money. Those same people will have blinkered and tunnel vision when it comes to trying other products. My outlook on the matter is simple, I’m still looking for the perfect combination of products for each step I perform whether it be; snow foam, drying, decontamination, cleaners for paint, cleaners for wheels, glass cleaners, polishes, waxes, microfiber cloths, brushes, carpet stain remover, rubber restorer, vinyl cleaner etc. Just about everything I use is in a combination of many products such as Meguiar’s, Auto Finesse, Chemical Guys, Poor Boys World, Mirror Bright, Valet Pro, Dat Wax and so on depending on what is need, and what I intend to do to get the results I want. This time I decided to use a Chemical Guys EcoSmart which is a waterless wash & wax product I have been using for a while now, but just couldn’t get it right to use it properly. The results are amazing (now) which have improved a huge amount since I started to use top quality plush, deep pile microfiber cloths at £5 each and not the 25 cloths for £5 scenario, which aren’t much better than toilet rolls if the truth is to be known. Round two was onto the quick detailer, a brand new product recommended to me which is Chemical Guys – P40. (Yes, I buy ALL my own car cleaning products, and I am unbiased in my reviews.)
The car finished and it looked quite clean again.
The Mustang Maniac stand was starting to get full as I was almost done and was easily the Mustang place to be. There were customers who turned up for a chat, people interested in getting a Mustang, and people who were just happy to be around the cars.
With the car finished some one and half hours later I went for a wonder around the show to look at the cars and stalls.
It was an fairly good show in general, but I think that this show is getting more mainstream rather than car focussed stalls. There were lots of house clearance stalls selling cheap rubbish, stalls that sell plenty of plastic toys and stalls selling a selection of tools (I use that term very loosely), which were aimed at people with an extremely tight budget should we say. For once I didn’t buy anything at all from anybody. The wife says I should take her out for the day with the money I saved, she’s right of course, there is a car show this weekend, I could take her there and maybe get her a burger and buy more stuff for the car.
Classic car owners second worse nightmare? Stone Chips.
The worst nightmare has to be rust, the second has to be the dreaded stone chips. I always drive with an extra spaces between the car in front of me and I back off if somebody pulls into that gap. It seems as though I have been caught out with the hated stone chips. Let’s just say I was pretty pi55ed off and the air was filled with the colourful language that may have slipped out of my mouth on a repeated number of occasions.
I spotted the evil craters from the previous car show and fixed them up before the trip down to Enfield. Although I got another one on the way back from Enfield, I spotted this one when I cleaned the car on Monday. I have done a walkthrough or tutorial guide that works for me under the Menu ‘How To…Projects/Fixing Stone Chips’. Here is just a taster of what I did to fix them. This is only the basic explanation, I fully explain it all here.
Identify the location of the chips by marking with a piece of masking tape.
Thoroughly clean the area with Isopropyl Alcohol (or similar) to remove all waxes and sealants, use lint free panel wipe or similar. Then take a little colour and place into a pot. I had some left from the original paint job so I was lucky in that respect for colour matching.
isopropyl alcohol
lint free cloth
There are various ways to apply the paint, with a brush, paper, matchstick, toothpick or similar. I use a wooden burger skewer as they are longer, easier to hold and I can sharpen them well without splintering.
tooth pick
The idea is to place a tiny droplet into the centre of the chip so that it sits just proud of the rest of the paint around it. Place the tip of your choice of applicator into the paint and remove it which should now hold a tiny droplet which is held in place by the wood and not running straight off. If you get a big drop you have the chance of it dropping onto places it shouldn’t be, with a lot of recovery work for yourself later.
With the paint drop as small as possible, covering the chip itself and sitting proud of the paint – leave it to dry and cure. Not an hour or two, I’m talking a couple of days, I left mine for a week. This will also allow any waxes to apply to the fresh paint properly.
Next is to get the sanding paper out, I got a wide selection of wet & dry papers starting with coarsest being 1500grit all the way to impossibly fine 8000grit. They are different colours for identification.
I then take my special stone chip tool, a pencil eraser and mark out the width I need on the grades of paper to cut to the size I need. These erasers come in various sizes and shapes for your needs or what suits you.
The idea is to start with the courser grade and work finer to remove the previous sanding marks. I prefer the rubber eraser as it will give slightly to a contour as it’s not rigid, but firm enough to hold the paper flat to the surface. I marked the back of the papers as the cut strips may not show the grit grade itself.
Patience, then use lots more patience.
Wet the area, I use a small travel spray you can get from eBay. Then gently rub the paint drop down keeping the paper flat as possible. A few gentle rubs then check. This will give an idea of how the paint is reacting to the paper and also you don’t want to sand the topcoat or lacquer of the paint if you can help it. You can adjust your technique accordingly.
water spray bottle
wet area
initial paste rubbing
after drying
When you are getting close to the flat paint, swap the papers over to a higher grit. With the sanding the paper may shed and give you a light paste look depending on the type of paper you bought.
The higher the grit number will reduce the previous marks and stop you from rubbing the paint to hard, keep the area wet. Repeat as necessary all the way to the fine grades. When you rub your finger over the chipped area you shouldn’t feel anything at all, it should be glass smooth. If the paint has sunk and you have a pit, stop sanding and add another tiny drop of paint by repeating all the application steps above and let it dry.
Once you are happy with the sanded area then it’s time to bring the car paint back to life. Use a polish that you normally use to remove swirl marks or light scratches. This will remove all the sanding marks, I used Tripple on this occasion as it’s hardly abrasive. Rub into the area using a DA machine or by hand as in my case using the ‘Handipuck’ to get the shine back.
With the area polished it just leaves the protective wax to be applied, this after the hand polish. Pointed out stone chip area with the wooden paint pick tool.
My next step to wax and protect the area. Dat Wax which is show wax and is heavy on oils not the paste style which is ideal for this type of work. Oh, its also blue and smells of beautiful bubble-gum which I reviewed here.
Recently I have been kicking an idea around that I wanted to have a H-Pipe fitted to my twin exhaust system. This would be a trade-off, noise vs power the pros and cons.
By adding an H-pipe section it increases power. Even when headers are installed, the close firing cylinders are competing for space in the exhaust pipe after the collector, which creates back pressure and reduces power. Connecting the exhaust pipes allows pressure to escape to the other side of the system, with a resulting gain in low-end and mid-range torque. However, the effectiveness of an H-pipe section decreases somewhat at higher rpm. The increased exhaust gas velocity at high rpm causes most of the exhaust to take the path of least resistance and continue down the exhaust pipe, rather than make the turn into the H-pipe.
On the other hand, when the two close firing cylinders are exhausting on one bank, there is nothing happening in the other bank, so connecting both pipes effectively enlarged the exhaust system, allowing these exhaust pulses to exit through both sides of the system. It was found that, with the addition of an H-pipe, exhaust noise could be reduced by as much as two decibels.
So I took the plunge and made a date at Mustang Maniac for my car to go down and have the H-Pipe fitted. It was good to see Yogi again and he had already cleared a ramp for me to drive straight onto. Within a minute or so he had already pre-cut a length of pipe ready, quite impressive really, and would need proper fitting & fettling.
The pipe was offered up and the best position worked out for it. There isn’t a lot of space under there due to the headers of my exhaust, not to mention the custom-made brake lever as a result of the exhaust headers. Yogi marked up the proposed fitting points on the first of the exhaust pipes and made the initial holes. The holes were made bigger a little at a time in order fir the diameter of the pipes.
The surrounding area was sanded down ready for a little tack weld. The pipe was offered up numerous times to get the fitting and location correct. The welder was set up for the task, making sure the weld would be just how Yogi wanted it.
With the tacks in place a final check for clearance and position then the welding could start. Hand held face mask for more tack welds then the full on mask for the proper welding. I just love the blue arch light from the welding.
To complete the top of the pipes the rest of the exhaust would have to be taken down and finish the seam weld.
The H-Pipe finished and all tightened back up into place. The H-Pipe has a curve in order to make it fit within the space, a straight pipe simply wouldn’t fit. This is where the skill of the guys at Mustang Maniac can work around and make something to fit properly. Something that many other competitors try to do and fail big time.
I couldn’t wait to get in the car so I could start her up almost jumping in the car before it had got down on the ground. The exhaust is now a slightly deeper tone and a more even note. Although the volume is still there I’m glad to say. The drive home I could feel the difference at lower acceleration using the torque and not revs and got up to speed a little faster, it has improved the power band range no question about it.
Thanks Yogi for the good work.
I was then left to my own devises under the car to clean it while it was back up in the air on the ramps again. Yes I did, and I do clean the underside of the car. Then I noticed a split on the steering ram rubber boot. I picked up a repair kit from the new shop of Mustang Maniac’s and took it home ready to swap it over.
I have made a complete walk-through of the full process here, in more detail, or simply copy the link to the browser. This explanation below is just a quick summary of what I done.
The repair kit from Mustang Maniac was a very reasonable £24 and straight of the shelf with everything you need in it. Click here for the link to buy it if you need one.
The boot had ripped completely and looks more like it has torn or been caught to damage it so much. I suspect driving over fields and rough tracks to get to the Car Shows has done the damage as this part does sit lower than normal Mustangs.
So the process; there are just two nuts that holds the ram in place, one for the tension and the other for locking in place. My mounting bracket is a modified bracket to sit lower down from the chassis because of the larger exhaust headers and not having enough clearance for the steering ram. However, the principles are exactly the same regardless of the bracket being standard or the lowered upgrade. Undo the bolts and slide off the outer steel plate.
The bushing can either be pulled of or just push the ram through and out the other side. On the ram itself there will be a sleeve that sits inside the bushings inside the bracket.
The bushings will probably be stuck to the bracket and may need a little persuasion to get them off, I used a mini hook that makes it much easier to remove without slipping and mashing your knuckles.
Behind the bracket on the inner side there is a pinch clip or single ear O ring that also needs to come off. This can be a pair of cutters, pliers or what ever, again I just hooked it off. be careful not to damage the ram shaft. With the pinch clip off, remove the damaged boot and clean the shaft.
The next part is to refit the boot and the new pinch clip, If you don’t have a pinch clip tool you can use an alternative fixing. Slide the new boot over the cleaned shaft with the bigger end first, this has to sit over the end of the cylinder ram’s mounting flange.
As my bracket is thicker than the standard bracket, this little modification is not required for the normal bracket. I had to trim a little off (about a third) the bushings otherwise I would not be able to fit the nuts back onto the end of the ram to tighten it back up.
Don’t bother to fit the cylinder end of the boot just yet. Next refit the outer plate and bushing on the inner side of the bracket, they do need to be fitted the correct way, so take care when refitting..
Slide the ram shaft sleeve on and will fit inside the bushing about a quarter of the way. Make sure enough is exposed in order to fit into the other bushing once it is through the bracket.
Push the shaft through the bracket and locate the lip of the bushing into the bracket hole, You should be able to see the end of the shaft and the sleeve ready to be surrounded by the next bushing and then the outer plate.
Looking on from the side. the bracket is sandwiched by bushings and then a plate on each side of the bushings. Slide a nut onto the shaft to tighten in place, then the locking nut.
Now we can secure the bracket end of the boot with the pinch clip tool. Use the proper tool to clamp the bracket in place and not pliers to squash it in place. Be careful not to damage or rip the boot with the tool.
At the other cylinder end you can now stretch it over the lip of the flange. Make sure that the boot is not twisted and is able to move freely.
With the boot in place I found that it can pop of the cylinder and is a pain. So most people use a cable tie just to hold it in place from slipping off. Trim the excess tie and make sure the boot is still free to move.
That’s it job done, total of no more than an hour including me taking the pictures!
My car was due for its MOT later this month, even though it technically it doesn’t need one. However most like-minded and conscientious classic car owners, they want to know that their car is safe and not going to cause problems. This split rubber boot would have been a failure of that test. Once the boot was changed, I took the car to the MOT centre where she then passed with flying colours. Now I’m ready for the car shows again.
I usually look over the car when I clean it to see if anything out of the ordinary is wrong. This was one of those times that saved me not being allowed to drive the car as a result of the failure. It’s a good idea to check the old cars over especially if they have been stored up for a while. Mine had sat in the garage unmoved since the end of October last year.
Last weekend a Classic Car Show at Stonham Barns was pretty much the last car show for the year officially for me, unless I go on a winter organised cruise that is, providing it doesn’t rain of course. It seemed fitting to end this year’s season with a show just for American Cars. There was a nice mixture of classic, not so new and new with some real beauties on display. I arrived about nine in the morning I meet up with Yogi from Mustang Manic who had made a long trip for this show. We were shown into the main arena and parked next to each other, me with my ’66 and Yogi with his red rocket ’69 Mach1 that will run ten seconds down a quarter-mile!
After a quick buff over to remove the dusty road residue, we both found ourselves ‘broken down’ (in joke) with our hoods up. Yogi’s beast got a lot of attention for all the trick bits he has under the hood. Also it’s not often that he;
1) he opens his hood to the public to see his engine
2) he cleans his car
On the Mustang Maniac blog last weekend they had a rare photo of him cleaning it so I have borrowed it with their permission I might add, just to show that miracles do happen!
The other cars that followed us in the gates were parked around the main area until the area was pretty much full, then they filled the outside areas of the field.
My overheard quote of the day came from a woman who looked at my car and said to the guy walking next to her; “Look at the seats in that car, they are disgusting, I don’t like them, they should be taken out.”
To that woman; you came over to my car to look at it, if you don’t like it – don’t look at it, so kindly keep your opinions to yourself! Far from being upset by the comment, I just smiled to myself and thought; if I gave her the keys to my car, she would have happily driven it away sitting on those ‘disgusting’ seats.
Throughout the day there was ‘Uncle Sam’ taking selfies with lots of people and a beautiful bald eagle how much more American do you want to get?
There was the odd car for sale, this one for £8,000, a little bit to much of a project for me at that sort of money.
It was a good day and I even bought a couple of little bits for my memorabilia collection too. Great cars, great company and a great day.